I started messing around with different cauliflower recipes a couple of years ago, but the two I continue to go back two are either mashed (a favorite in Kyle’s family) or roasted. Roasted cauliflower is so simple and is ready quickly, which makes it perfect for any weeknight or a quick snack. Normally I just break apart a head a cauliflower, toss with a little salt, pepper and olive oil and roast off in the oven for half an hour or so. I love the way it gets crispy, but retains most of its shape, and is great for dipping. I’ve been on a curry kick for the past year or so, and I’ll usually make a quick curry dipping sauce (as in spicy curry powder and mayo or sour cream) to go alongside.
While tooling around on Epicurious I stumbled over a recipe for Spice-Roasted Chickpeas that really spoke to me. I am a huge fan of chickpeas in almost any application. My one grievance is on occasion they tend to get really soggy if out on a salad bar. I love the creamy texture of hummus, and the crunch of roasted wasabi peas, and spice roasted garbanzos sounded like the perfect middleman.
I started thinking about ways to roast the chickpeas and cauliflower together, and the end result was a mutant dish with so much flavor, I had to restrain myself from not eating it all in one sitting. Mixing the curry powder in with the oil gave the dish a lovely bright color, and helped spread the seasoning evenly over all components. The pine nuts were a last minute gamble, and I loved the secondary crunch they brought in addition to the chickpeas.
I ended up serving this alongside some outstanding striped bass Ky provided for dinner with a friend, and the combination was a knockout. Kyle had originally told me we had might have a last minute addition to dinner, and concerned that we wouldn’t have enough of the side, I par boiled off a couple of red potatoes and tossed in with the cauliflower-chickpea mixture (I had roasted it off the night before with plans to heat before dinner), and it was a great addition and budget friendly way to stretch the dish. I will for sure be making this on a pretty regular basis- no lie, I have the fixins in the apartment now, and plan on whipping it up over the weekend. My only point of caution would be to make sure that your chickpeas are as dry as humanly possible- drained in a colander after rinsing and pressed between two kitchen towels seemed to do the trick. Just make sure you have a good size batch made up, as it will develop legs quickly!
Curry Roasted Cauliflower with Crispy Chickpeas (morphed from here and here on Epicurious)
- 2 lbs. Cauliflower, stemmed & broken into florets
- 15oz. can Chickpeas, rinsed, drained & well dried
- ¼ - ½ Cup extra virgin olive oil
- 1 tspn. Cayenne pepper
- 2 Cloves garlic, well minced
- 4 tbspn. Pine nuts
- 3(ish) tbspns. Spicy curry powder
- 2 tspn. Hungarian hot paprika (optional)
- Sea salt & fresh cracked pepper to taste
- Handful fresh cilantro, chopped
Preheat oven to 450 degrees. In a large bowl, mix olive oil, pine nuts, garlic & all spices until well combined. Toss cauliflower & chickpeas with oil to coat and season with salt & pepper to taste. Spread evenly onto high lipped sheet pan in one layer. Roast off in oven for 35-25 minutes, until cauliflower is well browned & chickpeas are crispy. Stir occasionally throughout roasting time. Remove from oven, let cool for a few minutes & transfer to a large serving bowl. Sprinkle with chopped cilantro and serve warm or at room temperature. Great as a side, over greens or as a snack.
Showing posts with label Weeknight. Show all posts
Friday, October 15, 2010
Thursday, September 16, 2010
A True Lunch Break
Almost every day, I bring my lunch to work from home. Usually it consists of leftovers from a previous meal, and a lot of times it takes shape in the form of a salad. I do my best to keep my lunches relatively light and satisfying, since there is nothing worse than sitting at your desk feeling the creeping onset of a food coma- especially when your desk lacks any sort of privacy from the rest of the office! It also may sound a little silly, but I enjoy taking a few minutes to “time out” from my daily tasks and actually enjoy my lunch whenever possible- I bring cutlery from home, stash a cloth napkin in my work bag, and make an attempt to actually have a lunch break as opposed to wolfing down some non-descript take out item while scanning over spec sheets (not that this doesn’t happen on occasion!).
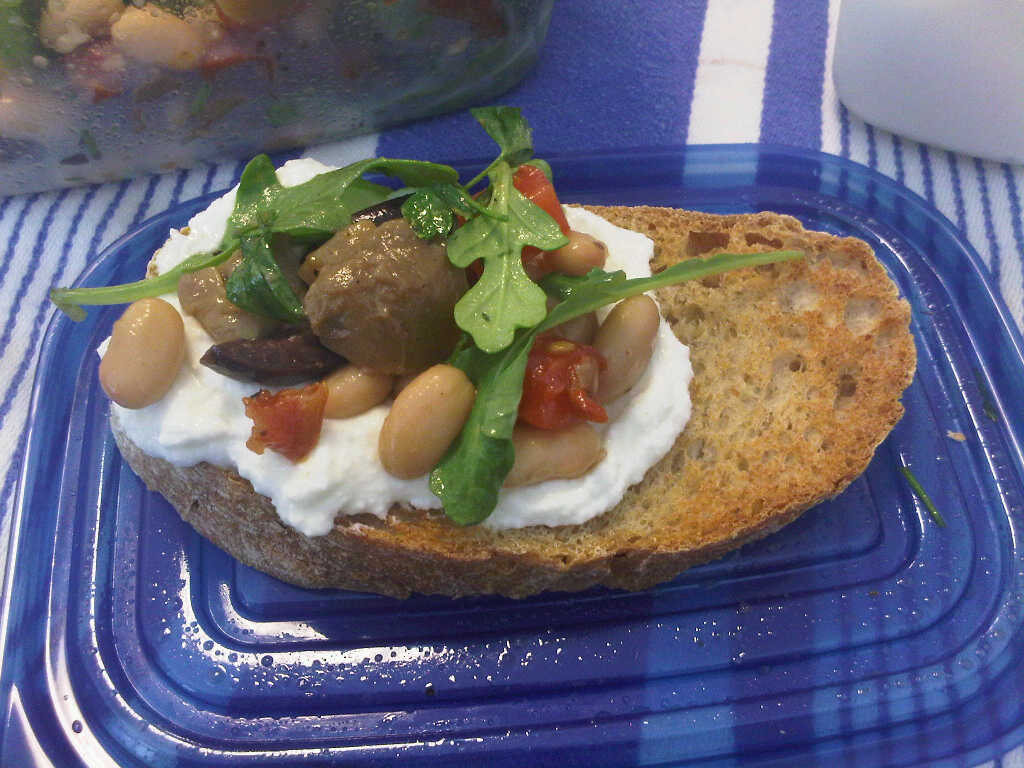
During my massive re-nesting/cooking marathon of the past weekend, I was attempting to figure out a way to combine items I had on hand that I could stretch out over a couple of lunches that was a little outside of my usual routine. I get daily email newsletters from one of my favorite publications, Real Simple, and I remembered seeing a tomato & garbanzo salad that had looked appealing, and decided to play off of the concept. I had made a HUGE batch of Slow Roasted Tomatoes & Garlic on Sunday (I really should not be allowed to go to the Farmer’s Market without adult supervision!) and I had done a long drag through the market’s olive bar- one of my favorite destinations- and had picked up some olives and balsamic marinated mushrooms. I swapped out the garbanzos for Cannellini beans, which I had on hand, and the end result was a perfect salad for lunch- packed with protein, tasty veggies and loads of flavor. I was able to get three full lunches out of the mixture, and will definitely be making it again. By using the slow roasted tomatoes, the salad can be made year round, since the roasting will get rid of any mealy texture or less flavorful tomatoes in the off-season. When fresh tomatoes are in season, adding ½ a rough chopped fresh tomato brings and interesting and appealing play on flavors in the two tomato style. The salad would also make for a great hors d’ oeuvres applying the same concept- allow guests to build their own bruschetta with toasted bread, ricotta, baby arugula (baby spinach works well also) and the bean salad- wildly easy, and a perfect flavor combination.
The longer the salad sits, the better, so I would recommend starting this the night before, and dividing it up in the morning, so the beans have a chance to meld with the other flavors, and the arugula will remain crisp until lunch time. If you’re looking for a single container lunch, omit the side of ricotta cheese and toss in some cubed feta with the salad. This salad is a great way to implement simple ingredients into a very satisfying meal using minimal prep time and effort.
Bellissimo White Bean Salad
(Recipe makes enough for 3 lunches, 2 dinners or as an hors d’oeuvres for a crowd)
- 1 Can Cannellini beans, rinsed & drained
- 6 Slices Slow Roasted Tomatoes, rough chopped
- 3 Cloves Roasted Garlic, chopped (garlic will break down when combined into salad)
- ½ Ripe Roma tomato, diced
- 6 Olives, pitted & quartered (I used kalamata and Moroccan green)
- 6 Marinated mushrooms, quartered
-2 Tbspn fresh Italian parsley, chopped
- Fresh baby Arugula
- Cracked black pepper & sea salt
- Basil leaves (3-4 per serving)
- Part skim Ricotta cheese (1/4 cup per serving)
- 1Tspn. fresh grated lemon zest (per serving)
- Sliced rustic bread (2 slices per serving)
In a good sized container, combine beans, tomatoes, garlic, parsley, olives and mushrooms. Add a little of the oil from the roasted tomatoes and season with salt & pepper to taste. Mix ingredients well, cover and refrigerate overnight if possible before dividing.
Chiffonade basil leaves by stacking leaves into a neat pile, roll lengthwise and slice into thin rounds. Separate the ribbons with fingers & combine with ricotta & lemon zest in a small sealable container.
When dividing for lunches, place approx ¾ cup of bean salad into a sealable container and top with a hearty handful of baby Arugula (placing on top will prevent rapid wilting) and seal. Pack ricotta mixture & bread separately, and when ready assemble into lunch portion bruschetta and take a few minutes to relax and enjoy.
Tuesday, June 29, 2010
Friday Night Sandwich Fix
Friday night, just after walking in the door from work, is one of my favorite moments of the week. No matter how strenuous your work week, no matter how many frustrating phone calls were made, packages were lost, or clients were disgruntled, you’re HOME. And the whole weekend stretches out in front of you with a warm smile. For me, Friday night is like a mini birthday every week, in which you can treat yourself to that extra glass of wine, slip into something comfortable and tell the world of commerce you’ll check back in 72 hours.
This past Friday was an especially stressful day in my little world, and when I came home, there was nothing I wanted to do more than relax- and I proceeded to do just that! I had all good intentions on starting preparations for a small dinner party we were having on Saturday, but I passed on that and went directly to making a pitcher of Sangria (recipe to follow soon) and pulling together an easy dinner. The weather has been hot & muggy in Newport, and the last thing I was interested in was standing in front of a hot stove for an extensive period of time, especially when that stove has no hood vent. I had been playing out an idea for a meal-worthy sandwich in my head for a few days, comprised wholly of items already in my kitchen, and knew it would fit the bill to a “T”. Prep involved just enough work so that I felt productive (and what better way to get out some work frustrations then smashing a couple of cloves of garlic?), and assembly and cleanup were a snap.
I’m sure there are those out there that might scoff at a mere sandwich recipe, but for me there is something really wonderful about layering flavors together into a delicious handheld meal. Scoff if you must, but I am beyond satisfied with the end sandwich product (is there really nothing the sandwich can’t do???), and more importantly, so was my husband. ;-)
Tuscan Chicken Sandwich for Two
- ½ Loaf of crusty Italian bread, whole wheat or white
- ½ Medium vine ripened tomato, sliced
- ¼ Sweet Vidalia onion, sliced thin
- 1 Grilled chicken breast, sliced
- ¼- ½ Cup good shredded Parmesan cheese
- 4-6 Pitted Kalamata olives, sliced
- 6 Basil leaves
- Lemon-Garlic mayonnaise (recipe follows)
- Handful of salad greens
- Sea salt & fresh cracked pepper
Lemon-Garlic Mayonnaise
- 3 Tblspns good quality mayonnaise
- 1 Large or 2 small cloves of garlic, peeled
- Zest from ¼ of a lemon
- Juice from ¼ of a lemon
-1 Tbspn fresh Italian parsley, chopped
-Sea salt & fresh cracked pepper
To Assemble Sandwich: Preheat oven broiler to low. Split bread length-wise and place on a baking sheet, cut side up. Place under broiler, approx four to six inches below broiler plate and toast bread (I would advise keeping an eye on the toasting, as bread can go from brown to black in a flash!). Remove bread from broiler. Coat the “bottom” side of the bread with Lemon-Garlic mayonnaise and top with tomatoes, olives, and sliced chicken. Coat the “top” with mayonnaise, onions and basil leaves. Sprinkle both sides with parmesan cheese and season with salt & pepper to taste. Place sandwich back under broiler for another 4-6 minutes, or until cheese is melted and browned. Remove sandwich from oven, top “bottom” with salad greens & cover with “top”. Slice in half & serve with favorite sandwich sides.
Curried Eggplant Delight
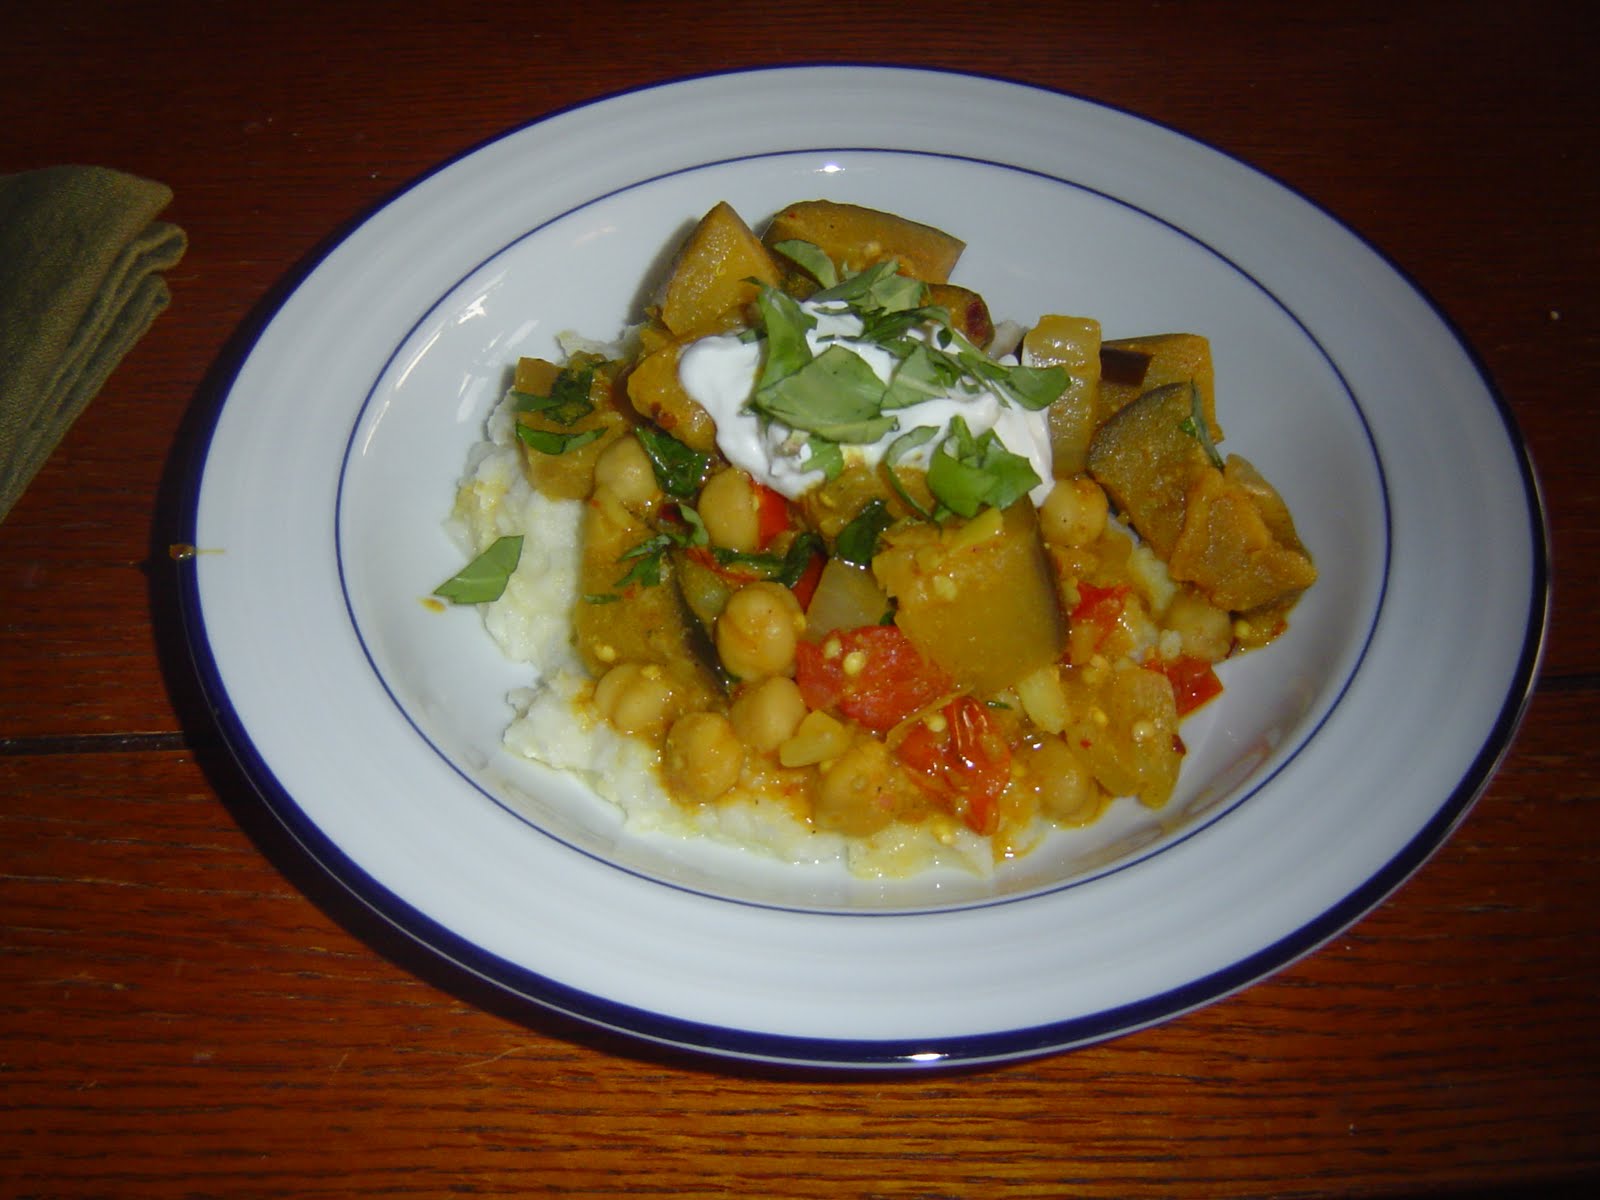
As we are now officially into the summer season, my menu planning takes a turn to lighter, more refreshing meals. I get a lot of daily recipe and cooking emails, and one such recent email fit the bill perfectly for using fresh summer produce, and employing fresh herbs from my windowsill. Real Simple is hands down one of my favorite magazines (I’ve been an avid reader and subscriber for the past two years), and a lot of their recipes ascribe to my cooking philosophy of keeping it simple (no surprise there!) in order to showcase the natural flavors of the ingredients. When the recipe for Curried Eggplant & Tomatoes with Basil popped up in my inbox, I knew it would be a smash success, and it was! I used the original recipe as a guide a tweaked for my own taste. My husband and I both really enjoyed it- the combination of eggplant and chickpeas made for a substantial vegetarian meal that left us both really satisfied. I used just a bit of light yogurt to add a little richness to the sauce, and the basil and curry played off of each other really well. Instead of serving it over rice (as suggested in RS’s recipe), we opted to use cauliflower mash, which cut out some of that heavy carb feeling and upped the veggie intake. I actually had the leftovers the next day for lunch, and the curry flavor was more saturated after a night in the fridge. It’s an easy weeknight meal to pull together, and I would even recommend serving it at a casual dinner party- it would be great for a homestyle dinner where large dishes are passed, and would go well with homemade pita chips on the side. All in all, a wildly tasty dish!
Curried Eggplant with Tomatoes and Basil
(Adapted from Real Simple, Cauliflower recipe my own)
For the Cauliflower Mash:
-1 Medium head of fresh cauliflower, broken into florets
-2 Tbspns salted butter (optional)
-2 Tbspns low fat Greek yogurt
-Sea salt & fresh cracked pepper
Steam cauliflower florets over boiling water in a vegetable steamer until fork tender. Remove from heat & transfer florets to a large bowl heatproof bowl. Add in butter & yogurt and mash using a handheld masher, stick blender or hand beaters until smooth. Season with salt & pepper to taste. Mash can be kept warm over a low simmering pot of water for up to 30 minutes. Give mash a good stir before plating.
For the Eggplant Curry:
-1 Large eggplant, about 1-1 ½ lbs. cut in 1 inch pieces
-1 Pint cherry tomatoes, halved
-1 Medium onion chopped (I recommend a sweet onion, such as Vidalia)
-3 Medium cloves of garlic, minced
-1 15.5-16oz Can of chickpeas, rinsed & drained
-3+ Tblspns good curry powder (I used Spice Island’s Spicy Curry Powder for a little extra kick)
-Good handful of fresh basil, chopped
- ¼ - ½ Cup of low fat Greek yogurt
-Olive oil
-Sea salt & fresh cracked pepper
-Red pepper flakes (optional)
- Couple tspns fresh cilantro, minced (optional)
-Crumbled goat cheese (optional)
In a large sauté pan or wok, heat a couple of tablespoons of olive oil over medium heat. Add onions and cook, stirring, until slightly translucent- about 3 minutes. Add in tomatoes and continue cooking for a few minutes, seasoning with salt & pepper. Add in eggplant, and cook until it begins to soften slightly about 5-7 minutes. Stir in garlic, curry powder and red pepper (if using), and cook another few minutes until fragrant (adjust curry powder to your personal taste, I tend to be a bit heavy handed personally). Add in chickpeas and about 1- 1 ½ cups of water and stir to combine all ingredients well. Simmer, stirring occasionally until vegetables are tender and chickpeas are heated through, about 15 minutes or so. Turn off heat, add in basil and yogurt and stir to combine well. Adjust salt & pepper seasoning to taste. Serve over cauliflower mash with chopped cilantro and goat cheese sprinkled on top.
Note: This dish would also be wonderful over brown rice, Israeli (or regular) couscous or any other hearty grain.
Curried Eggplant with Tomatoes and Basil
(Adapted from Real Simple, Cauliflower recipe my own)
For the Cauliflower Mash:
-1 Medium head of fresh cauliflower, broken into florets
-2 Tbspns salted butter (optional)
-2 Tbspns low fat Greek yogurt
-Sea salt & fresh cracked pepper
Steam cauliflower florets over boiling water in a vegetable steamer until fork tender. Remove from heat & transfer florets to a large bowl heatproof bowl. Add in butter & yogurt and mash using a handheld masher, stick blender or hand beaters until smooth. Season with salt & pepper to taste. Mash can be kept warm over a low simmering pot of water for up to 30 minutes. Give mash a good stir before plating.
For the Eggplant Curry:
-1 Large eggplant, about 1-1 ½ lbs. cut in 1 inch pieces
-1 Pint cherry tomatoes, halved
-1 Medium onion chopped (I recommend a sweet onion, such as Vidalia)
-3 Medium cloves of garlic, minced
-1 15.5-16oz Can of chickpeas, rinsed & drained
-3+ Tblspns good curry powder (I used Spice Island’s Spicy Curry Powder for a little extra kick)
-Good handful of fresh basil, chopped
- ¼ - ½ Cup of low fat Greek yogurt
-Olive oil
-Sea salt & fresh cracked pepper
-Red pepper flakes (optional)
- Couple tspns fresh cilantro, minced (optional)
-Crumbled goat cheese (optional)
In a large sauté pan or wok, heat a couple of tablespoons of olive oil over medium heat. Add onions and cook, stirring, until slightly translucent- about 3 minutes. Add in tomatoes and continue cooking for a few minutes, seasoning with salt & pepper. Add in eggplant, and cook until it begins to soften slightly about 5-7 minutes. Stir in garlic, curry powder and red pepper (if using), and cook another few minutes until fragrant (adjust curry powder to your personal taste, I tend to be a bit heavy handed personally). Add in chickpeas and about 1- 1 ½ cups of water and stir to combine all ingredients well. Simmer, stirring occasionally until vegetables are tender and chickpeas are heated through, about 15 minutes or so. Turn off heat, add in basil and yogurt and stir to combine well. Adjust salt & pepper seasoning to taste. Serve over cauliflower mash with chopped cilantro and goat cheese sprinkled on top.
Note: This dish would also be wonderful over brown rice, Israeli (or regular) couscous or any other hearty grain.
Friday, May 14, 2010
Satisfying & Light Weeknight
Once again, menu planning from The Book (as it will now be referred to) strikes with great success! My husband and I are heading to Philadelphia to see a dear friend from college get married this weekend, so I didn’t want to do a lot of grocery shopping this week since we would be on the road, and were some items that I wanted to use up before we headed out of town. I had flagged Mario Batali’s Spaghetti with Artichokes and Pancetta the second it graced the cover of Food & Wine’s April 2010 issue, and knew it was a flavor combination I wanted to work with. I have a lot of respect for Batali as a chef- he seems to really know who he is, both as a person and a chef, and he has a wonderful backstory to his rise to fame.
I love a simple pasta dish, especially something that can be thrown together easily on a week night without feeling like an afterthought. Following Batali’s flavor profile, I amended the components for what I had on hand, and the result was a perfect after workout spring supper that was wholly satisfying. By switching to an unrefined whole grain pasta, I upped the fiber and grain intake, and I thought he pairing of the light artichokes with the hearty fettuccini made for a great balance. I also switched out the pancetta for leaner prosciutto, helping to lighten up the dish further. The dish was only further confirmed a success when my husband not only cleaned his own bowl, but happily devoured my leftovers when I offered them up for sacrifice. Paired with a bright salad, Whole Wheat Pasta with Artichokes & Pancetta is a perfect spring meal.
Whole Wheat Pasta with Artichokes & Prosciutto
(inspired by Mario Batali’s Spaghetti with Artichokes & Pancetta)
- 6-8oz. jar marinated & quartered artichokes
- ½ Red Onion, sliced thinly
- 2 garlic cloves, minced
- 4oz. Good quality lean prosciutto, sliced into ribbons (freeze the prosciutto for 10-15 minutes to make slicing easy)
- Juice of ½ a lemon
- Zest of ¼- ½ a lemon
- Scant ¼ cup dry white wine
- ½ Package of whole wheat fettuccini or spaghetti
- Olive oil
- Sea salt
- Fresh cracked black pepper
- Grated parmesan cheese
- Chopped flat leaf parsley or fresh basil (optional)
Place a large pot of salted water over high heat and bring to a rolling boil, and build sauce while water is coming to temp. Heat 1-2 tablespoons of olive oil in a high sided pan or wok (big enough to hold pasta when cooked) and add in prosciutto. Keep prosciutto moving & cook until well crisped, but not burned. Transfer to paper or kitchen towel to drain. Add in a little more olive oil and sauté artichoke hearts until warmed through, breaking up if pieces are large. Add in onion and cook for another 2-3 minutes, until onion begins to soften. Introduce garlic, and cook for another 1-2 minutes until fragrant and softened. Pour in wine and lemon juice, stirring to combine and cook until slightly reduced. Drop heat to low, add in lemon zest, stir to fully incorporate and adjust flavor with salt and pepper to taste. Sauce can be set aside while pasta is cooked. Follow recommended cooking instructions for pasta, reserve about ¾ cup of cooking liquid and drain well. Add cooked pasta to sauce with cooked prosciutto and toss well, adding some of pasta cooking liquid to loosen sauce to a light consistency and have even coating on pasta. Sprinkle liberally with fresh parmesan cheese and herbs (if using) and serve immediately.
Labels:
Healthy,
Pantry items,
Pasta,
Veggies,
Weeknight
Subscribe to:
Posts (Atom)