Showing posts with label Herbs. Show all posts

Monday, November 15, 2010

Chopped Mediterranean Salad

This recipe falls into the category of “whatever was on hand”, and turned out to be a hit! I had initially planned on making a simple green salad with olives, tomatoes and sweet onion to go with last weekend’s Polenta Lasagne, so I picked up a box of organic greens a few days before. A few minutes before the lasagne was due to exit the oven, I grabbed the salad fixins out of the refrigerator and set myself up for assembly. Let me just say, there is no disappointment worse in the kitchen than opening what you suspect to be perfect good produce only to find it is RUINED. Sad panda face. The greens were beyond salvage- slimy, limp and in the throes of decomposition. Being someone who doesn’t like to waste food, I reluctantly pitched the greens in questions and set about finding a suitable side dish on the fly.

With the other ingredients ready to play, I pilfered the fridge and windowsill for a couple of additions to bulk up the salad, and ended up with a very refreshing, crisp chopped salad that gave a great play of cool to the piping hot lasagne. The portions made enough for 3-4 sides and can be easily doubled. The salad would be best with super fresh produce, however the use of a light dressing and the fine chop on all the vegetables can help mask the lack of farm fresh vegetables in the off season. It’s also incredibly easy to throw together for a quick lunch or weeknight meal side or as an appetizer topping for bruschetta.

Chopped Mediterranean Salad

- 3 Plum tomatoes, chopped
- ½ English cucumber, chopped
- ¼ Vidalia onion, chopped
- 4 Kalamata Olives, chopped
- 4 Greek green olives, chopped
- 1/3 Cup crumbled feta
- Handful flat leaf Italian parsley, rough chopped
- 5-6 Basil leaves, chiffonade
- 3-4 Tblspns olive oil
- ½(ish) Tblspn balsamic or red wine vinegar
- Wedge of lemon
- Sea salt & fresh cracked black pepper

Comine all ingredients in a wide, low bowl and toss well to coat with olive oil & vinegar. Season to taste with salt & pepper, squeeze lemon over and toss again to incorporate. Allow to rest for 15 or so minutes before serving to allow vegetables time to marinate. Cover any leftovers tightly with plastic wrap & refrigerate. Salad will lose brightness after a day or two in the fridge, but is still very tasty!

If making ahead, combine all vegetables and herbs, but hold off on adding in oil & vinegar (this mixture can be made a day in advance if needed). Add o&v 15-30 minutes before serving, season with salt, pepper & lemon, and serve.

Wednesday, September 15, 2010

Tastes of Fall

"These apples are delicious- as a matter of fact they are, she said
Can all this fruit be free..?"

While we were up in Maine for Labor Day weekend, Kyle and I stopped by his folk’s farm just up the road from my family’s house. It’s an absolutely beautiful piece of land complete with a fish pond, raspberry patch, herb & vegetable gardens and a great orchard. A few weeks before, the peaches had been in season and I was thrilled to tote home a large bag of the fresh beauties. This time around, the apples and pears were coming in, and Kyle’s stepfather and I took a couple of bags out to harvest. Kyle’s mother had been busy at work canning and preserving the summer’s harvest and sent us home with a couple of jars of her homemade peach chutneys and jams, which I’m really looking forward to getting into!

Returning to Newport, we hauled our bags of apples and pears up to the apartment, and I began concocting ways to use, store & preserve out bounty. Given our limited space in the treehouse, and my inability to execute proper canning procedure, I wanted to come up with ways to get the most flavor out of these little beauties that would keep once frozen. Applesauce was my first instinct, as it is easy to make, easy to freeze (I used gallon Ziplock freezer bags- almost all the air can be removed, and they can be frozen flat for minimal space usage), and is a great way to prolong the comforting fall flavors of apples for an extended amount of time.

Since I had already committed myself to A LOT of peeling, coring and chopping (I set up a station in the living room so I could watch the Patriots season opener last Sunday!), my second option was for apple turnovers. Don had also picked me half a dozen pears, and I wanted to mix the pears and apples together with some dried cranberries- another favorite fall flavor. Building on that, I decided to let the creativity flow a bit more by adding a thin layer of brie before sealing the edges of the tart, as there are very few situations where I feel that cheese does not make something better. I am not a huge sweet tooth, and had some extra fresh Thyme lying around, so I sprinkled a few leaves into the last few turnovers, and the outcome was right in my wheelhouse- all of the sweetness you would expect from the fruit, the tartness of the cranberries, a spice hit from the rum, the creamy subtlety of the brie and a little earthiness from the Thyme. For me- a perfect balance of savory and sweet.

I prefer my turnovers to have more of a pie-like dough, not overly flaky with a bit of heft to hold up to the filling. I had watched the gang over on America’s Test Kitchen prepare their Foolproof Pie Dough, and with the security of knowing my baker extraordinaire was safely out of the house I set to work. As they note, adding the vodka gives you the moisture you need to make the dough pliable when rolling out, but bakes out once in the oven, so the dough comes out light and flaky- brilliant! For both the filling and the dough, I like to make both components the day before, so that the fruit has plenty of time to soak up the flavor from the rum, and the dough has a chance to rest and come together. Although there are a fair amount of steps to this process, it really does come together quickly, especially if you start the dough and filling the night before.

With only a handful of leftover apples in my fruit bowl, I am looking forward to enjoying the flavors of the harvest for months to come, and sharing these treats with friends coming through the door looking to warm up after a walk through the crisp fall air.

Spiked Pear, Apple and Cranberry Turnovers with Brie
(This recipe will make enough for 8-10 turnovers, and can be easily doubled or tripled)

Turnover Filling

-4 Fresh apples, of variety, peeled, cored & diced
-3-4 Fresh pears, peeled, cored & diced
- ½ Cup dried cranberries
- ½ Tblspn Cinnamon, ground
- ½ Tblspn Nutmeg, ground
-Juice & zest of ½ a lemon
- ½ to ¾ Cup Organic sugar (adjust according to your preferred level of sweetness)
- ½ Cup dark spiced rum

Combine all fruit, spices, lemon, sugar and rum in a shallow glass or plastic container and stir well to coat. Taste and adjust spices/sweetness to desired level. Cover dish & place in the refrigerator overnight to allow fruit to soak up the liquid, stirring mixture once or twice throughout.


Foolproof Pie Dough- From America’s Test Kitchen (doubled)

- 2 ½ cups unbleached all-purpose flour (6 1/4 ounces)
- 1 teaspoon table salt
- 2 tablespoon sugar
- 12 tablespoons cold unsalted butter (3/4 stick), cut into 1/4-inch slices
- 1/2 cup chilled solid vegetable shortening , cut into 2 pieces
- 4 tablespoons vodka , cold
- 4 tablespoons cold water

Process 1¼ cups flour, salt, and sugar together in food processor until combined, about 2 one-second pulses. Add butter and shortening and process until homogenous dough just starts to collect in uneven clumps, about 10 seconds (dough will resemble cottage cheese curds with some very small pieces of butter remaining, but there should be no uncoated flour). Scrape down sides and bottom of bowl with rubber spatula and redistribute dough evenly around processor blade. Add remaining 1 cup flour and pulse until mixture is evenly distributed around bowl and mass of dough has been broken up, 4 to 6 quick pulses. Empty mixture into medium bowl.

Sprinkle vodka and water over mixture. With rubber spatula, use folding motion to mix, pressing down on dough until dough is slightly tacky and sticks together. Flatten dough into two 4-inch disks. Wrap in plastic wrap and refrigerate at least 45 minutes or up to 2 days.

Remove dough disk from refrigerator and roll out on generously floured (up to ¼ cup) work surface to 12-inch square (or a close assimilation), about 1/8 inch thick. Trim edges to clean up shape and cut dough into four even squares and stack on a small plate in between small sheets of wax or parchment paper. Repeat with second half of dough.

To Assemble

-Turnover filling
-Foolproof Dough, cut into squares
-8-10 small slices double cream brie (with our without rinds
-Fresh Thyme leaves (optional), stemmed
-1 egg, lightly beaten
-Cinnamon & sugar to dust
-Baking sheet topped with parchment paper.

Before starting, be sure to give the filling one last good stir to ensure evenly coated fruit. Working one square at a time, place a small amount of filling on the lower (triangular) half of the dough. Top fruit mixture with a sprinkle of Thyme leaves (if using) and cover with slice of brie. Dip your finger into the filling liquid and run along the edge of the turnover to help seal. Fold over the top half of the dough to form a triangle and crimp (using fingers or fork tines) to seal. Place finished turnover on baking sheet and repeat with remaining mixture and dough squares. If baking off immediately, preheat oven to 400 degrees, brush turnover tops with egg wash and dust with cinnamon sugar. Bake in oven for 20-25 minutes until golden brown and flaky.

For Freezing: Follow through assembly process and place turnovers in a single layer on parchment lined baking sheet. Do not brush with egg wash. Place entire baking sheet directly into freezer and allow turnovers to freeze for four hours, or overnight. Once frozen, pack tightly into labeled freezer bags, and seal out as much air as possible. Turnovers will keep in this method for a few months, and can be baked directly from frozen state, with an added 5-10 minutes of cooking time, depending on your oven. If you choose to thaw before baking off, be sure to remove turnovers from bags and place on a parchment lined baking sheet to come up to temp- otherwise you’ll end up with a gooey mess in the bag! For both methods, follow the same egg wash & dusting step as above, as well as oven temp.

Tuesday, August 31, 2010

Slow Roasted Goodness

August- where did you go?! It’s hard to believe tomorrow is September 1st, I feel like this summer flew by, as most of them do. In a way, I am glad August passed so quickly, as it was a long six weeks of waiting for Kyle to come back from sea. The ship made it back safely into its homeport this past Saturday, and we spent the weekend celebrating his return all over Newport (I’ll be posting an update of our adventures over on The Humble Home later). It’s been absolutely awesome to have him home, and I’m doing my best to not think about him heading back out to sea again after Labor Day weekend.

Last week I hit up the local farmer’s market and bought a HUGE sack of Roma tomatoes- I think I was so excited about fresh tomatoes, that I got a little ahead of myself! While I did my best to get through as many as possible, I knew I would have to use up the rest before they turned. I adore slow roasted tomatoes, as it is a very simple and delicious way of prolonging the enjoyment of your tomatoes while concentrating the flavor. There really is no limit to the application of slow roasted tomatoes- over pasta, grilled meats, on toasted bagels or sandwiches, blended in with hummus, or just as is with a little fresh basil (my favorite application!). The tomatoes can be roasted off in large or small batches, depending on how many you have on hand in surplus, and when stored properly, can last a couple of months in the refrigerator. Additionally, if you roast off a large batch, once cooled, the tomatoes can be portioned off into freezer or vacuum bags and will last even longer in the freezer for use all winter.

When I roast my tomatoes, I usually throw in a couple of heads of garlic to roast as well. As my friend Brianne over at Sweet Cheeks in the Kitchen said: “Garlic. How I love you. Let me count the ways”. Roasted garlic, like the tomatoes, is a wonderful addition to really any dish. Once roasted, it keeps well, and has a wonderfully mellow flavor. I roasted one head with plain olive oil, and the second with white truffle oil, and they both turned out incredibly flavorful! Although the roasting process usually takes a couple of hours, the hands on time is quite minimal (good for a Sunday night roasting, so you can use them all week), and the end product is really worth the time.

For a beyond easy hors d’ oeuvres, toast up some baguette slices, spread on the roasted garlic, add a fresh basil leaf, top with a slice of roasted tomato, and voila!- instant satisfaction, and a treat that appeals to all, as it’s vegan friendly, but the meaty, robust flavor of the tomato more than compensates for the carnivores. You can even take it a step further and top it off with a little crumbled chevre or fresh mozzarella and pop it under the broiler to brown for a few minutes. Once cooled, I packed my tomato slices and garlic with a couple of sprigs of fresh picked basil, and we took it to the park for a snack with pita chips. There is nothing better than a treat that is simple, rich with flavor and easy to transport, and slow roasted tomatoes & garlic fit the bill perfectly!


Slow Roasted Tomatoes & Garlic

-Roma, Cherry or other fresh tomatoes
-2 or 3 Full heads of garlic
-Sea Salt
-Fresh Cracked Pepper
-Thyme sprigs
-Extra Virgin Olive oil (I recommend using a high quality oil here- given that the ingredient list is short, using top notch components will make a big difference. For a little more of a twist, a flavor infused oil, such as the white truffle oil I used on one the garlic heads)

Pre heat the oven to 225 degrees. Halve cherry tomatoes, or cut Romas into thirds or quarters. Cut off the top quarter of each head of garlic to expose all cloves. Arrange tomato slices and garlic on a baking sheet. Sprinkle tomatoes generously with sea salt, fresh pepper and olive oil. Lay thyme sprigs across the top of tomatoes. Drizzle olive oil over garlic heads, fully covering exposed garlic. Top with sea salt & pepper. Place baking sheet on the middle oven rack and roast, checking every 30 minutes or so. Depending on the size and moisture level of your tomatoes and the capacity of your oven, complete roasting should take between an hour and a half to two hours. To intensify the flavors, during the last 30 minute cycle, turn the oven up to 275 to draw out any additional moisture. When done, the tomatoes should have a rich red-brown color and appear dried around the edges, and the garlic should be “popping” out of its jacket. Remove pan from oven and let cool. If not using immediately, store tomatoes in a glass jar or dish with a tight fitting lid, covered by a layer of olive oil. Once cooled, the garlic cloves should slip right out of the skin, and can be left whole or made into a paste, and also stores well in a covered dish.

Wednesday, June 30, 2010

Sangria Season!

Oh Sangria, my dear, dear friend- is there no situation that you can’t make better with your presence? I want to thank you for hanging out this past weekend and making not only my Friday night post-work decompression time all the more relaxing, but also staying over to share your festive spirit with our dinner soiree guests, it was much appreciated!

Sangria is such a versatile cocktail, and it lends itself well to a lot of different flavor combinations, and meal pairings. It is the perfect way to get some extra mileage out of less expensive wine, and a great way to showcase fresh seasonal fruits. I personally find it a lot of fun to fish bits of Triple Sec laced fruit out of a glass while sitting around and relaxing with friends. Last summer I had a group of friends who would get together for weekly summers and without fail, my friend Alyssa and I would whip up a big batch of white or red Sangria for the gang. The options are really endless for making Sangria, and as a result each person’s approach is a bit different, but the results are almost always fun!

The vast majority of times, I find most restaurant versions to be overly sweet, with too much emphasis on fruit juice, and not enough on the wine and actual fresh fruit (the exception being Salvation Café, a fabulous Newport spot that makes is perfectly!). I prefer my Sangria a little less on the sweet side, with lots of fresh citrus for a refreshing finish. Too much added sugar can leave you with the “mouth coat” feel, which is not appealing when the mercury starts to rise. When making Sangria for a party or get together, I usually start it a few hours in advance, leaving ample time for the fruit to infuse the mixture and absorb some of the Triple Sec- the extra time gives the finished Sangria a bit more cohesion, and gives the ingredients a better chance to come together. A few years ago I started adding fresh herbs to cut a little of the sweetness of the Triple Sec, and the end result was a well balanced, porch sipping Sangria that is perfect for the upcoming holiday weekend.

Red Sangria with Fresh Fruit & Herbs

- 1 .75ml (standard) bottle of Pinot Noir
- ¾ Cup Grand Mariner or other Triple Sec
- 1 Lime, halved & sliced thinly
- 1 Star or Ruby Red grapefruit, halved & sliced thinly
- 2 White peaches, sliced
- 3 Plums, sliced
- ½ Cup fresh Basil leaves, torn
- ¼ Cup fresh Mint leaves, torn
- 6-8oz. Seltzer water- I prefer using Pomegranate or any other flavored seltzer

Combine fruit, herbs & Triple Sec in a large, wide bottomed pitcher. Using a wooden spoon, begin lightly bruising fruit & herbs against the bottom and sides of the pitcher, releasing some of the juice into the mixture. Set aside for at least 30 minutes. Give mixture a good stir and add in wine. Cover & place in the refrigerator for a minimum of 30 minutes, or even overnight if time allows. Just before serving, remove from refrigerator, add in seltzer and stir well. Serve over ice.

Note: Any fresh seasonal fruits are a perfect addition to Sangria- other recommendations would be blueberries, strawberries, black raspberries, star fruit, clementines, apples, etc.


Tuesday, June 29, 2010

Friday Night Sandwich Fix


Friday night, just after walking in the door from work, is one of my favorite moments of the week. No matter how strenuous your work week, no matter how many frustrating phone calls were made, packages were lost, or clients were disgruntled, you’re HOME. And the whole weekend stretches out in front of you with a warm smile. For me, Friday night is like a mini birthday every week, in which you can treat yourself to that extra glass of wine, slip into something comfortable and tell the world of commerce you’ll check back in 72 hours.

This past Friday was an especially stressful day in my little world, and when I came home, there was nothing I wanted to do more than relax- and I proceeded to do just that! I had all good intentions on starting preparations for a small dinner party we were having on Saturday, but I passed on that and went directly to making a pitcher of Sangria (recipe to follow soon) and pulling together an easy dinner. The weather has been hot & muggy in Newport, and the last thing I was interested in was standing in front of a hot stove for an extensive period of time, especially when that stove has no hood vent. I had been playing out an idea for a meal-worthy sandwich in my head for a few days, comprised wholly of items already in my kitchen, and knew it would fit the bill to a “T”. Prep involved just enough work so that I felt productive (and what better way to get out some work frustrations then smashing a couple of cloves of garlic?), and assembly and cleanup were a snap.

I’m sure there are those out there that might scoff at a mere sandwich recipe, but for me there is something really wonderful about layering flavors together into a delicious handheld meal. Scoff if you must, but I am beyond satisfied with the end sandwich product (is there really nothing the sandwich can’t do???), and more importantly, so was my husband. ;-)

Tuscan Chicken Sandwich for Two
- ½ Loaf of crusty Italian bread, whole wheat or white
- ½ Medium vine ripened tomato, sliced
- ¼ Sweet Vidalia onion, sliced thin
- 1 Grilled chicken breast, sliced
- ¼- ½ Cup good shredded Parmesan cheese
- 4-6 Pitted Kalamata olives, sliced
- 6 Basil leaves
- Lemon-Garlic mayonnaise (recipe follows)
- Handful of salad greens
- Sea salt & fresh cracked pepper

Lemon-Garlic Mayonnaise
- 3 Tblspns good quality mayonnaise
- 1 Large or 2 small cloves of garlic, peeled
- Zest from ¼ of a lemon
- Juice from ¼ of a lemon
-1 Tbspn fresh Italian parsley, chopped
-Sea salt & fresh cracked pepper

For Mayonnaise: Crack garlic cloves and rough chop. Sprinkle garlic with sea salt, and using the side of the knife, work the garlic into a smooth paste by running over a few times until proper consistency is reached (add more salt accordingly to help break down garlic & soften flavor). Combine all ingredients in a bowl and combine well. Set aside while assembling rest of sandwich.

To Assemble Sandwich: Preheat oven broiler to low. Split bread length-wise and place on a baking sheet, cut side up. Place under broiler, approx four to six inches below broiler plate and toast bread (I would advise keeping an eye on the toasting, as bread can go from brown to black in a flash!). Remove bread from broiler. Coat the “bottom” side of the bread with Lemon-Garlic mayonnaise and top with tomatoes, olives, and sliced chicken. Coat the “top” with mayonnaise, onions and basil leaves. Sprinkle both sides with parmesan cheese and season with salt & pepper to taste. Place sandwich back under broiler for another 4-6 minutes, or until cheese is melted and browned. Remove sandwich from oven, top “bottom” with salad greens & cover with “top”. Slice in half & serve with favorite sandwich sides.

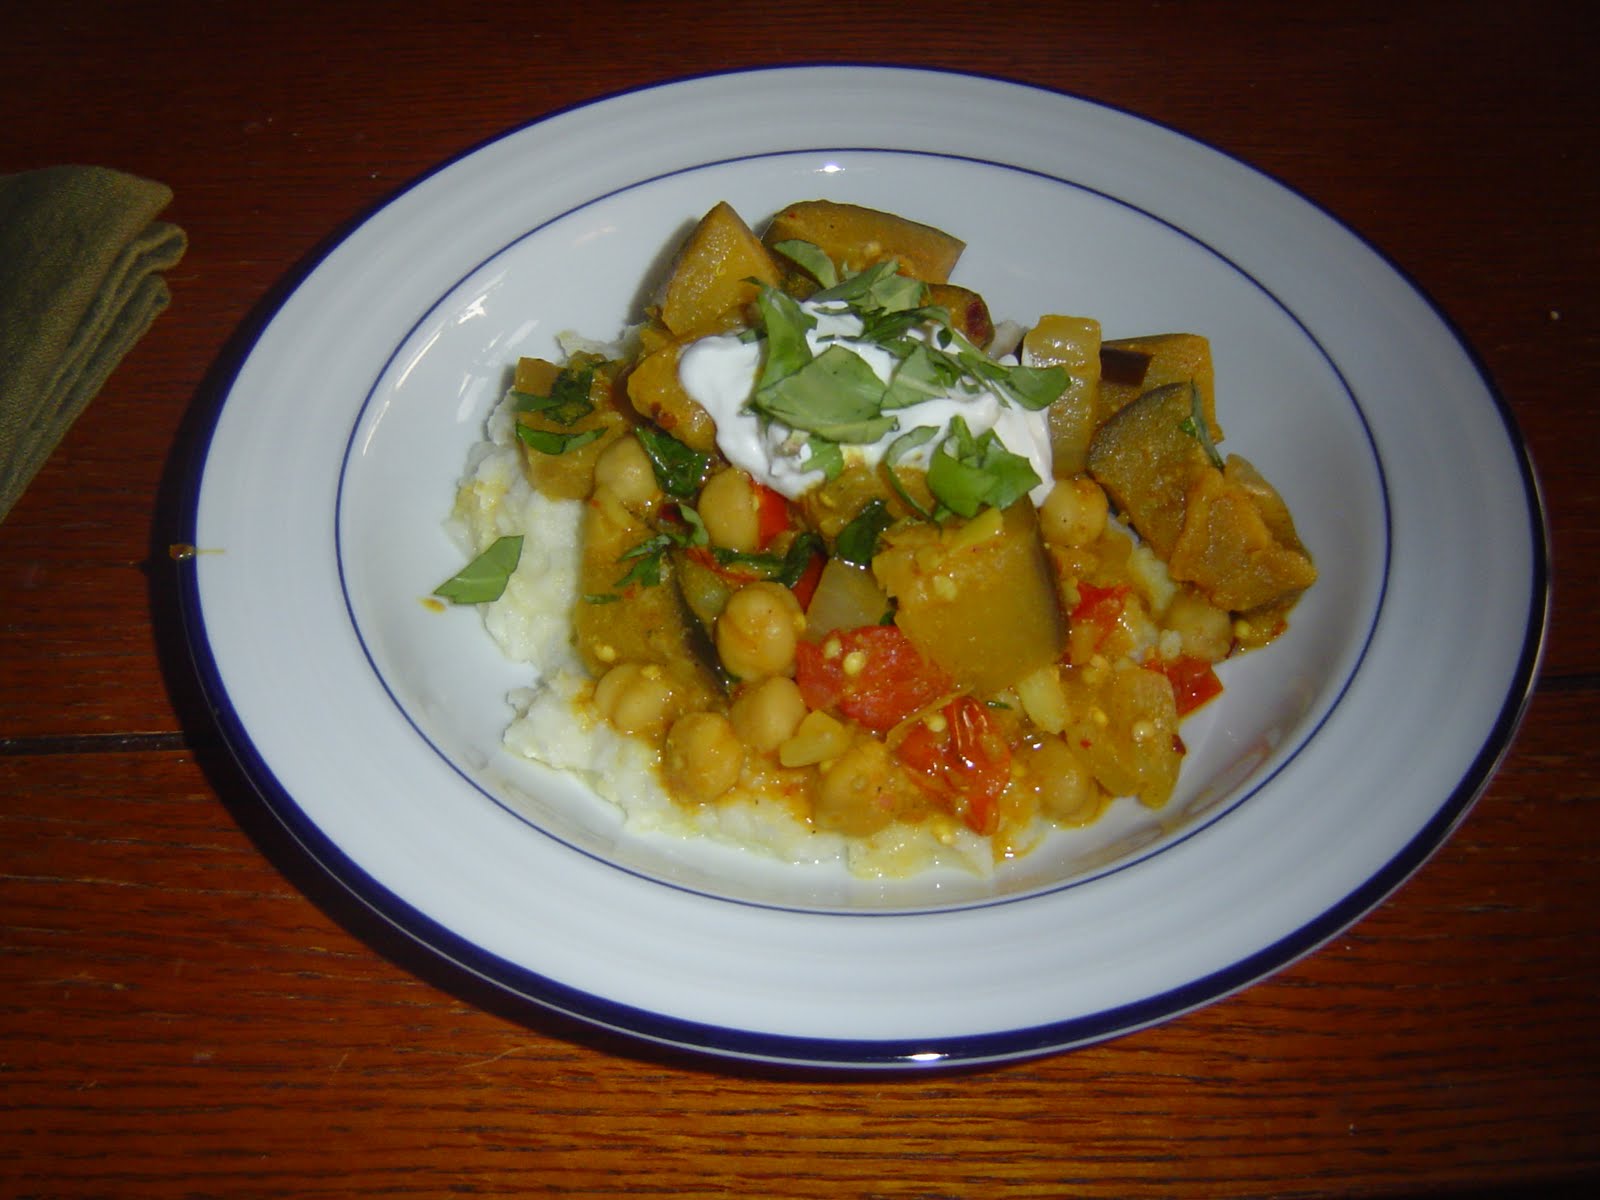
Curried Eggplant Delight

As we are now officially into the summer season, my menu planning takes a turn to lighter, more refreshing meals. I get a lot of daily recipe and cooking emails, and one such recent email fit the bill perfectly for using fresh summer produce, and employing fresh herbs from my windowsill. Real Simple is hands down one of my favorite magazines (I’ve been an avid reader and subscriber for the past two years), and a lot of their recipes ascribe to my cooking philosophy of keeping it simple (no surprise there!) in order to showcase the natural flavors of the ingredients. When the recipe for Curried Eggplant & Tomatoes with Basil popped up in my inbox, I knew it would be a smash success, and it was! I used the original recipe as a guide a tweaked for my own taste. My husband and I both really enjoyed it- the combination of eggplant and chickpeas made for a substantial vegetarian meal that left us both really satisfied. I used just a bit of light yogurt to add a little richness to the sauce, and the basil and curry played off of each other really well. Instead of serving it over rice (as suggested in RS’s recipe), we opted to use cauliflower mash, which cut out some of that heavy carb feeling and upped the veggie intake. I actually had the leftovers the next day for lunch, and the curry flavor was more saturated after a night in the fridge. It’s an easy weeknight meal to pull together, and I would even recommend serving it at a casual dinner party- it would be great for a homestyle dinner where large dishes are passed, and would go well with homemade pita chips on the side. All in all, a wildly tasty dish!

Curried Eggplant with Tomatoes and Basil
(Adapted from Real Simple, Cauliflower recipe my own)

For the Cauliflower Mash:
-1 Medium head of fresh cauliflower, broken into florets
-2 Tbspns salted butter (optional)
-2 Tbspns low fat Greek yogurt
-Sea salt & fresh cracked pepper

Steam cauliflower florets over boiling water in a vegetable steamer until fork tender. Remove from heat & transfer florets to a large bowl heatproof bowl. Add in butter & yogurt and mash using a handheld masher, stick blender or hand beaters until smooth. Season with salt & pepper to taste. Mash can be kept warm over a low simmering pot of water for up to 30 minutes. Give mash a good stir before plating.

For the Eggplant Curry:
-1 Large eggplant, about 1-1 ½ lbs. cut in 1 inch pieces
-1 Pint cherry tomatoes, halved
-1 Medium onion chopped (I recommend a sweet onion, such as Vidalia)
-3 Medium cloves of garlic, minced
-1 15.5-16oz Can of chickpeas, rinsed & drained
-3+ Tblspns good curry powder (I used Spice Island’s Spicy Curry Powder for a little extra kick)
-Good handful of fresh basil, chopped
- ¼ - ½ Cup of low fat Greek yogurt
-Olive oil
-Sea salt & fresh cracked pepper
-Red pepper flakes (optional)
- Couple tspns fresh cilantro, minced (optional)
-Crumbled goat cheese (optional)

In a large sauté pan or wok, heat a couple of tablespoons of olive oil over medium heat. Add onions and cook, stirring, until slightly translucent- about 3 minutes. Add in tomatoes and continue cooking for a few minutes, seasoning with salt & pepper. Add in eggplant, and cook until it begins to soften slightly about 5-7 minutes. Stir in garlic, curry powder and red pepper (if using), and cook another few minutes until fragrant (adjust curry powder to your personal taste, I tend to be a bit heavy handed personally). Add in chickpeas and about 1- 1 ½ cups of water and stir to combine all ingredients well. Simmer, stirring occasionally until vegetables are tender and chickpeas are heated through, about 15 minutes or so. Turn off heat, add in basil and yogurt and stir to combine well. Adjust salt & pepper seasoning to taste. Serve over cauliflower mash with chopped cilantro and goat cheese sprinkled on top.

Note: This dish would also be wonderful over brown rice, Israeli (or regular) couscous or any other hearty grain.

Wednesday, April 21, 2010

The Brights of Spring

My husband has been out to sea for the past ten days or so, and as per usual I try to do my best not to have a ton of food in the house since I hate to see anything go to waste! I have been thrilled to see my container garden take off, and have really enjoyed being able to use some of my hand-grown treats in recent dishes. Now that the rain has (finally!) stopped, and the weather is getting warmer, I tend to lean on fresh, lighter meals such as large salads when I’m making dinner for myself. A big salad is easy to make, has endless possibilities and are extremely filling after a good run or workout (another part of my spring afternoon routine). I’ve got a bit longer before my tomatoes start producing, so I’ve been relying on getting my produce from the local market, and  have been lucky enough to find locally grown organic tomatoes at a decent price. My baby arugula pot has come along beautifully, and I love the peppery bite of it in salads. Keeping in the mindset of using what is on hand, I made this fantastic salad out of what was already in my kitchen, and I will surely be making it many times throughout the warmer months. As noted in a previous post, I adore a good poached egg, and I’ve recently seen them paired with cool salads on seasonal restaurant menus. The creamy texture of the yolk makes an ideal dressing, and the play of warm and cool elements really satisfy. A great salad is a perfect way of combining color, texture, and flavor simply and quickly enough for any weeknight dinner or casual lunch.


Herbed Green Salad with Poached Eggs and Crispy Turkey “Lardons”

Per Person:

-1-2 Large fresh eggs
-1 ½ Cups fresh salad greens (I used a mix of baby spinach & arugula)
- ¼ Cup fresh herbs, chopped (flat leaf parsley, dill, cilantro, etc.)
- ½ Cup cherry or grape tomatoes, quartered
- ¼ Cup sweet Vidalia onion, sliced thinly
- 2 Slices turkey bacon, cut into bite sized pieces
- 5 Kalamata olives, quartered (optional)
- 1-2 Tblspns toasted pine nuts (optional)
- Sea salt & fresh cracked pepper

Heat skillet over medium high heat and cook turkey bacon until crisp, about 12 minutes, and drain on paper towels. Toss greens, herbs, tomatoes, onion, olives and pine nuts together. Poach eggs (refer to my recommended instructions in previous post, A Little Comfort) and nestle eggs on top of salad. Top with cooked turkey bacon and season with salt & pepper to taste. Serve & enjoy immediately for best texture- goes great with a glass of crisp white wine!

Tuesday, April 13, 2010

The Simplicity of Sauce

A good tomato sauce is the cornerstone of any cook’s repertoire. In addition to being the perfect go-to recipe on a busy night, a tomato sauce is the ideal way of showcasing your own personal flavor palate, which in the world of cooking is like a fingerprint. I make no claims to being of Italian lineage, and would never put my sauce up against an “authentic” version, as I think it all comes down to what you know, what you’ve grown up with and what satisfies your cravings.

Growing up, tomato sauce was a perpetual staple in our household- from quick weeknight meals filled with rehearsals and sports practices, to all day simmered pots of Chicken Cacciatore, there were always a half dozen cans of crushed tomatoes in our pantry. Both of my parents had a similar style to their basic sauce (one of my father’s first cooking jobs had been in the only Italian restaurant in Bangor), and it is what I have built my own off of. Many people might scoff that tomato sauce is too basic to be interesting or refined, but I would argue that its beauty is in its simplicity. Not only can you highlight wonderful seasonal vegetables in prime growing season, but you can also make a cold weather comfort food with good tinned tomatoes, and on the cheap!

This last evolution of sauce making was on a Friday night after a very busy week of work. Kyle was driving home from Kings Point after giving a talk to a group of officers, and I was charged with putting together something quick, and was less than motivated to hit the market, so I went with what I had on hand in the house. A few weeks back I had taken up container gardening, and had fresh basil and flat leaf parsley, which were perfect for balancing against the acidity of the tomatoes. The result was a comforting bowl of shared pasta on a relaxed Friday night. Although my sauce does differ from time to time, this is what I find to be my favorite unpretentious tomato sauce that can be made year round. I’m not a fan of adding tomato paste or sugar to my sauce, as I like it a little bit more loose and chunky, and if you’re using fresh tomatoes, you are going to more than likely have a sweet sauce. If you’ve got fresh tomatoes, herbs and any other vegetables, use them! When working with fresh as opposed to canned, use equal proportions of chopped fresh tomatoes, and just simmer a bit longer. Skinning and de-seeding is up to you, I leave it all in, as I’m a fan of a more rustic texture, and if you want to break down the flesh more, a handheld potato masher does the trick. In line with my cooking philosophy, if you use simple, fresh, great ingredients to start with, it’s hard to go wrong. It’s all about finding what works for your taste, and using what you’ve got.

Basic Tomato Sauce (easily doubled for freezing)

- 1 28oz. can of Pastene “Kitchen Ready” tomatoes (or any similar good quality)
- 3-4 tblspns Extra Virgin olive oil
- 3 cloves garlic, minced finely
- ½ of a sweet onion, halved and sliced thinly
- 4ish tblspns. Red wine (I used Merlot, as that was what I was sipping on after work)
- 3-4 tblspns minced fresh herbs (I had flat leaf parsley, basil and baby arugula on hand)
- Good sea salt & cracked black pepper
-1-2 tspns Crushed red pepper (optional)
In the base of a large pot or Dutch oven, heat olive oil over medium heat. Add in onions and sweat, stirring regularly so as not to brown, until translucent, about 4-5 minutes. Add in garlic and continue to stir for another minute or two. Add in tomatoes & stir to combine. Season with salt & pepper to taste, and crushed red pepper, if using. Stir in wine and allow sauce to come together over low heat for as long as possible. Depending on your desired thickness, you can add a little more wine, water, pasta water (if you’re cooking pasta to serve with sauce) or even stock to thin out a bit. About 5 minutes before serving, stir in fresh herbs (basil will turn brown if added to early), check seasonings and adjust if needed. Wonderful served over pasta, with grilled sausages, simply on toasted bread with olive oil.