Showing posts with label Tomato. Show all posts

Friday, February 4, 2011

Tomatoes and Garlic and Capers, Oh My!

Hi friends! I have been gone from the cooking and blogging realm for far too long (a fact I am painfully aware of!), but I am very excited to be jumping back in. For those that don’t already know, I have been hard at work on a new sort of baking project for the past few months- and it’s not a Sourdough starter... Yes, that’s right, I’m working on a baby!


Oh, hey baby!

Kyle and I were over the moon when we found out that we would be expecting our first child in July of this year, and had kept the news on the hush until we made it home to visit family and friends over the holiday season. Now that I am settling comfortably into my second trimester stride, my energy and appetite have both shot back up, and I am looking forward to getting back into the kitchen and working on some tasty ideas that have been bouncing around in my head!

With that news out of the way, let’s get down to the food. You'll have to be kind to me as I get back into the culinary groove, since I have been away for some time, and it usually takes me a little bit to get the creativity flowing again, so bear with me! After a couple of busy months of traveling, visiting friends and family, holidays and intermittent nausea battles, I was very excited to have a little quiet time at home last weekend. With all the traveling and being out of the apartment that we’ve done recently, the fresh produce was pretty much non-existent, so it took a few shopping trips/lists to get the kitchen up and running. For those that don’t live in the area, the weather has been terrible as of late, with weekly snow & ice storms that leave much to be desired, and have me craving warm & comforting food.

While out on one of my re-stocking adventures at the market, I spied veal cutlets on sale and quickly began throwing together ideas in my head. Roasted tomatoes and garlic scream comfort to me (see my opus to their awesomeness here), so I quickly put together a dish in my head that would be simple to make, and had leftovers that could be used again. I was super satisfied with the results, and found it to be equally comforting when used over the veal as well as when tossed with pasta. It’s not a wildly imaginative recipe, but it was a good first step back into cooking for me, and has already left me mulling over more new ideas in my head that should make their way here very soon.

My portions for the tomato “sauce” are for two servings, so if you’re like me and eating solo, you can save the 2nd half to be used for pasta later in the week. If you’re looking to have more leftover tomatoes or looking to feed a slightly larger crowd, you can easily double the amount called for.

Roasted Tomatoes, Garlic and Capers for Meat & Pasta

For Roasted Tomatoes:

- ½ pint organic grape tomatoes
- 5-6 cloves of garlic, skins intact
- ½ Spanish red onion, sliced thick
- 8 Large oil cured black olives
- 1 Tblspn of capers
- ¼ cup(ish) Good olive oil
- Sea salt & cracked pepper to taste
- 1 Tspn crushed red pepper (optional)
- 6 Fresh basil leaves, sliced thinly lengthwise

Preheat oven to 350 degrees. In an oven-proof pan or Dutch oven just large enough to hold ingredients, combine tomatoes, garlic, onion, olives and capers, and toss with olive oil until well coated. Season with salt, pepper and crushed red pepper. Place pan in oven for 53-50 minutes, or until tomatoes begin to pop, garlic has taken on rich caramel color, and onions have browned.

For Breaded Veal Cutlets (works well for chicken too!):

- Veal cutlets of medium thickness, pounded lightly (1 for each person, depending on size)
- ½ Cup all purpose flour, seasoned with salt & pepper
- 1 Large egg, beaten
- ½ Cup panko bread crumbs seasoned with salt, pepper & a little dried oregano
- 2-4 slices of fresh mozzarella
-Olive oil

Heat a non-stick frying pan over medium heat with a little olive oil to coat the bottom of the pan. Using the breading “assembly line” technique discussed here, dredge veal cutlets through flour, egg and panko, and place breaded cutlets directly into pre-heated pan (if cooking for more than 2 servings, do this in batches, as over-crowding your pan will cause an uneven distribution of heat, and cutlets will not brown as well). Cook cutlets 4-5 minutes per side, or a bit more depending on thickness, until cooked through and golden brown on the exterior. Remove fully cooked cutlets and place in an oven proof baking dish.

To Assemble:

When tomatoes have fully roasted, remove from oven, switch oven off and turn on broiler to high. Transfer tomato mixture to the same pan used for sautéing veal and lightly sauté tomatoes over medium heat (this will help break up the roasted tomatoes a bit, creating a more saucy texture). While sauce heats, top each cutlet with a few slices of fresh mozzarella, place under broiler and broil until cheese is brown and bubbly. Remove from oven and transfer to serving plate. Spoon tomato mixture over cutlets, and top with fresh basil. Serve with a simple green salad and a loaf of rustic bread for a hearty meal.

Using Leftover Sauce for Pasta:

Bring a pot of salted water to a boil over high heat. Drop in pasta & cook, following package directions. While pasta cooks, heat up leftover sauce in a small skillet, adding a little water, wine or chicken stock to loosen it up a bit. Once pasta has cooked, drop into skillet with sauce and toss to coat. Finish with a little grated or shredded parmesan and fresh basil. If you’ve got some leftover cooked off chicken breast, sausage, or really any protein, dice up and heat in with the sauce- it’s a great addition!

Monday, November 8, 2010

Rustic Lamb Lasagne

Whenever Kyle comes home from sea, I try to make something really comforting and homey to welcome him back from his time out to sea, especially now that we are into November and the mercury has taken a significant nose dive. As I’ve said many times before, I really enjoy fall and winter, and all of the hearty cooking that comes along with it. On the whole, Kyle is a very much a “meat & potatoes” kind of fella, although he has a very adventurous palate. This past cruise, his ship was researching off of Georges Bank, and this time of year up North can be quite biting.

I have been traveling almost every weekend for the past couple of weeks, and as a result my cooking & blogging have been somewhat lacking. However, the stars aligned for this past weekend, and with Kyle coming home for more than a night or two, I was excited to make something truly “from scratch” that would be filled with rustic flavors and soul warming substance.

I stumbled across Nigella Lawson’s recipe for Venetian Lasagne, and immediately felt inspired. I loved the idea of replacing noodle layers with polenta, and from her initial recipe, I began building my own take on it in my head over the next two days. With the much appreciated help of my friend and colleague, Matt, I began bouncing ideas off of him on how to expand on the polenta lasagne concept, which he and his wife had made a take on before. Nigella’s original recipe called for ground beef, and after playing around with different textural concepts, I settled on substituting a combination of ground sausage and diced lamb to create a more interesting consistency. From there, I decided upon adding a layer of ricotta with fresh herbs- a component I have to add to any baked Italian pasta dish. I upped my vegetable measurements as well to add to the robust nature of my concept.

I took a lot of pleasure in the entire slow-cook process of this dish- I bought my lamb as a bone-in leg section, and butchered it down myself to ensure absolute freshness and flavor. As the sauce simmered away on low heat (the smell was incredible!), I enjoyed a glass of wine, mixed up the ricotta layer and prepared my assembly line and enjoyed the warmth of my tiny kitchen on a blustery night. I cooked & assembled the lasagne a day in advance, and I would not recommend attempting this from start to finish on for a weeknight meal. It is a perfect “do ahead” recipe, as it will survive perfectly covered in a dish in the refrigerator for up to two days in advance or could be made the day of a weekend dinner party. It is hearty enough to chase away any cold fall or winter day, and elegant enough to serve at a casual dinner party with good friends and a hearty red wine. My recipe ended up being enough to make a grand 9”x13” pan for Kyle and I, and as a thank you to Matt, I sent him home after work on Friday with a 9” round pan of the same to share with his wife over the weekend- it was only fitting after being my soundboard on it over two days!

I have never been so happy with the way a lasagne has turned out from start to finish, and I will be making this again and again in the future. The lamb was robust and full of flavor from its slow simmer in the sauce, and the polenta absorbed the all of the flavor while still maintaining its own integrity. I served it alongside a chopped style Mediterranean salad (recipe up soon!), and the huge flavors of the lasagne complimented it perfectly. At the end of the weekend, Kyle and I were left with two measly end pieces, which we plan on devouring after work today. I have to say, the best compliment came from Matt and his wife, who texted the following message to me on Satuday: “I must say that the lasagne is superb! Nice work. Natascha and I totally owned the whole pan. Can’t feel my face.” It doesn’t get any better than that, as far as I’m concerned!

Rustic Polenta Lasagne with Lamb, Mushroom & Sausage Ragu (inspiration taken from Nigella Lawson’s Venetian Lasagne)

Written out in order of preparation:

For the Polenta:
-2 Cups instant or quick cooking polenta (I used Pastene)
- Chicken stock (enough for whatever the polenta instructions require for cooking liquid)
- ¾ Cup shredded Parmesan
- 1Tblspn. butter
-Sea salt & fresh cracked black pepper

For the Ragu:
- ½ lb. loose Italian sausage
- 1½ lbs. Fresh lamb leg, diced into bite size pieces
- 16oz. Baby Bella mushrooms, roughly diced
- ½ Vidalia onion, diced
-3-4 Medium garlic cloves, minced
- 3 Celery stalks (with green tops), diced
- 3 Carrots, peeled & diced
- 16oz. Can crushed tomatoes (San Marzano or Pastene are perfect)
- 2-3 Tblspn. tomato paste
- ½ Cup hearty red wine, such as Chianti, Merlot or Bordeaux
- 2 Bay leaves
- Olive oil
- Sea salt & fresh cracked black pepper

For the Ricotta Layer:
- 16oz. Part skim Ricotta cheese, at room temperature
- 1 Large egg
- Handful of flat leaf Italian parsley, chopped
- Heavy pinch of fresh ground nutmeg
-Sea salt & fresh cracked black pepper

Additional ingredient: 1+ Cup shredded Parmesan, for layering

For Polenta: In an adequately sized stock pot, heat chicken stock (amount determined by brand of polenta used) over medium high heat until boiling. Add in dry polenta and stir continually until stock is absorbed. Remove from heat & quickly stir in Parmesan cheese, butter and season with salt & pepper. Divide polenta between two cookie or baking sheets, using a spatula to spread out evenly (once polenta begins to cool slightly, it can be smoothed further by placing a layer of parchment paper on top and passing a rolling pin over the top). Set aside and allow to cool completely.

For Ragu: In a large pot or Dutch oven, heat 1 Tblspn of olive oil over medium heat, add in sausage meat and cook until browned, stirring to break up. Once browned, remove with a slotted spoon & reserve in a large dish. Add a little more olive oil & add in onions, celery and carrot. Season to taste with salt & pepper and sweat, stirring occasionally for 10-12 minutes, until vegetables are softened. Add in garlic & mushroom, cooking an additional 5 minutes until mushrooms have softened and garlic is fragrant, but not browned. Remove vegetables with a slotted spoon to same dish as sausage and reserve. Turn heat to medium-high, add a little more oil if needed, and sear off lamb pieces until well browned, approximately 7-10 minutes, seasoning with salt & pepper. After fully browning, add in sausage and vegetable mixture and stir well to incorporate. Reduce heat to medium-low, add in bay leaves, crushed tomatoes, tomato puree and wine and bring to low simmer. Stir well and cover partially with lid, dropping heat to low. Allow sauce to cook down over the 60-90 minutes, checking & stirring occasionally. If sauce becomes too thick, thin with a bit of stock or water, and if sauce does not reduce enough, add a bit more tomato paste. Once sauce has reached desired consistency, turn off heat, remove bay leaves and allow to cool slightly for assembly.

For Ricotta: Combine Ricotta, parsley, egg, nutmeg, salt & pepper in a bowl until well mixed.

To assemble Lasagne: Using your pan as a guide, cut cooled polenta to fit the bottom of pan (you should be able to get 3 full slices of polenta out of the pans for layering, and use the last ½ for a smaller [freezer?] lasagne), and place first layer into the bottom of pan. Spread a layer of ricotta on top using a spatula, and top with 1/3 of the Parmesan. Top with a layer of the ragu sauce. Repeat process for a second layer, topping with a final layer of polenta (3 layers of polenta total). Spread with remaining parmesan.

If serving immediately: cover lasagne with a layer of aluminum foil and bake off for 60 minutes in a 370 degree oven, or until bubbly and heated through. Remove foil and broil for 3-5 minutes, until cheese browns and becomes crunchy. Remove from oven & serve with simply dressed greens, lightly sautéed broccoli rabe or lemony haricot verts and a glass of your favorite red.

If making ahead of time: All assembly up to cooking can be done up to two days in advance, and lasagne can be stored in your refrigerator. Top tightly with a layer of plastic wrap, and cover with aluminum foil. Before baking, discard plastic wrap, and follow above directions, adding 20 minutes cooking time if going straight from refrigerator to oven.

Tuesday, August 31, 2010

Slow Roasted Goodness

August- where did you go?! It’s hard to believe tomorrow is September 1st, I feel like this summer flew by, as most of them do. In a way, I am glad August passed so quickly, as it was a long six weeks of waiting for Kyle to come back from sea. The ship made it back safely into its homeport this past Saturday, and we spent the weekend celebrating his return all over Newport (I’ll be posting an update of our adventures over on The Humble Home later). It’s been absolutely awesome to have him home, and I’m doing my best to not think about him heading back out to sea again after Labor Day weekend.

Last week I hit up the local farmer’s market and bought a HUGE sack of Roma tomatoes- I think I was so excited about fresh tomatoes, that I got a little ahead of myself! While I did my best to get through as many as possible, I knew I would have to use up the rest before they turned. I adore slow roasted tomatoes, as it is a very simple and delicious way of prolonging the enjoyment of your tomatoes while concentrating the flavor. There really is no limit to the application of slow roasted tomatoes- over pasta, grilled meats, on toasted bagels or sandwiches, blended in with hummus, or just as is with a little fresh basil (my favorite application!). The tomatoes can be roasted off in large or small batches, depending on how many you have on hand in surplus, and when stored properly, can last a couple of months in the refrigerator. Additionally, if you roast off a large batch, once cooled, the tomatoes can be portioned off into freezer or vacuum bags and will last even longer in the freezer for use all winter.

When I roast my tomatoes, I usually throw in a couple of heads of garlic to roast as well. As my friend Brianne over at Sweet Cheeks in the Kitchen said: “Garlic. How I love you. Let me count the ways”. Roasted garlic, like the tomatoes, is a wonderful addition to really any dish. Once roasted, it keeps well, and has a wonderfully mellow flavor. I roasted one head with plain olive oil, and the second with white truffle oil, and they both turned out incredibly flavorful! Although the roasting process usually takes a couple of hours, the hands on time is quite minimal (good for a Sunday night roasting, so you can use them all week), and the end product is really worth the time.

For a beyond easy hors d’ oeuvres, toast up some baguette slices, spread on the roasted garlic, add a fresh basil leaf, top with a slice of roasted tomato, and voila!- instant satisfaction, and a treat that appeals to all, as it’s vegan friendly, but the meaty, robust flavor of the tomato more than compensates for the carnivores. You can even take it a step further and top it off with a little crumbled chevre or fresh mozzarella and pop it under the broiler to brown for a few minutes. Once cooled, I packed my tomato slices and garlic with a couple of sprigs of fresh picked basil, and we took it to the park for a snack with pita chips. There is nothing better than a treat that is simple, rich with flavor and easy to transport, and slow roasted tomatoes & garlic fit the bill perfectly!


Slow Roasted Tomatoes & Garlic

-Roma, Cherry or other fresh tomatoes
-2 or 3 Full heads of garlic
-Sea Salt
-Fresh Cracked Pepper
-Thyme sprigs
-Extra Virgin Olive oil (I recommend using a high quality oil here- given that the ingredient list is short, using top notch components will make a big difference. For a little more of a twist, a flavor infused oil, such as the white truffle oil I used on one the garlic heads)

Pre heat the oven to 225 degrees. Halve cherry tomatoes, or cut Romas into thirds or quarters. Cut off the top quarter of each head of garlic to expose all cloves. Arrange tomato slices and garlic on a baking sheet. Sprinkle tomatoes generously with sea salt, fresh pepper and olive oil. Lay thyme sprigs across the top of tomatoes. Drizzle olive oil over garlic heads, fully covering exposed garlic. Top with sea salt & pepper. Place baking sheet on the middle oven rack and roast, checking every 30 minutes or so. Depending on the size and moisture level of your tomatoes and the capacity of your oven, complete roasting should take between an hour and a half to two hours. To intensify the flavors, during the last 30 minute cycle, turn the oven up to 275 to draw out any additional moisture. When done, the tomatoes should have a rich red-brown color and appear dried around the edges, and the garlic should be “popping” out of its jacket. Remove pan from oven and let cool. If not using immediately, store tomatoes in a glass jar or dish with a tight fitting lid, covered by a layer of olive oil. Once cooled, the garlic cloves should slip right out of the skin, and can be left whole or made into a paste, and also stores well in a covered dish.

Tuesday, June 29, 2010

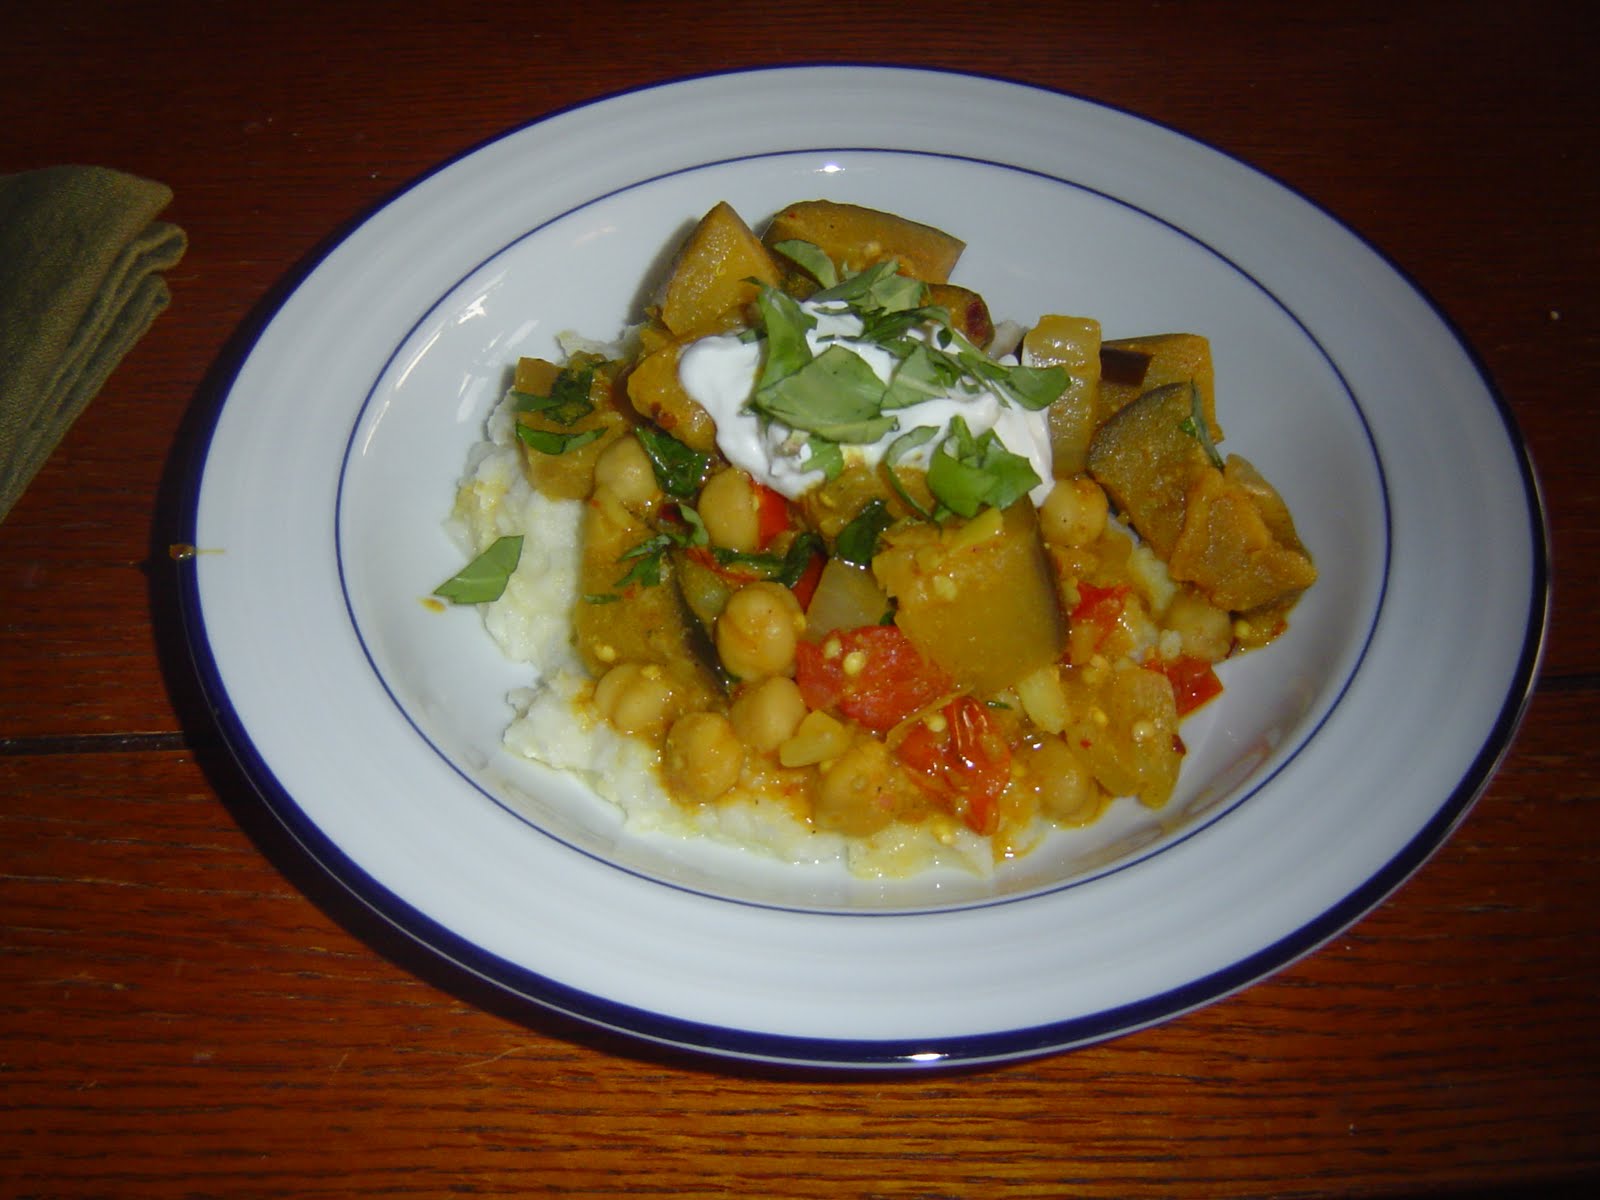
Curried Eggplant Delight

As we are now officially into the summer season, my menu planning takes a turn to lighter, more refreshing meals. I get a lot of daily recipe and cooking emails, and one such recent email fit the bill perfectly for using fresh summer produce, and employing fresh herbs from my windowsill. Real Simple is hands down one of my favorite magazines (I’ve been an avid reader and subscriber for the past two years), and a lot of their recipes ascribe to my cooking philosophy of keeping it simple (no surprise there!) in order to showcase the natural flavors of the ingredients. When the recipe for Curried Eggplant & Tomatoes with Basil popped up in my inbox, I knew it would be a smash success, and it was! I used the original recipe as a guide a tweaked for my own taste. My husband and I both really enjoyed it- the combination of eggplant and chickpeas made for a substantial vegetarian meal that left us both really satisfied. I used just a bit of light yogurt to add a little richness to the sauce, and the basil and curry played off of each other really well. Instead of serving it over rice (as suggested in RS’s recipe), we opted to use cauliflower mash, which cut out some of that heavy carb feeling and upped the veggie intake. I actually had the leftovers the next day for lunch, and the curry flavor was more saturated after a night in the fridge. It’s an easy weeknight meal to pull together, and I would even recommend serving it at a casual dinner party- it would be great for a homestyle dinner where large dishes are passed, and would go well with homemade pita chips on the side. All in all, a wildly tasty dish!

Curried Eggplant with Tomatoes and Basil
(Adapted from Real Simple, Cauliflower recipe my own)

For the Cauliflower Mash:
-1 Medium head of fresh cauliflower, broken into florets
-2 Tbspns salted butter (optional)
-2 Tbspns low fat Greek yogurt
-Sea salt & fresh cracked pepper

Steam cauliflower florets over boiling water in a vegetable steamer until fork tender. Remove from heat & transfer florets to a large bowl heatproof bowl. Add in butter & yogurt and mash using a handheld masher, stick blender or hand beaters until smooth. Season with salt & pepper to taste. Mash can be kept warm over a low simmering pot of water for up to 30 minutes. Give mash a good stir before plating.

For the Eggplant Curry:
-1 Large eggplant, about 1-1 ½ lbs. cut in 1 inch pieces
-1 Pint cherry tomatoes, halved
-1 Medium onion chopped (I recommend a sweet onion, such as Vidalia)
-3 Medium cloves of garlic, minced
-1 15.5-16oz Can of chickpeas, rinsed & drained
-3+ Tblspns good curry powder (I used Spice Island’s Spicy Curry Powder for a little extra kick)
-Good handful of fresh basil, chopped
- ¼ - ½ Cup of low fat Greek yogurt
-Olive oil
-Sea salt & fresh cracked pepper
-Red pepper flakes (optional)
- Couple tspns fresh cilantro, minced (optional)
-Crumbled goat cheese (optional)

In a large sauté pan or wok, heat a couple of tablespoons of olive oil over medium heat. Add onions and cook, stirring, until slightly translucent- about 3 minutes. Add in tomatoes and continue cooking for a few minutes, seasoning with salt & pepper. Add in eggplant, and cook until it begins to soften slightly about 5-7 minutes. Stir in garlic, curry powder and red pepper (if using), and cook another few minutes until fragrant (adjust curry powder to your personal taste, I tend to be a bit heavy handed personally). Add in chickpeas and about 1- 1 ½ cups of water and stir to combine all ingredients well. Simmer, stirring occasionally until vegetables are tender and chickpeas are heated through, about 15 minutes or so. Turn off heat, add in basil and yogurt and stir to combine well. Adjust salt & pepper seasoning to taste. Serve over cauliflower mash with chopped cilantro and goat cheese sprinkled on top.

Note: This dish would also be wonderful over brown rice, Israeli (or regular) couscous or any other hearty grain.

Tuesday, April 13, 2010

The Simplicity of Sauce

A good tomato sauce is the cornerstone of any cook’s repertoire. In addition to being the perfect go-to recipe on a busy night, a tomato sauce is the ideal way of showcasing your own personal flavor palate, which in the world of cooking is like a fingerprint. I make no claims to being of Italian lineage, and would never put my sauce up against an “authentic” version, as I think it all comes down to what you know, what you’ve grown up with and what satisfies your cravings.

Growing up, tomato sauce was a perpetual staple in our household- from quick weeknight meals filled with rehearsals and sports practices, to all day simmered pots of Chicken Cacciatore, there were always a half dozen cans of crushed tomatoes in our pantry. Both of my parents had a similar style to their basic sauce (one of my father’s first cooking jobs had been in the only Italian restaurant in Bangor), and it is what I have built my own off of. Many people might scoff that tomato sauce is too basic to be interesting or refined, but I would argue that its beauty is in its simplicity. Not only can you highlight wonderful seasonal vegetables in prime growing season, but you can also make a cold weather comfort food with good tinned tomatoes, and on the cheap!

This last evolution of sauce making was on a Friday night after a very busy week of work. Kyle was driving home from Kings Point after giving a talk to a group of officers, and I was charged with putting together something quick, and was less than motivated to hit the market, so I went with what I had on hand in the house. A few weeks back I had taken up container gardening, and had fresh basil and flat leaf parsley, which were perfect for balancing against the acidity of the tomatoes. The result was a comforting bowl of shared pasta on a relaxed Friday night. Although my sauce does differ from time to time, this is what I find to be my favorite unpretentious tomato sauce that can be made year round. I’m not a fan of adding tomato paste or sugar to my sauce, as I like it a little bit more loose and chunky, and if you’re using fresh tomatoes, you are going to more than likely have a sweet sauce. If you’ve got fresh tomatoes, herbs and any other vegetables, use them! When working with fresh as opposed to canned, use equal proportions of chopped fresh tomatoes, and just simmer a bit longer. Skinning and de-seeding is up to you, I leave it all in, as I’m a fan of a more rustic texture, and if you want to break down the flesh more, a handheld potato masher does the trick. In line with my cooking philosophy, if you use simple, fresh, great ingredients to start with, it’s hard to go wrong. It’s all about finding what works for your taste, and using what you’ve got.

Basic Tomato Sauce (easily doubled for freezing)

- 1 28oz. can of Pastene “Kitchen Ready” tomatoes (or any similar good quality)
- 3-4 tblspns Extra Virgin olive oil
- 3 cloves garlic, minced finely
- ½ of a sweet onion, halved and sliced thinly
- 4ish tblspns. Red wine (I used Merlot, as that was what I was sipping on after work)
- 3-4 tblspns minced fresh herbs (I had flat leaf parsley, basil and baby arugula on hand)
- Good sea salt & cracked black pepper
-1-2 tspns Crushed red pepper (optional)
In the base of a large pot or Dutch oven, heat olive oil over medium heat. Add in onions and sweat, stirring regularly so as not to brown, until translucent, about 4-5 minutes. Add in garlic and continue to stir for another minute or two. Add in tomatoes & stir to combine. Season with salt & pepper to taste, and crushed red pepper, if using. Stir in wine and allow sauce to come together over low heat for as long as possible. Depending on your desired thickness, you can add a little more wine, water, pasta water (if you’re cooking pasta to serve with sauce) or even stock to thin out a bit. About 5 minutes before serving, stir in fresh herbs (basil will turn brown if added to early), check seasonings and adjust if needed. Wonderful served over pasta, with grilled sausages, simply on toasted bread with olive oil.