Showing posts with label Simple. Show all posts
Tuesday, April 17, 2012
Mummy's Banana Bread
Good lord- has the early spring been crazy busy for everyone else, or is it just me??? They say that life with a baby can move at warp speed, but I really didn't think time could go by quite as quickly as it has been in the last few months- wow!
Just a quick update on our boy- Will is on the cusp of the nine month mark, and he continues to grow and amaze us every day. Having mastered crawling, he is on the move all the time these days, and I wouldn't be surprised if walking isn't too far away, since he lives to pull himself up on various items and use them to work on his stepping skills.
This baby update isn't just a shameless bragfest about my little fella, since as Will continues to grow and change, he has become a more adventurous eater (not surprising, given his genetic disposition!). As a result, I find myself with a renewed sense of motivation in the kitchen, and a I've started testing out various recipes with him to see what he's into. This new rebirth of my culinary endeavors has also been compounded by the fact that we purchased a share in a CSA (that's Community Supported Agriculture) through Covey Rise Farms started up last week, so I have been working to find new ways to bring out the wonderful produce we're getting from the program. We found out about the farm from their partner, Covey Rise Lodge, a fantastic hunter's paradise that my father-in-law discovered on a visit, and a place we keep going back to for a fun afternoon of clay shooting. So, be on the lookout in the future for posts highlighting our amazing CSA produce (as well as the stuff we're growing here in our backyard- check out The Humble Home), I'm really excited to see what the season brings!
One thing I've found that Will adores so far is my mother's banana bread recipe. I have long loved this wonderfully tasty bread, and you can imagine how thrilled I was to find out that Will was just as enthusiastic about it. It's a great way to use up bananas that have gone a little past peak, and the addition of Grapenuts gives the bread a wonderful texture and body with a subtle brightness from the lemon zest. The original recipe called for just white flour, but I've been subbing in 3/4 cup of whole wheat flour for a little added boost. I usually take the sugar down to about 1/2 a cup as opposed to the 2/3 cup the recipe calls for, but you can adjust to your taste.
For Will, I make these as mini muffins (omitting the nuts for his share, but adding it in for the 1/2 half), and it makes a perfect pan of 24 minis. They're a great size for him, and it's easy to throw a couple in a snack bag to take with us on adventures down to the park. Baked off as a loaf, the bread makes for a great hostess gift or contribution to a potluck. The bread also freezes well in either form, and is a sinch to throw together- this morning's batch I just whipped up while the boy was taking his morning snooze.
Big thanks again to my wonderful Mummy for this family favorite that has already made a friend in the newest generation of foodies!
Mummy's Banana Bread
- 1/3 Cup butter, softened
- 1/2-2/3 Cup sugar
- 3/4 Tspn lemon zest
- 1 Egg, beaten
- 1 3/4 Cups flour (I use 1 c. white a 3/4 cup whole wheat)
- 2 Tspn baking powder
- 1/4 Tspn baking soda
- 1/2 Tspn salt
- 1 Cup mashed banana
- 1/2 Cup chopped walnuts (optional)
- 1/2 Cup dried cranberries
- 1/2 Cup Grapenuts
* about 1/2 Cup milk
Preheat oven to 350. Cream together butter and sugar, add in lemon zest and egg. Sift dry ingredients together and stir into wet. Add in bananas and mix well. Add in nuts, cranberries and Grapenuts and mix well. Thin dough slightly with milk, until consistency is smooth, but still thick. Spoon into mini muffin or bread pan. Bake muffins for 30 mins, and bread for about 1 hour, or until a toothpick inserted in the middle comes out clean.
Labels:
Baked Goods,
Bread,
Breakfast,
Comfort Food,
Simple
Monday, January 9, 2012
Grapefruit Cake
As with many fellow bloggers, I vow to get more posts up this year, as last year had such an extreme (yet understandable) drop off in my postings with the birth of our darling son. Now that we are settled and moved in down here in sunny Louisiana, and our traveling should calm down for a while, I am going to hit the ground running!
When we returned from our holiday travels last week, we found a bag of beautiful, fresh grapefruit waiting for us on our doorstep. Our very charming elderly neighbor had left them from us, as he has a huge grapefruit tree out in his front yard. We've been enjoying the delicious fruits just as is, in smoothies and as fresh juice, but there were are still a few left that I wanted to find a way to use up. In keeping with my recent foray into Southern-inspired cooking, I remembered catching a broadcast of Paula Deen making a grapefruit cake, so I hopped online and found the recipe. While the cake recipe itself looked fantastic, I wasn't overly excited about the cream cheese frosting- which is a 180 from my usual behavior! Few are the times that I have turned down am opportunity to make (and eat!) cream cheese frosting, but for some reason the pairing didn't seem quite right on this one. The cake appeared to be light, fluffy and delicate in taste and texture, and I thought that the cream cheese frosting (and food coloring???) would weigh it down, so instead I went with a simple grapefruit glaze. I also doubled the amount of grapefruit juice and zest called for in the recipe, since I had an abundance of both, and the batter seemed a bit dry before I folded in the egg whites, so I just went for it.
The cake is wildly easy to put together (even for a novice/nervous baker such as myself), bakes up in about 25 minutes, and has a delightfully fluffy texture, much like an angel food cake. I thought the glaze was a perfect compliment to the clean flavor, and I'm thinking next time I might do supremes of ruby red grapefruit simmered in simple syrup to dress up the top a bit. Do follow Paula's advice, though and be sure to line your cake pan, as I thought I could get away with not doing it, and removing it was a bit dicey!
It's the perfect cake for tea, as a light desert, with a scoop of good vanilla ice cream, or really anytime- I'm enjoying a slice now while watching the BCS Championship and snuggling with the babe!
Gratuitous photo of my sous chef- doing a bang up job of being awesome.
Paula Deen's Grapefruit Cake (from pauladeen.com)
For the cake:
-1 1/2 Cup cake flour, sifted
-3/4 Cup sugar
-1 1/2 Tspn baking powder
-1/2 Tspn salt
-1/4 Cup water
-1/4 Cup vegetable oil
-1/2 Tspn fresh grated grapefruit zest (I used 1 Tblspn)
-3 Tblspn fresh squeezed grapefruit juice (I used about 6-7 Tblspns)
-3 Egg yolks
-3 Egg whites
-1/4 Tspn cream of tartar
-3/4 Cup sugar
-1 1/2 Tspn baking powder
-1/2 Tspn salt
-1/4 Cup water
-1/4 Cup vegetable oil
-1/2 Tspn fresh grated grapefruit zest (I used 1 Tblspn)
-3 Tblspn fresh squeezed grapefruit juice (I used about 6-7 Tblspns)
-3 Egg yolks
-3 Egg whites
-1/4 Tspn cream of tartar
For the glaze:
-2/3 Cup confectioners sugar, sifted
-3 Tblspns fresh squeeze grapefruit juice
-1 Generous tspn fresh grated grapefruit zest
Preheat oven at 350 degrees. Line cake pan with waxed paper and spray with nonstick oil.
Sift together flour, sugar, baking powder and salt into a mixing bowl. Make a well in the center for dry ingredients. Add water, oil, zest, grapefruit juice and egg yolks. Beat until smooth. Beat egg whites and cream of tartar separately until whites are stiff but not dry. Gradually fold egg whites into flour mixture with a rubber spatula until just blended. Do not stir the mixture.
Pour batter into prepared cake pan.
Bake for 25 minutes or until cake springs back when gently touched with a finger. Invert pan on cake rack to cool. Run spatula around edge of cake. Carefully remove from pan and place on platter.
Whisk together confectioners sugar, grapefruit juice and zest. Drizzle all over cake and allow to drip down sides.
Monday, November 7, 2011
Creole Red Beans & Rice
That's a big ol' pot of love, folks
Well, try my hardest, I didn't quite make my goal of getting a post up this weekend, alas! In part, I actually blame this recipe for my delay, since I was doing my best to take down an entire pot of this tasty Louisiana treat before the week- another goal I didn't quite get to. But I digress. Since moving down here and getting settled, I've been really excited to sample all the local flavors and start working on my own versions of them. So far, my favorite two have been red beans & rice and shrimp po'boys, both of which I have been tinkering with in the new Humble Kitchen (look for a Roasted Shrimp Po' Boy to be appearing soon!).
Much like a lot of the food that I love to cook and share, this Louisiana staple has its roots in necessity. Beans (either dried or tinned) are a very inexpensive staple, as is plain and simple rice. Naturally, red beans & rice is a great go-to dish that is wildly satisfying to the soul, and also a comfort to the wallet. Since I am now a stay at home mama, I am not only charged with taking care of our little love, but also taking care of my big love and making sure that they are both well-fed. The babe is pretty easy, so most of my food focus is on keeping Kyle and I well fed on a very tight budget. So after a little research (mostly on Epicurious and Food Network as well as the back of the bag of small red beans I purchased!) I started to piece together my recipe from what I had on hand, and what I could spend out of my budget. My method for rehydrating the beans was done somewhat out of error (I had meant to soak the beans overnight, but forgot the night before), but I think it still turned out very well, just be sure to start the beans early in the day if you plan on having them that night, or keep it simple and do an overnight soak.
I've got to take a moment and give a little respect to the guy manning the meat counter at our local Albertson's- not only was he incredibly knowledgeable about their offerings, he had a lot of great suggestions for how to use their various meats & fish offerings- very inspiring! It's amazing to walk into a run of the mill grocery store and be greeted by such a beautiful meat/fish counter with so many offerings from local sources, truly awesome!
I'm not sure exactly how "authentic" my red beans & rice came out to be, but I feel confident that it was a good representation of the local flavor. It's a great way to stretch your dollar and fill hungry bellies without feeling like you're skimping.
Red Beans & Rice (pieced together from sources noted above)
-1 lb bag of dried small red beans, picked over & rinsed
- 3/4 lbs fresh cajun sausage (Andouille works very well)
- 3 stalks of celery with leaves, washed & diced small
- 1/2 a sweet onion, diced small
- 3 cloves of garlic, minced fine
- 3 tbspns Creole seasoning (I used a mix of "Slap Ya Mama" and "Cajun Land")
- Louisiana hot sauce (I used Crystal "Extra Hot"), optional
- Sea salt & fresh cracked black pepper
- Olive oil
-1 cup long grain rice, prepared to package instructions
After picking over and rinsing beans well, combine with six cups of water and a hearty sprinkling of salt in a Dutch oven and bring to a boil. Lower temp to just barely simmering, cover almost full with lid (leaving a small opening for steam to escape), and leave beans to fully soften- about 1 1/2 to 2 hours, stirring occasionally. If liquid level drops below beans, add more water accordingly. When beans are fully cooked, mash about half the beans with a potato masher or a large wooden spoon- this will help thicken the liquid and give a great texture to the final product.
In a large saute pan over medium heat, add sausage and a little water (1/4" or so) and steam until sausage is cooked through (if working with pre-cooked sausage, skip this step). Remove sausage from pan and pour off water. When cool enough to handle, slice sausages into diagonal rounds. Return pan to stove, add a light coating of olive oil and saute sausage rounds until golden brown. Transfer sausage into Dutch oven with beans and stir to combine. Add a little more olive oil to the pan and saute celery and onion (1/2 a green pepper diced up is also a great addition if handy) until softened and onions become translucent but not brown. Add in garlic and continue to cook an additional 2-3 minutes until fragrant. Season vegetables with Creole seasonings to taste, and add into bean & sausage mixture. After combining all elements, check for seasoning and adjust accordingly, adding additional Creole seasoning, salt & pepper and hot sauce if using. Allow mixture to come together over low heat for a couple of hours if possible- the longer, the better!
To serve, ladle beans over servings of cooked white rice, and serve with hot sauce, ice cold beers and big hunks of french bread for sopping up the sauce.
Labels:
Beans,
Comfort Food,
Pantry items,
Sausage,
Simple
Friday, May 13, 2011
White Chocolate & Dried Cranberry Cookies
I’ve had this post half started for a couple of weeks now (what up, slacker), but somehow keep losing my train of thought, or get distracted by some sort of shiny object, whoops! I don’t have anything particularly earth shattering to say about how these cookies came about other than I had a pregnancy fueled cookie craving (or at least that’s what I’m blaming it on!), a giant bag of dried cranberries and some white chocolate chips on hand. Interestingly enough, I couldn’t find any recipes for cranberry-white chocolate cookies, so I went to the old standby- The Joy of Cooking- and scanned the cookie recipes for something that would fit what I was looking for. The recipe for White Chocolate Macadamia Nut Cookies had all the right things I was looking for and with a little modification for what I had on hand, I got the perfectly satisfying cookie I was looking for without having to leave the house to hit up the grocery store or bakery, and all was right in the world.
I’m a huge fan of the dried fruit/chocolate combination, and the tart, chewiness of the cranberries balanced very well with the smoothness of the white chocolate. I was happy that they also go the seal of approval from my husband (a true connoisseur of baked goods), as well as the boys at my all male office. I can usually tell when a baked good goes over well if the tin is empty before 1PM, and one of my bosses was sniffing around for extra cookies well before that time.
White Chocolate & Dried Cranberry Cookies
(recipe modified from The Joy of Cooking’s White Chocolate Macadamia Nut Cookies)
-- 2 ½ Cups all purpose flour
- 1 Tsp. baking soda
-- 1 Cup (2 sticks) butter, softened
-- 1 1/3 Cups organic white sugar
-- 2/3 Cup packed light brown sugar
-- 2 Large eggs
-- 1 Tsp. vanilla
-- 1 Cup dried cranberries
-- 1 Cup white chocolate morsels or coarsely chopped white chocolate
Pre-heat oven to 350. Line cookie sheets with parchment paper. Whisk together flour and baking soda. Set aside. In a large bowl, beat butter and both sugars until light and fluffy. Beat in eggs one at a time. Add in vanilla and mix well. Stir in dry ingredients until well incorporated. Add in cranberries and white chocolate. Spoon generous teaspoons of dough onto cookie sheets (about 1 ½ inches apart) and bake for 15-18 minutes. Transfer to wire rack to cool.
Labels:
Baked Goods,
Cookies,
Pantry items,
Simple
Monday, April 4, 2011
Black Walnut & Chocolate Chip Banana Cupcakes
Mmmmmm…fresh baked cupcakes. Is there really anything better? Ok, how about a good, healthy smear of homemade cream cheese frosting on top? Happiness? Yeah? Me too.
Prior to becoming pregnant, I had a minimal sweet tooth- a cookie here and there, the occasional small serving of ice cream or maybe a little cake on special holidays. Now that I’m encroaching on 3rd trimester, I find myself with ridiculous cravings for sweets- not all the time, but with enough frequency that I find myself wandering over to the kitchen cabinets and seeking out some satisfaction. Rather than pick up a box of store bought cookies or cupcakes, I’m trying to stick with treats I make at home. This way, I have to really think about the craving and decide whether or not it’s something I absolutely have to satisfy, or there is another way to stave off the beast. Home baked treats are also great, since I can pack up the second half of whatever I make and bring it into my office or send it to the ship with my husband, which not only keeps me from eating six cupcakes for dinner, but also wins me some points with the boss. Win-win in my book.
I have had a HUGE craving for cream cheese frosting for quite some time now, and finally caved late last week under the guise that I would be making the cupcakes for my husband who was coming back to port after being out to sea. Funny enough, he was so kind as to inform me over the weekend that he was not a huge cream cheese frosting fan. Whoops- more for me! I am a cream cheese frosting lunatic, and after a little playing with the proportions on the original recipe, I found my frosting nirvana by cutting back the powdered sugar, upping the vanilla and adding just a hint on nutmeg. Bliss!
I’m not sure that these little baked treats would completely qualify as cupcakes per se, as they are really more of a banana bread/muffin/cupcake hybrid, but I could not in good conscious refer to them as muffins after I layered on a heavy dose of cream cheese goodness. So, cupcakes it is! I picked up the base recipes for these insanely easy treats over on allrecipes.com, and tweaked it a bit with things that I had on hand for a really satisfying little treat. These could easily be converted back into the more healthy land of muffins by switching out some of the regular flour for whole wheat, trading the butter for applesauce, omitting the chocolate chips and forgoing the frosting (eek!). I’m sure the day will come when I’m interested in lightening them up, however, this was not that day!
Black Walnut & Chocolate Chip Banana Cupcakes with Cream Cheese Frosting
(original recipe here)
Makes 12
-1 1/2 Cups all-purpose flour
-1 Tspn baking powder
-1 Tspn baking soda
-1/2 Tspn salt
-3 Large bananas, mashed
-3/4 Cup organic sugar
-1 Large Egg
-1/3 Cup butter, melted
-1/3 Cup black walnuts, roughly chopped
-1/2 Cup dark chocolate chips
Preheat oven to 350 degrees. Line muffin pan(s) with liners. Sift together the flour, baking powder, baking soda, and salt- set aside. Combine bananas, sugar, egg, and melted butter in a large bowl. Fold in flour mixture, and mix lightly. Add in walnuts & chocolate chips and mix lightly until smooth (do not over-mix!) Scoop into muffin pans and transfer to oven. Bake for 25 to 30 minutes. Cakes should spring back when lightly tapped. Remove from oven, take out of muffin pans and let cool on a wire rack.
Cream Cheese Frosting
(original recipe here)
-1 8oz. Package of cream cheese, softened
-1/4 Cup butter (1/2 stick), softened
-3/4 Cups sifted confectioners' sugar
-1 Tspn vanilla extract
-1/2 Tspn fresh grated nutmeg (optional)
In a medium bowl, cream together the cream cheese and butter until creamy. Mix in the vanilla, then gradually stir in the confectioners' sugar and nutmeg.
Once cakes have cooled, coat well with frosting and enjoy!
Prior to becoming pregnant, I had a minimal sweet tooth- a cookie here and there, the occasional small serving of ice cream or maybe a little cake on special holidays. Now that I’m encroaching on 3rd trimester, I find myself with ridiculous cravings for sweets- not all the time, but with enough frequency that I find myself wandering over to the kitchen cabinets and seeking out some satisfaction. Rather than pick up a box of store bought cookies or cupcakes, I’m trying to stick with treats I make at home. This way, I have to really think about the craving and decide whether or not it’s something I absolutely have to satisfy, or there is another way to stave off the beast. Home baked treats are also great, since I can pack up the second half of whatever I make and bring it into my office or send it to the ship with my husband, which not only keeps me from eating six cupcakes for dinner, but also wins me some points with the boss. Win-win in my book.
I have had a HUGE craving for cream cheese frosting for quite some time now, and finally caved late last week under the guise that I would be making the cupcakes for my husband who was coming back to port after being out to sea. Funny enough, he was so kind as to inform me over the weekend that he was not a huge cream cheese frosting fan. Whoops- more for me! I am a cream cheese frosting lunatic, and after a little playing with the proportions on the original recipe, I found my frosting nirvana by cutting back the powdered sugar, upping the vanilla and adding just a hint on nutmeg. Bliss!
I’m not sure that these little baked treats would completely qualify as cupcakes per se, as they are really more of a banana bread/muffin/cupcake hybrid, but I could not in good conscious refer to them as muffins after I layered on a heavy dose of cream cheese goodness. So, cupcakes it is! I picked up the base recipes for these insanely easy treats over on allrecipes.com, and tweaked it a bit with things that I had on hand for a really satisfying little treat. These could easily be converted back into the more healthy land of muffins by switching out some of the regular flour for whole wheat, trading the butter for applesauce, omitting the chocolate chips and forgoing the frosting (eek!). I’m sure the day will come when I’m interested in lightening them up, however, this was not that day!
Black Walnut & Chocolate Chip Banana Cupcakes with Cream Cheese Frosting
(original recipe here)
Makes 12
-1 1/2 Cups all-purpose flour
-1 Tspn baking powder
-1 Tspn baking soda
-1/2 Tspn salt
-3 Large bananas, mashed
-3/4 Cup organic sugar
-1 Large Egg
-1/3 Cup butter, melted
-1/3 Cup black walnuts, roughly chopped
-1/2 Cup dark chocolate chips
Preheat oven to 350 degrees. Line muffin pan(s) with liners. Sift together the flour, baking powder, baking soda, and salt- set aside. Combine bananas, sugar, egg, and melted butter in a large bowl. Fold in flour mixture, and mix lightly. Add in walnuts & chocolate chips and mix lightly until smooth (do not over-mix!) Scoop into muffin pans and transfer to oven. Bake for 25 to 30 minutes. Cakes should spring back when lightly tapped. Remove from oven, take out of muffin pans and let cool on a wire rack.
Cream Cheese Frosting
(original recipe here)
-1 8oz. Package of cream cheese, softened
-1/4 Cup butter (1/2 stick), softened
-3/4 Cups sifted confectioners' sugar
-1 Tspn vanilla extract
-1/2 Tspn fresh grated nutmeg (optional)
In a medium bowl, cream together the cream cheese and butter until creamy. Mix in the vanilla, then gradually stir in the confectioners' sugar and nutmeg.
Once cakes have cooled, coat well with frosting and enjoy!
Labels:
Baked Goods,
Comfort Food,
Cupcakes,
Simple
Friday, February 4, 2011
Tomatoes and Garlic and Capers, Oh My!
Hi friends! I have been gone from the cooking and blogging realm for far too long (a fact I am painfully aware of!), but I am very excited to be jumping back in. For those that don’t already know, I have been hard at work on a new sort of baking project for the past few months- and it’s not a Sourdough starter... Yes, that’s right, I’m working on a baby!
Kyle and I were over the moon when we found out that we would be expecting our first child in July of this year, and had kept the news on the hush until we made it home to visit family and friends over the holiday season. Now that I am settling comfortably into my second trimester stride, my energy and appetite have both shot back up, and I am looking forward to getting back into the kitchen and working on some tasty ideas that have been bouncing around in my head!
With that news out of the way, let’s get down to the food. You'll have to be kind to me as I get back into the culinary groove, since I have been away for some time, and it usually takes me a little bit to get the creativity flowing again, so bear with me! After a couple of busy months of traveling, visiting friends and family, holidays and intermittent nausea battles, I was very excited to have a little quiet time at home last weekend. With all the traveling and being out of the apartment that we’ve done recently, the fresh produce was pretty much non-existent, so it took a few shopping trips/lists to get the kitchen up and running. For those that don’t live in the area, the weather has been terrible as of late, with weekly snow & ice storms that leave much to be desired, and have me craving warm & comforting food.
While out on one of my re-stocking adventures at the market, I spied veal cutlets on sale and quickly began throwing together ideas in my head. Roasted tomatoes and garlic scream comfort to me (see my opus to their awesomeness here), so I quickly put together a dish in my head that would be simple to make, and had leftovers that could be used again. I was super satisfied with the results, and found it to be equally comforting when used over the veal as well as when tossed with pasta. It’s not a wildly imaginative recipe, but it was a good first step back into cooking for me, and has already left me mulling over more new ideas in my head that should make their way here very soon.
My portions for the tomato “sauce” are for two servings, so if you’re like me and eating solo, you can save the 2nd half to be used for pasta later in the week. If you’re looking to have more leftover tomatoes or looking to feed a slightly larger crowd, you can easily double the amount called for.
Roasted Tomatoes, Garlic and Capers for Meat & Pasta
For Roasted Tomatoes:
- ½ pint organic grape tomatoes
- 5-6 cloves of garlic, skins intact
- ½ Spanish red onion, sliced thick
- 8 Large oil cured black olives
- 1 Tblspn of capers
- ¼ cup(ish) Good olive oil
- Sea salt & cracked pepper to taste
- 1 Tspn crushed red pepper (optional)
- 6 Fresh basil leaves, sliced thinly lengthwise
Preheat oven to 350 degrees. In an oven-proof pan or Dutch oven just large enough to hold ingredients, combine tomatoes, garlic, onion, olives and capers, and toss with olive oil until well coated. Season with salt, pepper and crushed red pepper. Place pan in oven for 53-50 minutes, or until tomatoes begin to pop, garlic has taken on rich caramel color, and onions have browned.
For Breaded Veal Cutlets (works well for chicken too!):
- Veal cutlets of medium thickness, pounded lightly (1 for each person, depending on size)
- ½ Cup all purpose flour, seasoned with salt & pepper
- 1 Large egg, beaten
- ½ Cup panko bread crumbs seasoned with salt, pepper & a little dried oregano
- 2-4 slices of fresh mozzarella
-Olive oil
Heat a non-stick frying pan over medium heat with a little olive oil to coat the bottom of the pan. Using the breading “assembly line” technique discussed here, dredge veal cutlets through flour, egg and panko, and place breaded cutlets directly into pre-heated pan (if cooking for more than 2 servings, do this in batches, as over-crowding your pan will cause an uneven distribution of heat, and cutlets will not brown as well). Cook cutlets 4-5 minutes per side, or a bit more depending on thickness, until cooked through and golden brown on the exterior. Remove fully cooked cutlets and place in an oven proof baking dish.
When tomatoes have fully roasted, remove from oven, switch oven off and turn on broiler to high. Transfer tomato mixture to the same pan used for sautéing veal and lightly sauté tomatoes over medium heat (this will help break up the roasted tomatoes a bit, creating a more saucy texture). While sauce heats, top each cutlet with a few slices of fresh mozzarella, place under broiler and broil until cheese is brown and bubbly. Remove from oven and transfer to serving plate. Spoon tomato mixture over cutlets, and top with fresh basil. Serve with a simple green salad and a loaf of rustic bread for a hearty meal.
Oh, hey baby!
Kyle and I were over the moon when we found out that we would be expecting our first child in July of this year, and had kept the news on the hush until we made it home to visit family and friends over the holiday season. Now that I am settling comfortably into my second trimester stride, my energy and appetite have both shot back up, and I am looking forward to getting back into the kitchen and working on some tasty ideas that have been bouncing around in my head!
With that news out of the way, let’s get down to the food. You'll have to be kind to me as I get back into the culinary groove, since I have been away for some time, and it usually takes me a little bit to get the creativity flowing again, so bear with me! After a couple of busy months of traveling, visiting friends and family, holidays and intermittent nausea battles, I was very excited to have a little quiet time at home last weekend. With all the traveling and being out of the apartment that we’ve done recently, the fresh produce was pretty much non-existent, so it took a few shopping trips/lists to get the kitchen up and running. For those that don’t live in the area, the weather has been terrible as of late, with weekly snow & ice storms that leave much to be desired, and have me craving warm & comforting food.
While out on one of my re-stocking adventures at the market, I spied veal cutlets on sale and quickly began throwing together ideas in my head. Roasted tomatoes and garlic scream comfort to me (see my opus to their awesomeness here), so I quickly put together a dish in my head that would be simple to make, and had leftovers that could be used again. I was super satisfied with the results, and found it to be equally comforting when used over the veal as well as when tossed with pasta. It’s not a wildly imaginative recipe, but it was a good first step back into cooking for me, and has already left me mulling over more new ideas in my head that should make their way here very soon.
My portions for the tomato “sauce” are for two servings, so if you’re like me and eating solo, you can save the 2nd half to be used for pasta later in the week. If you’re looking to have more leftover tomatoes or looking to feed a slightly larger crowd, you can easily double the amount called for.
Roasted Tomatoes, Garlic and Capers for Meat & Pasta
For Roasted Tomatoes:
- ½ pint organic grape tomatoes
- 5-6 cloves of garlic, skins intact
- ½ Spanish red onion, sliced thick
- 8 Large oil cured black olives
- 1 Tblspn of capers
- ¼ cup(ish) Good olive oil
- Sea salt & cracked pepper to taste
- 1 Tspn crushed red pepper (optional)
- 6 Fresh basil leaves, sliced thinly lengthwise
Preheat oven to 350 degrees. In an oven-proof pan or Dutch oven just large enough to hold ingredients, combine tomatoes, garlic, onion, olives and capers, and toss with olive oil until well coated. Season with salt, pepper and crushed red pepper. Place pan in oven for 53-50 minutes, or until tomatoes begin to pop, garlic has taken on rich caramel color, and onions have browned.
For Breaded Veal Cutlets (works well for chicken too!):
- Veal cutlets of medium thickness, pounded lightly (1 for each person, depending on size)
- ½ Cup all purpose flour, seasoned with salt & pepper
- 1 Large egg, beaten
- ½ Cup panko bread crumbs seasoned with salt, pepper & a little dried oregano
- 2-4 slices of fresh mozzarella
-Olive oil
Heat a non-stick frying pan over medium heat with a little olive oil to coat the bottom of the pan. Using the breading “assembly line” technique discussed here, dredge veal cutlets through flour, egg and panko, and place breaded cutlets directly into pre-heated pan (if cooking for more than 2 servings, do this in batches, as over-crowding your pan will cause an uneven distribution of heat, and cutlets will not brown as well). Cook cutlets 4-5 minutes per side, or a bit more depending on thickness, until cooked through and golden brown on the exterior. Remove fully cooked cutlets and place in an oven proof baking dish.
To Assemble:
When tomatoes have fully roasted, remove from oven, switch oven off and turn on broiler to high. Transfer tomato mixture to the same pan used for sautéing veal and lightly sauté tomatoes over medium heat (this will help break up the roasted tomatoes a bit, creating a more saucy texture). While sauce heats, top each cutlet with a few slices of fresh mozzarella, place under broiler and broil until cheese is brown and bubbly. Remove from oven and transfer to serving plate. Spoon tomato mixture over cutlets, and top with fresh basil. Serve with a simple green salad and a loaf of rustic bread for a hearty meal.
Using Leftover Sauce for Pasta:
Bring a pot of salted water to a boil over high heat. Drop in pasta & cook, following package directions. While pasta cooks, heat up leftover sauce in a small skillet, adding a little water, wine or chicken stock to loosen it up a bit. Once pasta has cooked, drop into skillet with sauce and toss to coat. Finish with a little grated or shredded parmesan and fresh basil. If you’ve got some leftover cooked off chicken breast, sausage, or really any protein, dice up and heat in with the sauce- it’s a great addition!
Monday, November 15, 2010
Chopped Mediterranean Salad
This recipe falls into the category of “whatever was on hand”, and turned out to be a hit! I had initially planned on making a simple green salad with olives, tomatoes and sweet onion to go with last weekend’s Polenta Lasagne, so I picked up a box of organic greens a few days before. A few minutes before the lasagne was due to exit the oven, I grabbed the salad fixins out of the refrigerator and set myself up for assembly. Let me just say, there is no disappointment worse in the kitchen than opening what you suspect to be perfect good produce only to find it is RUINED. Sad panda face. The greens were beyond salvage- slimy, limp and in the throes of decomposition. Being someone who doesn’t like to waste food, I reluctantly pitched the greens in questions and set about finding a suitable side dish on the fly.
With the other ingredients ready to play, I pilfered the fridge and windowsill for a couple of additions to bulk up the salad, and ended up with a very refreshing, crisp chopped salad that gave a great play of cool to the piping hot lasagne. The portions made enough for 3-4 sides and can be easily doubled. The salad would be best with super fresh produce, however the use of a light dressing and the fine chop on all the vegetables can help mask the lack of farm fresh vegetables in the off season. It’s also incredibly easy to throw together for a quick lunch or weeknight meal side or as an appetizer topping for bruschetta.
Chopped Mediterranean Salad
- 3 Plum tomatoes, chopped
- ½ English cucumber, chopped
- ¼ Vidalia onion, chopped
- 4 Kalamata Olives, chopped
- 4 Greek green olives, chopped
- 1/3 Cup crumbled feta
- Handful flat leaf Italian parsley, rough chopped
- 5-6 Basil leaves, chiffonade
- 3-4 Tblspns olive oil
- ½(ish) Tblspn balsamic or red wine vinegar
- Wedge of lemon
- Sea salt & fresh cracked black pepper
Comine all ingredients in a wide, low bowl and toss well to coat with olive oil & vinegar. Season to taste with salt & pepper, squeeze lemon over and toss again to incorporate. Allow to rest for 15 or so minutes before serving to allow vegetables time to marinate. Cover any leftovers tightly with plastic wrap & refrigerate. Salad will lose brightness after a day or two in the fridge, but is still very tasty!
If making ahead, combine all vegetables and herbs, but hold off on adding in oil & vinegar (this mixture can be made a day in advance if needed). Add o&v 15-30 minutes before serving, season with salt, pepper & lemon, and serve.
With the other ingredients ready to play, I pilfered the fridge and windowsill for a couple of additions to bulk up the salad, and ended up with a very refreshing, crisp chopped salad that gave a great play of cool to the piping hot lasagne. The portions made enough for 3-4 sides and can be easily doubled. The salad would be best with super fresh produce, however the use of a light dressing and the fine chop on all the vegetables can help mask the lack of farm fresh vegetables in the off season. It’s also incredibly easy to throw together for a quick lunch or weeknight meal side or as an appetizer topping for bruschetta.
Chopped Mediterranean Salad
- 3 Plum tomatoes, chopped
- ½ English cucumber, chopped
- ¼ Vidalia onion, chopped
- 4 Kalamata Olives, chopped
- 4 Greek green olives, chopped
- 1/3 Cup crumbled feta
- Handful flat leaf Italian parsley, rough chopped
- 5-6 Basil leaves, chiffonade
- 3-4 Tblspns olive oil
- ½(ish) Tblspn balsamic or red wine vinegar
- Wedge of lemon
- Sea salt & fresh cracked black pepper
Comine all ingredients in a wide, low bowl and toss well to coat with olive oil & vinegar. Season to taste with salt & pepper, squeeze lemon over and toss again to incorporate. Allow to rest for 15 or so minutes before serving to allow vegetables time to marinate. Cover any leftovers tightly with plastic wrap & refrigerate. Salad will lose brightness after a day or two in the fridge, but is still very tasty!
If making ahead, combine all vegetables and herbs, but hold off on adding in oil & vinegar (this mixture can be made a day in advance if needed). Add o&v 15-30 minutes before serving, season with salt, pepper & lemon, and serve.
Tuesday, November 9, 2010
Pumpkin Chocolate Chip Cookies
The cookies turned out beautifully- they baked up fluffy and full of flavor without being overly sweet or rich. I tend to like my cookies a bit more on the “cake-y” side, and these fit the bill perfectly. I ended up with about 30 cookies in the end, and they were just the right size for a little sweet satisfaction. In order to get a wider range of opinions, I brought in a tin to work and shared them with my neighbor, and they were well received by all participants, including my darling husband! In fact, they were so good (and simple!) I whipped up another batch on Sunday afternoon to help cope with the stinging loss my Patriots endured at the hands of the Browns (no, I do not want to talk about it, thanks), and they were extremely comforting, leaving the delicious aroma of fall hanging in the apartment for the next little while.
PS- Congratulations to Brianne and her husband on the birth of their beautiful son, Abe last week! There is no doubt in my mind that he will be fiercely loved, widely celebrated and well fed! ;-)
Pumpkin Chocolate Chip Cookies
From Brianne over on Sweet Cheeks in the Kitchen
- 2 ½ Cups flour
- 1 Tspn baking soda
- 1 Tspn baking powder
- 1 Tspn cinnamon
- 1 Tspn nutmeg
- ½ Tspn salt
- 1 ½ Cups organic sugar
- 1 Stick butter, softened
- 1 Full cup canned pumpkin
- 1 Large egg
- 1 Tspn vanilla
- 1 Cup chocolate chips, semi sweet or dark work well
-3 Tblspns organic sugar combined w/ 1 tspn pumpkin pie spice, for dusting (optional)
Preheat oven to 350. Grease or line two baking sheets.
Combine the dry ingredients in a medium bowl. Beat together the sugar and butter until well blended. Add in pumpkin, egg and vanilla, beat until smooth. Gradually add in the dry mixture. Stir in the chocolate chips.
Monday, October 25, 2010
Hungarian Mushroom Soup
My first taste of Hungarian Mushroom soup was back in college at the beloved Feasts of Reason in Chestertown, Maryland. Although it’s been years since I enjoyed a perfect roast beef sandwich on their fresh baked baguette with blue cheese mayonnaise (do I have your attention?) and a cup of their soup, my love affair with the soup continues.
I started working out a recipe for my own version of this soup years ago in my collegiate kitchen back on High Street, and it has maintained top billing in my mental rolodex. In the early stages, I would use condensed Golden Mushroom Soup as my base, and as my comfort in the kitchen grew, I traded in the soup base for fresh made roux to achieve the creamy base.
When Kyle and I were first living together, I remember mentioning having a craving for the soup one fall, and his eyes instantly lit up. Having lived in Hungary briefly years ago, Kyle has always been a big fan of the country’s flavors. It is a warm, comforting and creamy soup that will chase out the chill from any October evening. The ingredient list is relatively simple, and as such it’s great for feeding a large group without spending an exorbitant amount on the makings. If you’ve got it on hand, smoked paprika adds a wonderful depth of flavor, and a little Hot Hungarian paprika sprinkled on top before serving brings another element to the finished product. If you making the soup for a meatless crowd, a dark vegetable stock will work just as well as beef stock, just be sure to omit the Worcestershire
Paired with a loaf of crusty rustic bread, a spicy arugula salad and full bodied red and you’ve got the recipe for a perfect fall night in with friends. This recipe could easily serve 6 for a main course, and freezes well once cooled.
Hungarian Mushroom Soup
- 16 oz. Baby Bella mushrooms, cleaned and sliced
- 1 Medium Vidalia onion, quartered & sliced thinly
- 2 Garlic cloves, minced
- 40 oz. Good quality beef or dark vegetable stock (homemade is best)
- 1 Tbspn. olive oil
- 1 Stick salted butter
- ½ish Cup all purpose flour
- 8oz. Sour cream
- 8oz. Milk
- 4 Tbspn. dried dill
- 2 Tbspn. smoked paprika
- 1 Tbspn. regular paprika (if you don’t have smoked paprika, just substitute regular for both)
- Sea salt & fresh cracked pepper
- 1-2 Tbspns. Worcestershire sauce
- Chopped flat leaf parsely (optional)
- Hungarian hot paprika (optional)
In a small sauce pan, melt ¾ stick of butter over medium heat. Add in flour a little at a time and whisk to combine until a stiff roux consistency is reached. Continue cooking 5-10 minutes or until roux turns golden and flour is cooked down. Take off heat & set aside. Heat remaining butter and olive oil in the bottom of a large Dutch oven or soup pot over medium heat. Add in mushrooms and cook, stirring occasionally until mushrooms begin to release moisture, about 5-7 minutes. Add in sliced onions & cook an additional 5-7 minutes until onions become translucent. Add in minced garlic & cook 2-3 minutes until garlic is fragrant, but not browned. Season with salt & pepper to taste before adding dill and paprika, stirring well to incorporate and cook for an additional 2-3 minutes or until spices are well blended into vegetables. Once the mixture is well integrated, add in beef/vegetable stock and leave pot to come up to a low rolling boil. Once soup has reached a boil, mix roux into broth (see my note on a helpful technique at the bottom of this recipe), and continue mixing until a gravy- like texture is reached (you may not have to use all of the roux. Once all roux has diluted into the stock & the consistency is smooth, turn stove to low, add in milk & Worcestershire and mix well. Slowly add in sour cream until fully dissolved and texture is that of heavy cream-if too thick, add in a little more milk- and adjust salt & pepper seasoning as needed. Serve garnished with a little extra Hungarian hot paprika, chopped parsley or a dollop of sour cream.
I started working out a recipe for my own version of this soup years ago in my collegiate kitchen back on High Street, and it has maintained top billing in my mental rolodex. In the early stages, I would use condensed Golden Mushroom Soup as my base, and as my comfort in the kitchen grew, I traded in the soup base for fresh made roux to achieve the creamy base.
When Kyle and I were first living together, I remember mentioning having a craving for the soup one fall, and his eyes instantly lit up. Having lived in Hungary briefly years ago, Kyle has always been a big fan of the country’s flavors. It is a warm, comforting and creamy soup that will chase out the chill from any October evening. The ingredient list is relatively simple, and as such it’s great for feeding a large group without spending an exorbitant amount on the makings. If you’ve got it on hand, smoked paprika adds a wonderful depth of flavor, and a little Hot Hungarian paprika sprinkled on top before serving brings another element to the finished product. If you making the soup for a meatless crowd, a dark vegetable stock will work just as well as beef stock, just be sure to omit the Worcestershire
Paired with a loaf of crusty rustic bread, a spicy arugula salad and full bodied red and you’ve got the recipe for a perfect fall night in with friends. This recipe could easily serve 6 for a main course, and freezes well once cooled.
Hungarian Mushroom Soup
- 16 oz. Baby Bella mushrooms, cleaned and sliced
- 1 Medium Vidalia onion, quartered & sliced thinly
- 2 Garlic cloves, minced
- 40 oz. Good quality beef or dark vegetable stock (homemade is best)
- 1 Tbspn. olive oil
- 1 Stick salted butter
- ½ish Cup all purpose flour
- 8oz. Sour cream
- 8oz. Milk
- 4 Tbspn. dried dill
- 2 Tbspn. smoked paprika
- 1 Tbspn. regular paprika (if you don’t have smoked paprika, just substitute regular for both)
- Sea salt & fresh cracked pepper
- 1-2 Tbspns. Worcestershire sauce
- Chopped flat leaf parsely (optional)
- Hungarian hot paprika (optional)
In a small sauce pan, melt ¾ stick of butter over medium heat. Add in flour a little at a time and whisk to combine until a stiff roux consistency is reached. Continue cooking 5-10 minutes or until roux turns golden and flour is cooked down. Take off heat & set aside. Heat remaining butter and olive oil in the bottom of a large Dutch oven or soup pot over medium heat. Add in mushrooms and cook, stirring occasionally until mushrooms begin to release moisture, about 5-7 minutes. Add in sliced onions & cook an additional 5-7 minutes until onions become translucent. Add in minced garlic & cook 2-3 minutes until garlic is fragrant, but not browned. Season with salt & pepper to taste before adding dill and paprika, stirring well to incorporate and cook for an additional 2-3 minutes or until spices are well blended into vegetables. Once the mixture is well integrated, add in beef/vegetable stock and leave pot to come up to a low rolling boil. Once soup has reached a boil, mix roux into broth (see my note on a helpful technique at the bottom of this recipe), and continue mixing until a gravy- like texture is reached (you may not have to use all of the roux. Once all roux has diluted into the stock & the consistency is smooth, turn stove to low, add in milk & Worcestershire and mix well. Slowly add in sour cream until fully dissolved and texture is that of heavy cream-if too thick, add in a little more milk- and adjust salt & pepper seasoning as needed. Serve garnished with a little extra Hungarian hot paprika, chopped parsley or a dollop of sour cream.
Labels:
Comfort Food,
Mushrooms,
Simple,
Soup,
Veggies
Friday, October 15, 2010
Curry Roasted Cauliflower with Crispy Chickpeas
I started messing around with different cauliflower recipes a couple of years ago, but the two I continue to go back two are either mashed (a favorite in Kyle’s family) or roasted. Roasted cauliflower is so simple and is ready quickly, which makes it perfect for any weeknight or a quick snack. Normally I just break apart a head a cauliflower, toss with a little salt, pepper and olive oil and roast off in the oven for half an hour or so. I love the way it gets crispy, but retains most of its shape, and is great for dipping. I’ve been on a curry kick for the past year or so, and I’ll usually make a quick curry dipping sauce (as in spicy curry powder and mayo or sour cream) to go alongside.
While tooling around on Epicurious I stumbled over a recipe for Spice-Roasted Chickpeas that really spoke to me. I am a huge fan of chickpeas in almost any application. My one grievance is on occasion they tend to get really soggy if out on a salad bar. I love the creamy texture of hummus, and the crunch of roasted wasabi peas, and spice roasted garbanzos sounded like the perfect middleman.
I started thinking about ways to roast the chickpeas and cauliflower together, and the end result was a mutant dish with so much flavor, I had to restrain myself from not eating it all in one sitting. Mixing the curry powder in with the oil gave the dish a lovely bright color, and helped spread the seasoning evenly over all components. The pine nuts were a last minute gamble, and I loved the secondary crunch they brought in addition to the chickpeas.
I ended up serving this alongside some outstanding striped bass Ky provided for dinner with a friend, and the combination was a knockout. Kyle had originally told me we had might have a last minute addition to dinner, and concerned that we wouldn’t have enough of the side, I par boiled off a couple of red potatoes and tossed in with the cauliflower-chickpea mixture (I had roasted it off the night before with plans to heat before dinner), and it was a great addition and budget friendly way to stretch the dish. I will for sure be making this on a pretty regular basis- no lie, I have the fixins in the apartment now, and plan on whipping it up over the weekend. My only point of caution would be to make sure that your chickpeas are as dry as humanly possible- drained in a colander after rinsing and pressed between two kitchen towels seemed to do the trick. Just make sure you have a good size batch made up, as it will develop legs quickly!
Curry Roasted Cauliflower with Crispy Chickpeas (morphed from here and here on Epicurious)
- 2 lbs. Cauliflower, stemmed & broken into florets
- 15oz. can Chickpeas, rinsed, drained & well dried
- ¼ - ½ Cup extra virgin olive oil
- 1 tspn. Cayenne pepper
- 2 Cloves garlic, well minced
- 4 tbspn. Pine nuts
- 3(ish) tbspns. Spicy curry powder
- 2 tspn. Hungarian hot paprika (optional)
- Sea salt & fresh cracked pepper to taste
- Handful fresh cilantro, chopped
Preheat oven to 450 degrees. In a large bowl, mix olive oil, pine nuts, garlic & all spices until well combined. Toss cauliflower & chickpeas with oil to coat and season with salt & pepper to taste. Spread evenly onto high lipped sheet pan in one layer. Roast off in oven for 35-25 minutes, until cauliflower is well browned & chickpeas are crispy. Stir occasionally throughout roasting time. Remove from oven, let cool for a few minutes & transfer to a large serving bowl. Sprinkle with chopped cilantro and serve warm or at room temperature. Great as a side, over greens or as a snack.
While tooling around on Epicurious I stumbled over a recipe for Spice-Roasted Chickpeas that really spoke to me. I am a huge fan of chickpeas in almost any application. My one grievance is on occasion they tend to get really soggy if out on a salad bar. I love the creamy texture of hummus, and the crunch of roasted wasabi peas, and spice roasted garbanzos sounded like the perfect middleman.
I started thinking about ways to roast the chickpeas and cauliflower together, and the end result was a mutant dish with so much flavor, I had to restrain myself from not eating it all in one sitting. Mixing the curry powder in with the oil gave the dish a lovely bright color, and helped spread the seasoning evenly over all components. The pine nuts were a last minute gamble, and I loved the secondary crunch they brought in addition to the chickpeas.
I ended up serving this alongside some outstanding striped bass Ky provided for dinner with a friend, and the combination was a knockout. Kyle had originally told me we had might have a last minute addition to dinner, and concerned that we wouldn’t have enough of the side, I par boiled off a couple of red potatoes and tossed in with the cauliflower-chickpea mixture (I had roasted it off the night before with plans to heat before dinner), and it was a great addition and budget friendly way to stretch the dish. I will for sure be making this on a pretty regular basis- no lie, I have the fixins in the apartment now, and plan on whipping it up over the weekend. My only point of caution would be to make sure that your chickpeas are as dry as humanly possible- drained in a colander after rinsing and pressed between two kitchen towels seemed to do the trick. Just make sure you have a good size batch made up, as it will develop legs quickly!
Curry Roasted Cauliflower with Crispy Chickpeas (morphed from here and here on Epicurious)
- 2 lbs. Cauliflower, stemmed & broken into florets
- 15oz. can Chickpeas, rinsed, drained & well dried
- ¼ - ½ Cup extra virgin olive oil
- 1 tspn. Cayenne pepper
- 2 Cloves garlic, well minced
- 4 tbspn. Pine nuts
- 3(ish) tbspns. Spicy curry powder
- 2 tspn. Hungarian hot paprika (optional)
- Sea salt & fresh cracked pepper to taste
- Handful fresh cilantro, chopped
Preheat oven to 450 degrees. In a large bowl, mix olive oil, pine nuts, garlic & all spices until well combined. Toss cauliflower & chickpeas with oil to coat and season with salt & pepper to taste. Spread evenly onto high lipped sheet pan in one layer. Roast off in oven for 35-25 minutes, until cauliflower is well browned & chickpeas are crispy. Stir occasionally throughout roasting time. Remove from oven, let cool for a few minutes & transfer to a large serving bowl. Sprinkle with chopped cilantro and serve warm or at room temperature. Great as a side, over greens or as a snack.
Thursday, September 16, 2010
A True Lunch Break
Almost every day, I bring my lunch to work from home. Usually it consists of leftovers from a previous meal, and a lot of times it takes shape in the form of a salad. I do my best to keep my lunches relatively light and satisfying, since there is nothing worse than sitting at your desk feeling the creeping onset of a food coma- especially when your desk lacks any sort of privacy from the rest of the office! It also may sound a little silly, but I enjoy taking a few minutes to “time out” from my daily tasks and actually enjoy my lunch whenever possible- I bring cutlery from home, stash a cloth napkin in my work bag, and make an attempt to actually have a lunch break as opposed to wolfing down some non-descript take out item while scanning over spec sheets (not that this doesn’t happen on occasion!).
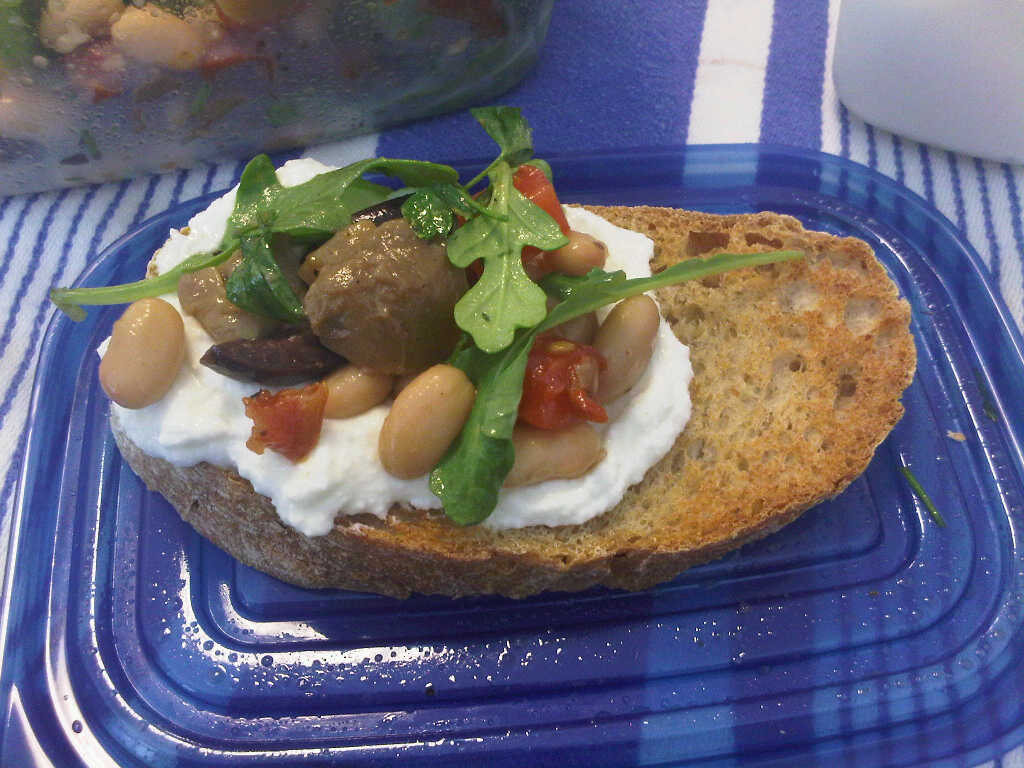
During my massive re-nesting/cooking marathon of the past weekend, I was attempting to figure out a way to combine items I had on hand that I could stretch out over a couple of lunches that was a little outside of my usual routine. I get daily email newsletters from one of my favorite publications, Real Simple, and I remembered seeing a tomato & garbanzo salad that had looked appealing, and decided to play off of the concept. I had made a HUGE batch of Slow Roasted Tomatoes & Garlic on Sunday (I really should not be allowed to go to the Farmer’s Market without adult supervision!) and I had done a long drag through the market’s olive bar- one of my favorite destinations- and had picked up some olives and balsamic marinated mushrooms. I swapped out the garbanzos for Cannellini beans, which I had on hand, and the end result was a perfect salad for lunch- packed with protein, tasty veggies and loads of flavor. I was able to get three full lunches out of the mixture, and will definitely be making it again. By using the slow roasted tomatoes, the salad can be made year round, since the roasting will get rid of any mealy texture or less flavorful tomatoes in the off-season. When fresh tomatoes are in season, adding ½ a rough chopped fresh tomato brings and interesting and appealing play on flavors in the two tomato style. The salad would also make for a great hors d’ oeuvres applying the same concept- allow guests to build their own bruschetta with toasted bread, ricotta, baby arugula (baby spinach works well also) and the bean salad- wildly easy, and a perfect flavor combination.
The longer the salad sits, the better, so I would recommend starting this the night before, and dividing it up in the morning, so the beans have a chance to meld with the other flavors, and the arugula will remain crisp until lunch time. If you’re looking for a single container lunch, omit the side of ricotta cheese and toss in some cubed feta with the salad. This salad is a great way to implement simple ingredients into a very satisfying meal using minimal prep time and effort.
Bellissimo White Bean Salad
(Recipe makes enough for 3 lunches, 2 dinners or as an hors d’oeuvres for a crowd)
- 1 Can Cannellini beans, rinsed & drained
- 6 Slices Slow Roasted Tomatoes, rough chopped
- 3 Cloves Roasted Garlic, chopped (garlic will break down when combined into salad)
- ½ Ripe Roma tomato, diced
- 6 Olives, pitted & quartered (I used kalamata and Moroccan green)
- 6 Marinated mushrooms, quartered
-2 Tbspn fresh Italian parsley, chopped
- Fresh baby Arugula
- Cracked black pepper & sea salt
- Basil leaves (3-4 per serving)
- Part skim Ricotta cheese (1/4 cup per serving)
- 1Tspn. fresh grated lemon zest (per serving)
- Sliced rustic bread (2 slices per serving)
In a good sized container, combine beans, tomatoes, garlic, parsley, olives and mushrooms. Add a little of the oil from the roasted tomatoes and season with salt & pepper to taste. Mix ingredients well, cover and refrigerate overnight if possible before dividing.
Chiffonade basil leaves by stacking leaves into a neat pile, roll lengthwise and slice into thin rounds. Separate the ribbons with fingers & combine with ricotta & lemon zest in a small sealable container.
When dividing for lunches, place approx ¾ cup of bean salad into a sealable container and top with a hearty handful of baby Arugula (placing on top will prevent rapid wilting) and seal. Pack ricotta mixture & bread separately, and when ready assemble into lunch portion bruschetta and take a few minutes to relax and enjoy.
Tuesday, August 31, 2010
Slow Roasted Goodness
August- where did you go?! It’s hard to believe tomorrow is September 1st, I feel like this summer flew by, as most of them do. In a way, I am glad August passed so quickly, as it was a long six weeks of waiting for Kyle to come back from sea. The ship made it back safely into its homeport this past Saturday, and we spent the weekend celebrating his return all over Newport (I’ll be posting an update of our adventures over on The Humble Home later). It’s been absolutely awesome to have him home, and I’m doing my best to not think about him heading back out to sea again after Labor Day weekend.
Last week I hit up the local farmer’s market and bought a HUGE sack of Roma tomatoes- I think I was so excited about fresh tomatoes, that I got a little ahead of myself! While I did my best to get through as many as possible, I knew I would have to use up the rest before they turned. I adore slow roasted tomatoes, as it is a very simple and delicious way of prolonging the enjoyment of your tomatoes while concentrating the flavor. There really is no limit to the application of slow roasted tomatoes- over pasta, grilled meats, on toasted bagels or sandwiches, blended in with hummus, or just as is with a little fresh basil (my favorite application!). The tomatoes can be roasted off in large or small batches, depending on how many you have on hand in surplus, and when stored properly, can last a couple of months in the refrigerator. Additionally, if you roast off a large batch, once cooled, the tomatoes can be portioned off into freezer or vacuum bags and will last even longer in the freezer for use all winter.
When I roast my tomatoes, I usually throw in a couple of heads of garlic to roast as well. As my friend Brianne over at Sweet Cheeks in the Kitchen said: “Garlic. How I love you. Let me count the ways”. Roasted garlic, like the tomatoes, is a wonderful addition to really any dish. Once roasted, it keeps well, and has a wonderfully mellow flavor. I roasted one head with plain olive oil, and the second with white truffle oil, and they both turned out incredibly flavorful! Although the roasting process usually takes a couple of hours, the hands on time is quite minimal (good for a Sunday night roasting, so you can use them all week), and the end product is really worth the time.
Slow Roasted Tomatoes & Garlic
-Roma, Cherry or other fresh tomatoes
-2 or 3 Full heads of garlic
-Sea Salt
-Fresh Cracked Pepper
-Thyme sprigs
-Extra Virgin Olive oil (I recommend using a high quality oil here- given that the ingredient list is short, using top notch components will make a big difference. For a little more of a twist, a flavor infused oil, such as the white truffle oil I used on one the garlic heads)
Pre heat the oven to 225 degrees. Halve cherry tomatoes, or cut Romas into thirds or quarters. Cut off the top quarter of each head of garlic to expose all cloves. Arrange tomato slices and garlic on a baking sheet. Sprinkle tomatoes generously with sea salt, fresh pepper and olive oil. Lay thyme sprigs across the top of tomatoes. Drizzle olive oil over garlic heads, fully covering exposed garlic. Top with sea salt & pepper. Place baking sheet on the middle oven rack and roast, checking every 30 minutes or so. Depending on the size and moisture level of your tomatoes and the capacity of your oven, complete roasting should take between an hour and a half to two hours. To intensify the flavors, during the last 30 minute cycle, turn the oven up to 275 to draw out any additional moisture. When done, the tomatoes should have a rich red-brown color and appear dried around the edges, and the garlic should be “popping” out of its jacket. Remove pan from oven and let cool. If not using immediately, store tomatoes in a glass jar or dish with a tight fitting lid, covered by a layer of olive oil. Once cooled, the garlic cloves should slip right out of the skin, and can be left whole or made into a paste, and also stores well in a covered dish.
Last week I hit up the local farmer’s market and bought a HUGE sack of Roma tomatoes- I think I was so excited about fresh tomatoes, that I got a little ahead of myself! While I did my best to get through as many as possible, I knew I would have to use up the rest before they turned. I adore slow roasted tomatoes, as it is a very simple and delicious way of prolonging the enjoyment of your tomatoes while concentrating the flavor. There really is no limit to the application of slow roasted tomatoes- over pasta, grilled meats, on toasted bagels or sandwiches, blended in with hummus, or just as is with a little fresh basil (my favorite application!). The tomatoes can be roasted off in large or small batches, depending on how many you have on hand in surplus, and when stored properly, can last a couple of months in the refrigerator. Additionally, if you roast off a large batch, once cooled, the tomatoes can be portioned off into freezer or vacuum bags and will last even longer in the freezer for use all winter.
When I roast my tomatoes, I usually throw in a couple of heads of garlic to roast as well. As my friend Brianne over at Sweet Cheeks in the Kitchen said: “Garlic. How I love you. Let me count the ways”. Roasted garlic, like the tomatoes, is a wonderful addition to really any dish. Once roasted, it keeps well, and has a wonderfully mellow flavor. I roasted one head with plain olive oil, and the second with white truffle oil, and they both turned out incredibly flavorful! Although the roasting process usually takes a couple of hours, the hands on time is quite minimal (good for a Sunday night roasting, so you can use them all week), and the end product is really worth the time.
For a beyond easy hors d’ oeuvres, toast up some baguette slices, spread on the roasted garlic, add a fresh basil leaf, top with a slice of roasted tomato, and voila!- instant satisfaction, and a treat that appeals to all, as it’s vegan friendly, but the meaty, robust flavor of the tomato more than compensates for the carnivores. You can even take it a step further and top it off with a little crumbled chevre or fresh mozzarella and pop it under the broiler to brown for a few minutes. Once cooled, I packed my tomato slices and garlic with a couple of sprigs of fresh picked basil, and we took it to the park for a snack with pita chips. There is nothing better than a treat that is simple, rich with flavor and easy to transport, and slow roasted tomatoes & garlic fit the bill perfectly!
Slow Roasted Tomatoes & Garlic
-Roma, Cherry or other fresh tomatoes
-2 or 3 Full heads of garlic
-Sea Salt
-Fresh Cracked Pepper
-Thyme sprigs
-Extra Virgin Olive oil (I recommend using a high quality oil here- given that the ingredient list is short, using top notch components will make a big difference. For a little more of a twist, a flavor infused oil, such as the white truffle oil I used on one the garlic heads)
Pre heat the oven to 225 degrees. Halve cherry tomatoes, or cut Romas into thirds or quarters. Cut off the top quarter of each head of garlic to expose all cloves. Arrange tomato slices and garlic on a baking sheet. Sprinkle tomatoes generously with sea salt, fresh pepper and olive oil. Lay thyme sprigs across the top of tomatoes. Drizzle olive oil over garlic heads, fully covering exposed garlic. Top with sea salt & pepper. Place baking sheet on the middle oven rack and roast, checking every 30 minutes or so. Depending on the size and moisture level of your tomatoes and the capacity of your oven, complete roasting should take between an hour and a half to two hours. To intensify the flavors, during the last 30 minute cycle, turn the oven up to 275 to draw out any additional moisture. When done, the tomatoes should have a rich red-brown color and appear dried around the edges, and the garlic should be “popping” out of its jacket. Remove pan from oven and let cool. If not using immediately, store tomatoes in a glass jar or dish with a tight fitting lid, covered by a layer of olive oil. Once cooled, the garlic cloves should slip right out of the skin, and can be left whole or made into a paste, and also stores well in a covered dish.
Labels:
Appetizers,
Herbs,
Simple,
Tomato,
Vegetarian
Subscribe to:
Posts (Atom)