Showing posts with label Veggies. Show all posts

Monday, April 18, 2011

Shrimp & Grits with Mushrooms, Leeks and Bacon

I am in love with the fact that second trimester has not only been extremely kind to my body, but has also marked the triumphant return of my insatiable appetite! While I have to pace out my eating a little more with smaller meals every couple of hours as opposed to plowing through a couple of giant sittings, I am thrilled to be enjoying pretty much all of the things that I love that caused for some rumblings early on in the pregnancy.

Our impending move South now only a matter of months away (five actually, woah!) combined with the slow arrival of more spring-like weather has me craving seafood. What better way to satisfy my cure something from the briny deep and prepare for Southern living than to try my hand at Shrimp & Grits! After cautiously easing into the Southern staple a few postings ago, I felt confident to take it on again.

When we first moved to town and I was on the hunt for a job, I decided to volunteer my time at the library of a local yacht school in an effort to meet some people and do something positive with my idle hands. Although I no longer volunteer there, I met Jill, one of my favorite people in Newport. About once a week after our shifts at the library we would wander down to The Pier, a restaurant just behind the library and enjoy their ½ price happy hour appetizers and drinks. It was always a great excuse to relax and gossip (as if we hadn’t already done that enough!), and we would occasionally drag our husbands along with us. Being a creature of habit, I would almost always order their Shrimp & Grits, and this recipe is based off of The Pier’s take on this classic dish. So while I am not yet immersed in the Southern culture, I feel myself getting more and more excited to enjoy all of the flavors that Louisiana has to offer, and to taste this classic comfort food as prepared by the folks that put it on the map!

It’s a pretty simple dish to pull together, and I recommend frying off your bacon first while you cook the grits (as I mentioned in my last post about grits, they’re pretty resilient and can hang out on a very low burner for a while), then putting together your mushroom & leek sauté and finishing up with the shrimp to ensure that they don’t overcook. This recipe could easily serve four for dinner with a big green salad and a crisp white wine- I made it for just the two of us, and we had the second half the next night.


Shrimp & Grits with Mushrooms, Leek and Bacon (as inspired by The Pier)

For the Grits:

Depending on the type of grits you are using, follow package instructions for four servings, or use my directions posted here, omitting the ricotta, parmesan and nutmeg. Once grits are fully cooked, stir in 1 tbspn butter, and slowly add in a generous ¼ cup freshly shredded sharp cheddar cheese. Season well with salt & pepper and set aside, covered over very low heat.

For the Shrimp:

- 1 lb. 16-20 count fresh, wild caught shrimp with tail on
- 4-5 Slices thick cut bacon, diced
- 1 Leek (medium size), sliced thinly and cleaned (see my note on cleaning here)
- ½ Package of Baby Bella mushrooms, sliced
- 1 Large clove garlic, minced
- ¼ (ish) Cup seafood or chicken stock
- Handful of flat leaf Italian parsley, chopped
- Sea salt
- Cracked black pepper
- Seafood seasoning (think Old Bay)
- 1-2 Tbspn butter
- Extra Virgin olive oil
- ½ Lemon, cut into wedges
- Hot sauce (optional)

Heat a large skillet over medium high heat, add in diced bacon and cook until crisp and fat is rendered. Remove bacon from pan and drain on paper towel. Reserve 1ish tbspn bacon fat in pan, lower heat to medium add in butter and a couple of turns of olive oil. While oil and butter come up to temp, season one side of shrimp lightly with salt, pepper and seafood seasoning. Once pan is heated, add in mushrooms and season lightly with salt & pepper. Saute, stirring until mushrooms begin to release liquid, about 2 minutes. Add in leeks and continue cooking while stirring occasionally until leeks begin to soften, about 4 minutes or so. Once leeks have fully softened, add in garlic and cook just until garlic is aromatic (a minute or two). Push mushroom/leek mixture to the edge of pan (see picture) and place shrimp into pan, seasoned side down. Season exposed side of shrimp with salt, pepper and seafood season and allow shrimp to cook, undisturbed for about 2 minutes or until bottoms just turn pink. Flip shrimp and cook an additional 2 minutes or until just cooked through. Stir shrimp, leeks and mushrooms together, and add in about ¼ cup of seafood stock and parsley. Allow to simmer for a minute or two and reduce.

To plate: Pile grits in the middle of a shallow bowl or dish and top with leek & mushroom mixture, and top with 4-5 shrimp running down the middle. Sprinkle crisp bacon on top and serve right away with lemon wedges and hot sauce on the side. Also pairs great with a light summer beer and a comfortable porch table!

Monday, November 15, 2010

Chopped Mediterranean Salad

This recipe falls into the category of “whatever was on hand”, and turned out to be a hit! I had initially planned on making a simple green salad with olives, tomatoes and sweet onion to go with last weekend’s Polenta Lasagne, so I picked up a box of organic greens a few days before. A few minutes before the lasagne was due to exit the oven, I grabbed the salad fixins out of the refrigerator and set myself up for assembly. Let me just say, there is no disappointment worse in the kitchen than opening what you suspect to be perfect good produce only to find it is RUINED. Sad panda face. The greens were beyond salvage- slimy, limp and in the throes of decomposition. Being someone who doesn’t like to waste food, I reluctantly pitched the greens in questions and set about finding a suitable side dish on the fly.

With the other ingredients ready to play, I pilfered the fridge and windowsill for a couple of additions to bulk up the salad, and ended up with a very refreshing, crisp chopped salad that gave a great play of cool to the piping hot lasagne. The portions made enough for 3-4 sides and can be easily doubled. The salad would be best with super fresh produce, however the use of a light dressing and the fine chop on all the vegetables can help mask the lack of farm fresh vegetables in the off season. It’s also incredibly easy to throw together for a quick lunch or weeknight meal side or as an appetizer topping for bruschetta.

Chopped Mediterranean Salad

- 3 Plum tomatoes, chopped
- ½ English cucumber, chopped
- ¼ Vidalia onion, chopped
- 4 Kalamata Olives, chopped
- 4 Greek green olives, chopped
- 1/3 Cup crumbled feta
- Handful flat leaf Italian parsley, rough chopped
- 5-6 Basil leaves, chiffonade
- 3-4 Tblspns olive oil
- ½(ish) Tblspn balsamic or red wine vinegar
- Wedge of lemon
- Sea salt & fresh cracked black pepper

Comine all ingredients in a wide, low bowl and toss well to coat with olive oil & vinegar. Season to taste with salt & pepper, squeeze lemon over and toss again to incorporate. Allow to rest for 15 or so minutes before serving to allow vegetables time to marinate. Cover any leftovers tightly with plastic wrap & refrigerate. Salad will lose brightness after a day or two in the fridge, but is still very tasty!

If making ahead, combine all vegetables and herbs, but hold off on adding in oil & vinegar (this mixture can be made a day in advance if needed). Add o&v 15-30 minutes before serving, season with salt, pepper & lemon, and serve.

Monday, October 25, 2010

Hungarian Mushroom Soup

My first taste of Hungarian Mushroom soup was back in college at the beloved Feasts of Reason in Chestertown, Maryland. Although it’s been years since I enjoyed a perfect roast beef sandwich on their fresh baked baguette with blue cheese mayonnaise (do I have your attention?) and a cup of their soup, my love affair with the soup continues.

I started working out a recipe for my own version of this soup years ago in my collegiate kitchen back on High Street, and it has maintained top billing in my mental rolodex. In the early stages, I would use condensed Golden Mushroom Soup as my base, and as my comfort in the kitchen grew, I traded in the soup base for fresh made roux to achieve the creamy base.

When Kyle and I were first living together, I remember mentioning having a craving for the soup one fall, and his eyes instantly lit up. Having lived in Hungary briefly years ago, Kyle has always been a big fan of the country’s flavors. It is a warm, comforting and creamy soup that will chase out the chill from any October evening. The ingredient list is relatively simple, and as such it’s great for feeding a large group without spending an exorbitant amount on the makings. If you’ve got it on hand, smoked paprika adds a wonderful depth of flavor, and a little Hot Hungarian paprika sprinkled on top before serving brings another element to the finished product. If you making the soup for a meatless crowd, a dark vegetable stock will work just as well as beef stock, just be sure to omit the Worcestershire

Paired with a loaf of crusty rustic bread, a spicy arugula salad and full bodied red and you’ve got the recipe for a perfect fall night in with friends. This recipe could easily serve 6 for a main course, and freezes well once cooled.

Hungarian Mushroom Soup

- 16 oz. Baby Bella mushrooms, cleaned and sliced
- 1 Medium Vidalia onion, quartered & sliced thinly
- 2 Garlic cloves, minced
- 40 oz. Good quality beef or dark vegetable stock (homemade is best)
- 1 Tbspn. olive oil
- 1 Stick salted butter
- ½ish Cup all purpose flour
- 8oz. Sour cream
- 8oz. Milk
- 4 Tbspn. dried dill
- 2 Tbspn. smoked paprika
- 1 Tbspn. regular paprika (if you don’t have smoked paprika, just substitute regular for both)
- Sea salt & fresh cracked pepper
- 1-2 Tbspns. Worcestershire sauce
- Chopped flat leaf parsely (optional)
- Hungarian hot paprika (optional)

In a small sauce pan, melt ¾ stick of butter over medium heat. Add in flour a little at a time and whisk to combine until a stiff roux consistency is reached. Continue cooking 5-10 minutes or until roux turns golden and flour is cooked down. Take off heat & set aside. Heat remaining butter and olive oil in the bottom of a large Dutch oven or soup pot over medium heat. Add in mushrooms and cook, stirring occasionally until mushrooms begin to release moisture, about 5-7 minutes. Add in sliced onions & cook an additional 5-7 minutes until onions become translucent. Add in minced garlic & cook 2-3 minutes until garlic is fragrant, but not browned. Season with salt & pepper to taste before adding dill and paprika, stirring well to incorporate and cook for an additional 2-3 minutes or until spices are well blended into vegetables. Once the mixture is well integrated, add in beef/vegetable stock and leave pot to come up to a low rolling boil. Once soup has reached a boil, mix roux into broth (see my note on a helpful technique at the bottom of this recipe), and continue mixing until a gravy- like texture is reached (you may not have to use all of the roux. Once all roux has diluted into the stock & the consistency is smooth, turn stove to low, add in milk & Worcestershire and mix well. Slowly add in sour cream until fully dissolved and texture is that of heavy cream-if too thick, add in a little more milk- and adjust salt & pepper seasoning as needed. Serve garnished with a little extra Hungarian hot paprika, chopped parsley or a dollop of sour cream.

Tuesday, June 29, 2010

Curried Eggplant Delight

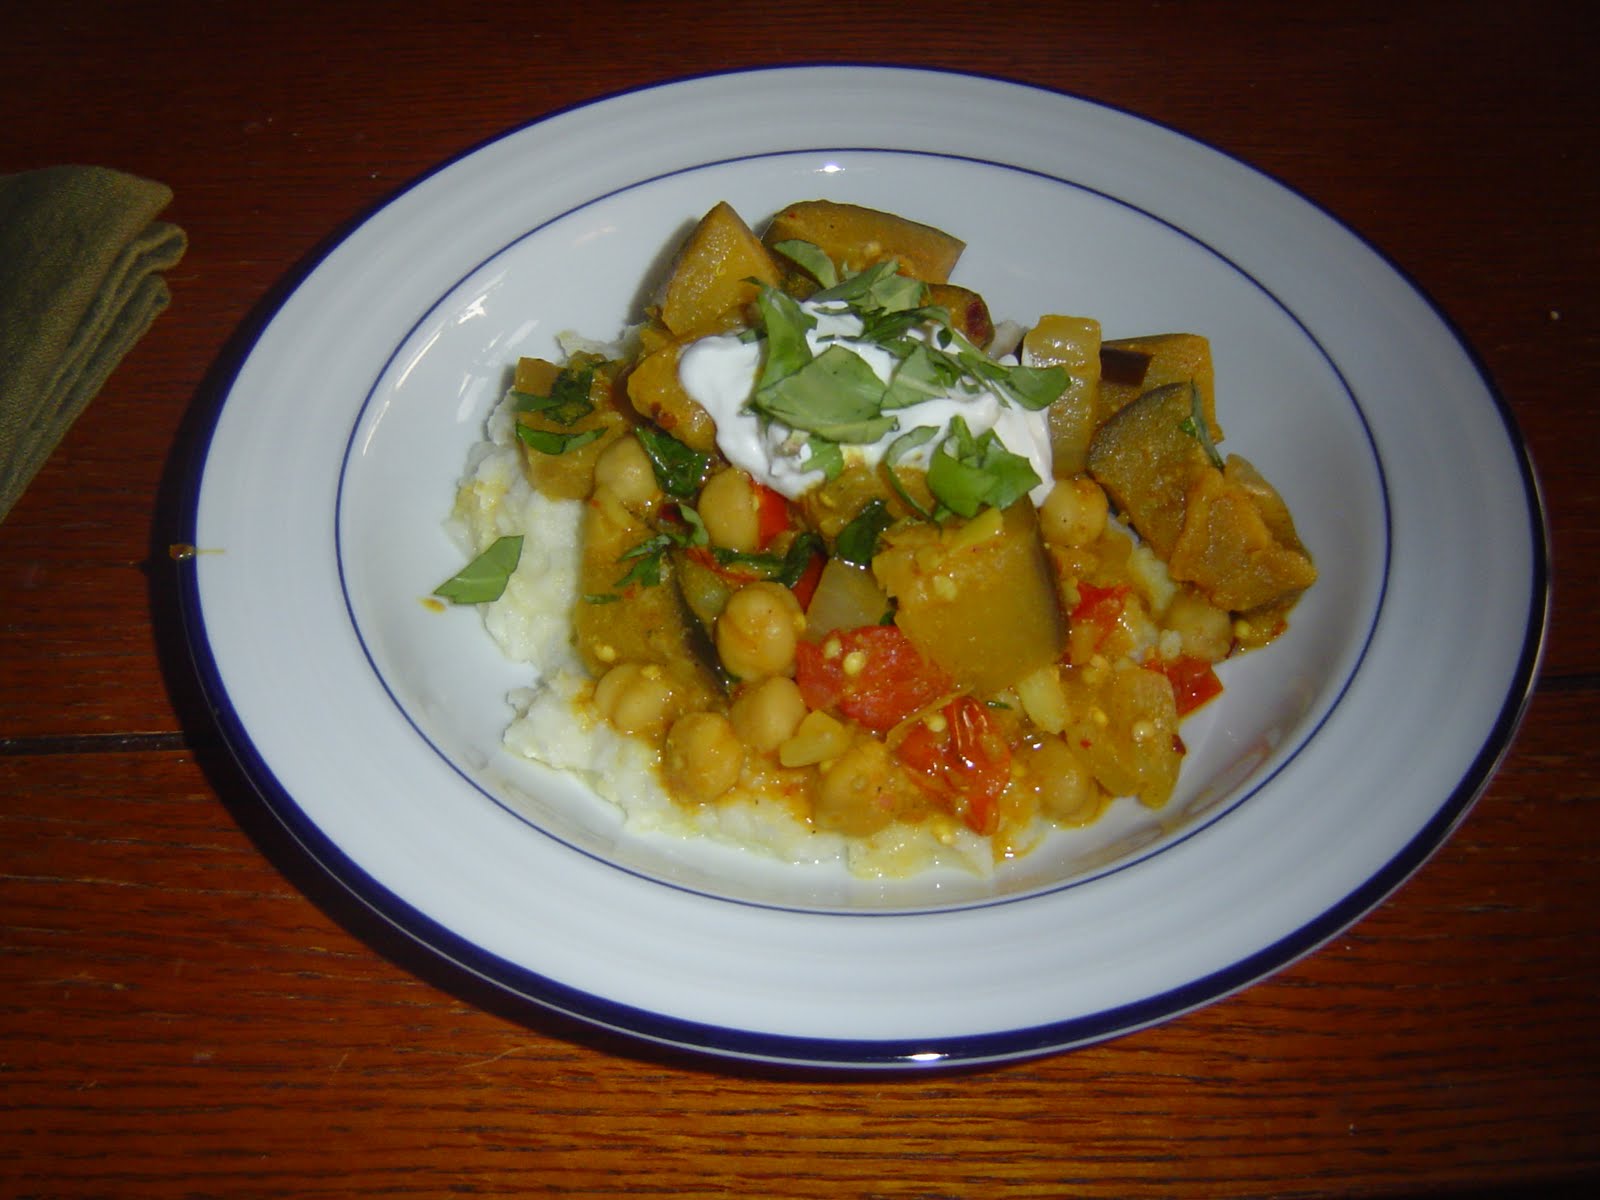
As we are now officially into the summer season, my menu planning takes a turn to lighter, more refreshing meals. I get a lot of daily recipe and cooking emails, and one such recent email fit the bill perfectly for using fresh summer produce, and employing fresh herbs from my windowsill. Real Simple is hands down one of my favorite magazines (I’ve been an avid reader and subscriber for the past two years), and a lot of their recipes ascribe to my cooking philosophy of keeping it simple (no surprise there!) in order to showcase the natural flavors of the ingredients. When the recipe for Curried Eggplant & Tomatoes with Basil popped up in my inbox, I knew it would be a smash success, and it was! I used the original recipe as a guide a tweaked for my own taste. My husband and I both really enjoyed it- the combination of eggplant and chickpeas made for a substantial vegetarian meal that left us both really satisfied. I used just a bit of light yogurt to add a little richness to the sauce, and the basil and curry played off of each other really well. Instead of serving it over rice (as suggested in RS’s recipe), we opted to use cauliflower mash, which cut out some of that heavy carb feeling and upped the veggie intake. I actually had the leftovers the next day for lunch, and the curry flavor was more saturated after a night in the fridge. It’s an easy weeknight meal to pull together, and I would even recommend serving it at a casual dinner party- it would be great for a homestyle dinner where large dishes are passed, and would go well with homemade pita chips on the side. All in all, a wildly tasty dish!

Curried Eggplant with Tomatoes and Basil
(Adapted from Real Simple, Cauliflower recipe my own)

For the Cauliflower Mash:
-1 Medium head of fresh cauliflower, broken into florets
-2 Tbspns salted butter (optional)
-2 Tbspns low fat Greek yogurt
-Sea salt & fresh cracked pepper

Steam cauliflower florets over boiling water in a vegetable steamer until fork tender. Remove from heat & transfer florets to a large bowl heatproof bowl. Add in butter & yogurt and mash using a handheld masher, stick blender or hand beaters until smooth. Season with salt & pepper to taste. Mash can be kept warm over a low simmering pot of water for up to 30 minutes. Give mash a good stir before plating.

For the Eggplant Curry:
-1 Large eggplant, about 1-1 ½ lbs. cut in 1 inch pieces
-1 Pint cherry tomatoes, halved
-1 Medium onion chopped (I recommend a sweet onion, such as Vidalia)
-3 Medium cloves of garlic, minced
-1 15.5-16oz Can of chickpeas, rinsed & drained
-3+ Tblspns good curry powder (I used Spice Island’s Spicy Curry Powder for a little extra kick)
-Good handful of fresh basil, chopped
- ¼ - ½ Cup of low fat Greek yogurt
-Olive oil
-Sea salt & fresh cracked pepper
-Red pepper flakes (optional)
- Couple tspns fresh cilantro, minced (optional)
-Crumbled goat cheese (optional)

In a large sauté pan or wok, heat a couple of tablespoons of olive oil over medium heat. Add onions and cook, stirring, until slightly translucent- about 3 minutes. Add in tomatoes and continue cooking for a few minutes, seasoning with salt & pepper. Add in eggplant, and cook until it begins to soften slightly about 5-7 minutes. Stir in garlic, curry powder and red pepper (if using), and cook another few minutes until fragrant (adjust curry powder to your personal taste, I tend to be a bit heavy handed personally). Add in chickpeas and about 1- 1 ½ cups of water and stir to combine all ingredients well. Simmer, stirring occasionally until vegetables are tender and chickpeas are heated through, about 15 minutes or so. Turn off heat, add in basil and yogurt and stir to combine well. Adjust salt & pepper seasoning to taste. Serve over cauliflower mash with chopped cilantro and goat cheese sprinkled on top.

Note: This dish would also be wonderful over brown rice, Israeli (or regular) couscous or any other hearty grain.

Friday, May 14, 2010

Satisfying & Light Weeknight


Once again, menu planning from The Book (as it will now be referred to) strikes with great success! My husband and I are heading to Philadelphia to see a dear friend from college get married this weekend, so I didn’t want to do a lot of grocery shopping this week since we would be on the road, and were some items that I wanted to use up before we headed out of town. I had flagged Mario Batali’s Spaghetti with Artichokes and Pancetta the second it graced the cover of Food & Wine’s April 2010 issue, and knew it was a flavor combination I wanted to work with. I have a lot of respect for Batali as a chef- he seems to really know who he is, both as a person and a chef, and he has a wonderful backstory to his rise to fame.
I love a simple pasta dish, especially something that can be thrown together easily on a week night without feeling like an afterthought. Following Batali’s flavor profile, I amended the components for what I had on hand, and the result was a perfect after workout spring supper that was wholly satisfying. By switching to an unrefined whole grain pasta, I upped the fiber and grain intake, and I thought he pairing of the light artichokes with the hearty fettuccini made for a great balance. I also switched out the pancetta for leaner prosciutto, helping to lighten up the dish further. The dish was only further confirmed a success when my husband not only cleaned his own bowl, but happily devoured my leftovers when I offered them up for sacrifice. Paired with a bright salad, Whole Wheat Pasta with Artichokes & Pancetta is a perfect spring meal.

Whole Wheat Pasta with Artichokes & Prosciutto
(inspired by Mario Batali’s Spaghetti with Artichokes & Pancetta)

- 6-8oz. jar marinated & quartered artichokes
- ½ Red Onion, sliced thinly
- 2 garlic cloves, minced
- 4oz. Good quality lean prosciutto, sliced into ribbons (freeze the prosciutto for 10-15 minutes to make slicing easy)
- Juice of ½ a lemon
- Zest of ¼- ½ a lemon
- Scant ¼ cup dry white wine
- ½ Package of whole wheat fettuccini or spaghetti
- Olive oil
- Sea salt
- Fresh cracked black pepper
- Grated parmesan cheese
- Chopped flat leaf parsley or fresh basil (optional)

Place a large pot of salted water over high heat and bring to a rolling boil, and build sauce while water is coming to temp. Heat 1-2 tablespoons of olive oil in a high sided pan or wok (big enough to hold pasta when cooked) and add in prosciutto. Keep prosciutto moving & cook until well crisped, but not burned. Transfer to paper or kitchen towel to drain. Add in a little more olive oil and sauté artichoke hearts until warmed through, breaking up if pieces are large. Add in onion and cook for another 2-3 minutes, until onion begins to soften. Introduce garlic, and cook for another 1-2 minutes until fragrant and softened. Pour in wine and lemon juice, stirring to combine and cook until slightly reduced. Drop heat to low, add in lemon zest, stir to fully incorporate and adjust flavor with salt and pepper to taste. Sauce can be set aside while pasta is cooked. Follow recommended cooking instructions for pasta, reserve about ¾ cup of cooking liquid and drain well. Add cooked pasta to sauce with cooked prosciutto and toss well, adding some of pasta cooking liquid to loosen sauce to a light consistency and have even coating on pasta. Sprinkle liberally with fresh parmesan cheese and herbs (if using) and serve immediately.

Artichoke on FoodistaArtichoke

Thursday, April 29, 2010

Fist 'Fel of Chickpeas


It’s been a very busy week in my little world- my husband and I spent the weekend up in Maine for Fisherman’s Festival with our family and friends, I drove down from Boston on Monday morning after dropping him off at his ship, my Mother-in-Law came for a visit, and work has been a zoo. As a result of all these happenings, I have had very little motivation to cook, at least until last night. I had thinned out our fridge stock before leaving for the weekend, and it finally got to the point where I had to go to the store yesterday and re-stock. I had spent a good portion of the afternoon trying to figure out what I wanted to make for dinner (nothing too time consuming, something relatively healthy and light), when it finally dawned on me: falafel!

I had been trolling one of the cooking chat posts I frequent and Josie of Pink Parsley had posted a recipe for baked falafel that suddenly struck a chord with me. I couldn’t remember the last time I had falafel, and knew it would be the perfect easy dinner, and it was! I made a couple of amendments (noted in italics) to Josie’s recipe for what I had on hand, and they turned out wonderfully. I was thrilled to be able to use some of the fresh herbs I’ve been growing, and the flavor of these little patties was on point. To serve with the falafel, I picked up some marinated olives, mushrooms, garlic and feta off of the olive bar, mixed up a quick batch of Fantastic World Foods tabouli from their mix (my go to for quick items when I just don’t have the energy, with wonderful organic ingredients!), made a quick zucchini Tzatziki sauce (which has been long evolving from various sources) and threw on a little Sabra roasted garlic hummus for good measure with some with some lentil & black bean pappadum snacks and had a perfect light meal! I found the papadum snacks in the world food aisle at our local grocery store (think bright blue Pringles canister, but much more tasty holdings), and I am already addicted to these crispy little lentil treats. They’re about the size of a silver dollar and packed with flavor. As an added bonus, they are already cooked, so you don’t have to worry about frying.

Although this wasn’t one of my usual “from scratch” meals, it was wholly satisfying without being overwhelming to make. I noticed in putting this post together that Josie’s recipe had been an evolution of a recipe from Kate’s World Kitchen, which had come from a recipe on Epicurious. I love that idea within the food blogging community, recipes can be passed down and altered along the way and shared with others, and each time the dish takes on a new personality and a new story. The possibilities for falafel are endless, and I know this will be a go to again and again!

Falafel with Fresh Herbs and Zucchini-Lemon Tzatziki

For the Falafel (adapted from Pink Parsley’s Baked Falafel):

- 1 Cup dried chickpeas or 16oz. can of Goya chickpeas, rinsed & drained
- 1/2 Large onion, roughly chopped
- 4 Tblspns. finely chopped fresh parsley (flat leaf)
- 2 Tblspns. finely chopped fresh dill
- 1 Tblspn finely chopped fresh cilantro
- 1/4 Tspn. Cayenne- I upped it to about ½ tspn or so, I like a little extra kick!
- 4 Cloves of garlic, finely chopped
- 2 Tspn ground cumin
- 2 Tspn. dried coriander
- Juice of 1 lemon- also added in ¼ of a lemon’s worth of zest for brightness
- 1 Tspn baking powder
- Up to 4 tablespoons whole wheat pastry flour- I used regular whole wheat flour as I had it on hand
- Sea salt & cracked black pepper
- Olive oil

Place chickpeas, onion, spices, lemon and salt and pepper in a food processor and pulse several times to form a paste (I used our Magic Bullet. Don’t laugh- it worked!). Transfer paste to a good sized bowl, check salt & pepper seasoning and adjust if necessary. Mix in baking powder until well incorporated. Adding 1 tablespoon at a time, mix in flour until dough comes together in large firm mass (if mixture becomes too dry, you can add a little extra lemon juice or water).

Set oven warm, and place a metal rack over a baking sheet in the middle of the oven. Using your hands form chickpea mixture into approximately 2” balls and flatten into patties (work quickly so that mixture does not fall apart). Place patties on parchment paper.

Heat olive oil in a non-stick skillet over medium to medium-high heat. Just as oil begins to smoke, add patties in and cook for 4-5 minutes per side, working in batches. Transfer patties to rack in oven to keep warm. Add additional olive oil as needed between batches. Once all patties have been cooked, serve with your favorite accompaniments, either in pitas with fresh greens, Tzatziki sauce and veggies, or as part of a platter with marinated olives, hummus, feta and tabouli salad. Falafel patties also freeze well, as there is minimal moisture and heat up quickly on the stovetop or oven.

For Zucchini- Tzatziki Sauce:

-1 ½ cups plain Greek Yogurt
-1 Small zucchini, minced (you can sub with a small cucumber, seeded and chopped too)
-2-3 Tblspns fresh dill, minced
-1 Large or 2 small cloves garlic, minced
-Juice from ½ a lemon
-1-2 Tblspns fresh lemon zest
-Sea salt & cracked black pepper

Combine all ingredients in a large bowl, adjust salt and pepper to taste, and let sit as long as possible to allow flavors to come together. In addition to being an excellent falafel accompaniment, this sauce is wonderful when served as a dip with fresh vegetables or homemade pita chips. Also great on grilled lamb as well!

Wednesday, April 21, 2010

The Brights of Spring

My husband has been out to sea for the past ten days or so, and as per usual I try to do my best not to have a ton of food in the house since I hate to see anything go to waste! I have been thrilled to see my container garden take off, and have really enjoyed being able to use some of my hand-grown treats in recent dishes. Now that the rain has (finally!) stopped, and the weather is getting warmer, I tend to lean on fresh, lighter meals such as large salads when I’m making dinner for myself. A big salad is easy to make, has endless possibilities and are extremely filling after a good run or workout (another part of my spring afternoon routine). I’ve got a bit longer before my tomatoes start producing, so I’ve been relying on getting my produce from the local market, and  have been lucky enough to find locally grown organic tomatoes at a decent price. My baby arugula pot has come along beautifully, and I love the peppery bite of it in salads. Keeping in the mindset of using what is on hand, I made this fantastic salad out of what was already in my kitchen, and I will surely be making it many times throughout the warmer months. As noted in a previous post, I adore a good poached egg, and I’ve recently seen them paired with cool salads on seasonal restaurant menus. The creamy texture of the yolk makes an ideal dressing, and the play of warm and cool elements really satisfy. A great salad is a perfect way of combining color, texture, and flavor simply and quickly enough for any weeknight dinner or casual lunch.


Herbed Green Salad with Poached Eggs and Crispy Turkey “Lardons”

Per Person:

-1-2 Large fresh eggs
-1 ½ Cups fresh salad greens (I used a mix of baby spinach & arugula)
- ¼ Cup fresh herbs, chopped (flat leaf parsley, dill, cilantro, etc.)
- ½ Cup cherry or grape tomatoes, quartered
- ¼ Cup sweet Vidalia onion, sliced thinly
- 2 Slices turkey bacon, cut into bite sized pieces
- 5 Kalamata olives, quartered (optional)
- 1-2 Tblspns toasted pine nuts (optional)
- Sea salt & fresh cracked pepper

Heat skillet over medium high heat and cook turkey bacon until crisp, about 12 minutes, and drain on paper towels. Toss greens, herbs, tomatoes, onion, olives and pine nuts together. Poach eggs (refer to my recommended instructions in previous post, A Little Comfort) and nestle eggs on top of salad. Top with cooked turkey bacon and season with salt & pepper to taste. Serve & enjoy immediately for best texture- goes great with a glass of crisp white wine!

Monday, January 18, 2010

Curried Vegetable Soup


Winter time is a perfect time for a big, delicious pot of soul-comforting soup. It not only makes your whole place smell incredible (especially to husbands and loved ones coming through the door after a long day at work), but is so simple, and a great way to use up a lot of ingredients that may be getting a little long in the tooth. There's a long standing family joke about my grandfather's recipe for soup referred to only as "Old Delicious", based loosely on beef barley with a staunch "don't ask, don't tell" policy when it came to the actual ingredients. Grampie was a magician when it came to stretching his ingredients to feed his eleven (yes, you read that correctly) children, and it's a trait that has been passed down through the generations. This frugality is a personal point of pride for me, and I love being able to make excellent food out of seemingly simple and inexpensive ingredients. This recipe for Curried Vegetable Soup is extremely versatile and is a lot of fun to play with until you get the perfect combination of ingredients to suit your palate.

Curried Vegetable Soup

-2lbs. Assorted vegetables (such as onion, celery, garlic, carrot, eggplant, mushroom or whatever else you have hanging around, sweet potatoes are also a great addition!) chopped into uniform 2" pieces.
-Olive oil
-Cracked pepper
-Salt
-Curry powder
-Vegetable stock or water (stock will add more rich flavor)
-Hot sauce (optional)
-1 1/2 Cups grilled chicken, cubed or grilled shrimp (optional)
-Toppings: Greek yogurt, toasted pine nuts, chopped cilantro, roasted red pepper strips

Preheat oven to 400 degrees. Toss veggies in enough olive oil to coat (if using eggplant, use more, as it will absorb a lot!), and a generous amount of salt, pepper and curry powder. Personally, I toss ingredients together in a large heavy duty dutch oven, which cuts down on the amount of dishes used, as the dutch oven can be transported directly from the oven to the stove top. Roast veggies for 20-25 minutes in the oven, until flavors begin to meld, but veggies don't burn. Pull out of oven and transfer to stove top over medium heat. Add in stock or water to cover all veggies and bring to a low boil. Use a good sized wooden spoon to scrape off any "drippings" from the bottom of the pot- there's a TON of flavor in 'em! Adjust seasoning as needed, adding more curry, s & p or hot sauce, depending on your preference. At this point, I usually use an immersion blender to create a beautifully velvety texture, but if you prefer it chunky, leave it as is. A great aspect of blending the soup is that it creates a deceptively rich texture, and you can fool yourself into thinking it has some sort of cream base when it doesn't, sneaky! If using chicken, add in after blending. Allow the soup to sit and come together as long as possible (or as long as you can stand it!) to really get the most out of the final flavor. Top with Greek yogurt, roasted red pepper strips, toasted pine nuts, cilantro, extra curry or whatever suits your taste. Relax with a big ol' bowl, and watch the snow drift by.

This is also a great soup for freezing- since my husband is out to sea a fair amount, I usually make large freezer friendly dishes to portion out and freeze for later. I throw a good size portion of cooled soup into a freezer friendly zip bag, squeeze out the air and freeze. In the bags, they're easy to pull out as needed, are less likely to fall victim to freezer burn and take up less space than regular plastic containers.

Wednesday, January 13, 2010

And Now For Something Completely Different...

Ok, so for these first couple of posts I've been focusing on some rich & tasty stuff, and since we are entering a new year, and I will be finding myself in a bathing suit at the end of the month (ah, come on!), I thought I'd toss in a recipe for something that does not involve cheese (sigh), cream (grumble) or any other of my favorite bad foods. In all honesty, I actually really love this salad, and eat it a lot for something quick and filling that won't destroy all those hours of sweatin' to the oldies. It was actually inspired by an awesome edamame salad that my hometown grocery store makes, but with a couple of tweaks. It's great as is, over a green salad, as a dip for tortilla chips or pretty much an other application you can think of.

Edamame Salad

-1 Package of shelled edamame (be careful to get the type with no additives, some companies will add funky stuff to maintain freshness which can really effect the taste!)
- 2/3 Cup of cooled corn roasted w/ cumin, olive oil, salt & pepper (roast @ 400 degrees for 15-20 minutes, stirring & checking often)
-4 Cloves of spicy marinated garlic cloves, minced*
- 2-3 of the hot peppers from marinated garlic, minced (adjust the spicy to your liking)*
-1/2 Cup of black beans (rinsed & drained if canned)
-Juice of 1/2 a lime
-Salt & Pepper to taste


Combine all ingredients in a shallow bowl and mix thoroughly (if you're having a bad day, toss 'em all in a re-sealable container, slap on the top, and shake the hell out of it. You'll feel better, trust me.). The salad will get better the more you allow the flavors to come together, so I would recommend letting it sit over night in the fridge. If you want to impress your friends, inform them that this dish is also vegan friendly. Cause you're so progressive.


*Hot pepper marinated garlic is pretty widely available off of those fancy olive bar/carts in most grocery stores. A word to the wise, it's got a fairly high level of spice, so exert caution if this is your maiden voyage into using marinated garlic & peppers. If you're feeling extra spicy, toss in some of the curing oil for some extra flavor kick. If you a bit of a Nancy, skip the garlic & pepper and sub in a little chopped red onion. Don't forget to pull down your skirt. :-)

Indoor Grill + Blue Cheese Fondue= LOVE.


Cheese and I have been BFFs for years now, at least since the Reagan administration. Any time that I can find a new way to shamlessly hork down mass
amounts, I am a happy girl. When Kyle and I got married, we graduated from mis-matched dish set (most of which were either lifted from a college dining room or a parent's cabinet) to an actual matching set, and all sorts of fun toys to boot! Within those new toys there was a fondue set and an indoor grill. The fondue brought forth visions of us with our friends during apres ski weekends in L.L. Bean sweaters nestled around a fire place (yes, think Dumb & Dumber) dipping into hot bubbly cheese. The indoor grill became a staple of our lives, especially during that first winter in Annapolis and now that we are living in a third floor walkup. When these two seemingly independent culinary tools come together like Voltron, the result is epic. Thus is present for your viewing (and consuming!) pleasure: Blue Cheese Fondue with Grilled Vegetables & Skirt Steak.


Blue Cheese Fondue
(I usually make this first, as it can hang out on a back burner set on low until the steak & veggies are ready)

-1/2 lb. of your favorite blue cheese, crumbled- Gorgonzola, Camzola and Danish Blue all work well
-1 Clove of garlic, minced
-1 Sprig of thyme, leaves removed and chopped
-1/4 Stick of salted butter
-2 Cups half & half, or if you're feeling extra indulgent use heavy cream, and don't tell your trainer!
-Fresh cracked black pepper, to taste
-Chopped fresh chives (optional)

Melt butter over medium heat in a saucepan. Add in garlic and thyme leaves and cook until garlic begins to soften. Add in half & half (or what ever other deliciously evil dairy you have decided to use) and bring to a simmer, making sure not to scald. Once mixture has slightly reduced, add in cheese and stir until mixture is smooth. Add black pepper to taste. At this point the sauce can hang out until you're ready to use it on the back burner (actually a little time to come together isn't a bad thing!). When ready to serve, transfer to fondue pot (if using) and top with chopped chives.

Simple Marinated Skirt Steak & Vegetables

-1 1/2lb Skirt Steak
-4 cloves garlic minced
-Olive oil
-Fresh cracked black pepper
-Good coarse salt (I'm a big fan of French grey sea salt)
-Mixed vegetables: I used asparagus spears, red onions (sliced into 1/6ths with root portion intact for easy grilling), cherry tomatoes, and sliced prortobella mushroom caps
-1 Loaf of french bread sliced and toasted

For the steak: Coat steak in olive oil, salt, pepper and 2 cloves of minced garlic in a glass dish and set aside on countertop (steak should come to room temp before grilling for best results). Let marinate for 20-30 mins, turning occasionally.

For Veggies: Use same preparation for veggies as used for steak- you can either toss all the veggies together in one big happy bowl, or separate them out, depending on how ambitious you want your clean up to be.

Preheat your grill (indoor or outdoor) and wipe down w/ a little olive oil to prevent sticking. I prefer to cook my steak first as it will need time to rest. Cook steak according to your desired temperature, which for me means barely driving it over the heat. Rest meat on a cutting board with a light tin foil cover. Give grill another quick rub down with olive oil to prep for veggies. If your grill can't handle all veggies at once, start with the onions, then follow with mushrooms, tomatoes and asparagus. Onions & mushrooms can take a little more time on the grill w/o completely losing their shape, but make sure to keep an eye on the asparagus as it can burn and lose it's snap pretty
easily if over cooked.

To serve: Arrange veggies on a tray with sliced bread. Slice steak on the bias to get he most tender slices and arrange on another platter. Pour fondue into a pre-warmed fondue pot and place in the middle of a table. Offer up fondue picks, small plates and big glasses of hearty red wine to those partaking a toast to the good life. Cheers!


Frogmore Stew


For those of you that are fans of the 90's sketch show The State, no, this does not have anything to do with Froggy Jamboree in a kiddie pool (and for those of you that have no idea what I'm talking about, never mind). In any event, this is one of my favorite simple meals. It's easy (one pot!), it's relaxed, and there's not a whole lot of technical work to prep it. It is definitely the kind of supper made for flannel shirts, old jeans and flip flops, and usually a good amount of story telling and beer, two of my favorite activities during meal time. Throw on some good classic soul music, and you've got a perfect night!

This is very similar to a low country boil which is popular in South Carolina and Georgia, with some slight alterations. It's a great dish to serve for a casual dinner party- I line the table w/ newspaper, put out a big roll of paper towels, a bunch of seafood picks, shell bowls and lots of cold good beer. Especially awesome if it's a warm enough night to eat outside!

Frogmore Stew

-2lbs. any combination of shrimp, clams*, mussels*, haddock, crab claws, or any firm fish that is fresh
-1lb. spicy cased sausage such as andouille, chorizo or linguisa cut into 2" pieces
-1/2 to 3/4lbs. small red potatoes halved
-2-3 sweet onions, quartered
-3 cloves of garlic, minced
-3-4 ears of corn, broken in half
-6-8oz. of decent beer (Newcastle, or Shipyard Export if you can get your hands on it!)
-Old Bay (lots, maybe 1/2 a cup or so? Adjust to your taste)
-Couple of shakes of hot sauce, to your taste
-Crusty loaf of french bread, toasted

Clean seafood accordingly (mussels/clams scrubbed and de-bearded and any with broken shells discarded, fish cut into 2" chunks, shrimp de-veined, etc.). In a large, wide pot lightly sautee garlic & sausage in a little olive oil (1 tbspn or so) until fat starts to render out of sausage and garlic is lightly colored. Add a large amount of water (enough to cover all ingredients once added, but not drown!), beer, hot sauce and Old Bay and bring to a boil. Toss in potatoes and cook for about 10 minutes. Add onion, cook another 10. Throw in corn and cook for 5 more minutes. Give the pot a stir and add in seafood, and keep a weather eye on it. If cooking a mixture of seafood, start with shellfish, add in whitefish and finish off with shrimp, with a few minutes in between each add in. When cooked clams & mussels will open naturally (discard any that do not open), fish will be opaque and shrimp will be curled and pink (about 6-12 minutes depending on what fish you use). Be careful not to overcook, otherwise seafood will turn rubbery. Serve family style out of the pot in the middle of the table with lots of bread for dipping.

-I also usually serve mine with a mustard-mayo dipping sauce with minced garlic & fresh parsley and lemon wedges, other great options are drawn butter or cocktail sauce.


*A note on selecting shellfish: When choosing fresh shellfish, have a chat w/ your fish monger to see what is fresh. Whenever possible, select those that are loose, not pre-bagged, as they are usually more fresh. To make sure that they are still alive and edible, tap the outside of the shell. If shellfish reacts & closes its shell, you're good to go.