Tuesday, August 31, 2010

Slow Roasted Goodness

August- where did you go?! It’s hard to believe tomorrow is September 1st, I feel like this summer flew by, as most of them do. In a way, I am glad August passed so quickly, as it was a long six weeks of waiting for Kyle to come back from sea. The ship made it back safely into its homeport this past Saturday, and we spent the weekend celebrating his return all over Newport (I’ll be posting an update of our adventures over on The Humble Home later). It’s been absolutely awesome to have him home, and I’m doing my best to not think about him heading back out to sea again after Labor Day weekend.

Last week I hit up the local farmer’s market and bought a HUGE sack of Roma tomatoes- I think I was so excited about fresh tomatoes, that I got a little ahead of myself! While I did my best to get through as many as possible, I knew I would have to use up the rest before they turned. I adore slow roasted tomatoes, as it is a very simple and delicious way of prolonging the enjoyment of your tomatoes while concentrating the flavor. There really is no limit to the application of slow roasted tomatoes- over pasta, grilled meats, on toasted bagels or sandwiches, blended in with hummus, or just as is with a little fresh basil (my favorite application!). The tomatoes can be roasted off in large or small batches, depending on how many you have on hand in surplus, and when stored properly, can last a couple of months in the refrigerator. Additionally, if you roast off a large batch, once cooled, the tomatoes can be portioned off into freezer or vacuum bags and will last even longer in the freezer for use all winter.

When I roast my tomatoes, I usually throw in a couple of heads of garlic to roast as well. As my friend Brianne over at Sweet Cheeks in the Kitchen said: “Garlic. How I love you. Let me count the ways”. Roasted garlic, like the tomatoes, is a wonderful addition to really any dish. Once roasted, it keeps well, and has a wonderfully mellow flavor. I roasted one head with plain olive oil, and the second with white truffle oil, and they both turned out incredibly flavorful! Although the roasting process usually takes a couple of hours, the hands on time is quite minimal (good for a Sunday night roasting, so you can use them all week), and the end product is really worth the time.

For a beyond easy hors d’ oeuvres, toast up some baguette slices, spread on the roasted garlic, add a fresh basil leaf, top with a slice of roasted tomato, and voila!- instant satisfaction, and a treat that appeals to all, as it’s vegan friendly, but the meaty, robust flavor of the tomato more than compensates for the carnivores. You can even take it a step further and top it off with a little crumbled chevre or fresh mozzarella and pop it under the broiler to brown for a few minutes. Once cooled, I packed my tomato slices and garlic with a couple of sprigs of fresh picked basil, and we took it to the park for a snack with pita chips. There is nothing better than a treat that is simple, rich with flavor and easy to transport, and slow roasted tomatoes & garlic fit the bill perfectly!


Slow Roasted Tomatoes & Garlic

-Roma, Cherry or other fresh tomatoes
-2 or 3 Full heads of garlic
-Sea Salt
-Fresh Cracked Pepper
-Thyme sprigs
-Extra Virgin Olive oil (I recommend using a high quality oil here- given that the ingredient list is short, using top notch components will make a big difference. For a little more of a twist, a flavor infused oil, such as the white truffle oil I used on one the garlic heads)

Pre heat the oven to 225 degrees. Halve cherry tomatoes, or cut Romas into thirds or quarters. Cut off the top quarter of each head of garlic to expose all cloves. Arrange tomato slices and garlic on a baking sheet. Sprinkle tomatoes generously with sea salt, fresh pepper and olive oil. Lay thyme sprigs across the top of tomatoes. Drizzle olive oil over garlic heads, fully covering exposed garlic. Top with sea salt & pepper. Place baking sheet on the middle oven rack and roast, checking every 30 minutes or so. Depending on the size and moisture level of your tomatoes and the capacity of your oven, complete roasting should take between an hour and a half to two hours. To intensify the flavors, during the last 30 minute cycle, turn the oven up to 275 to draw out any additional moisture. When done, the tomatoes should have a rich red-brown color and appear dried around the edges, and the garlic should be “popping” out of its jacket. Remove pan from oven and let cool. If not using immediately, store tomatoes in a glass jar or dish with a tight fitting lid, covered by a layer of olive oil. Once cooled, the garlic cloves should slip right out of the skin, and can be left whole or made into a paste, and also stores well in a covered dish.

Wednesday, July 28, 2010

Refreshing Snacks for Hot Weather

(once again, my lackluster photo skills don't do justice!)

Well hello there- it’s been too long! Summer 2010 has been an impressively busy season around our household with holidays, anniversaries, birthdays and out of town visitors, I have been bouncing around the East Coast enjoying all the season has to offer. Somehow, in my absence it also appears as though I've hit the 20 Followers mark, how exciting! What started as a way for me to organize my recipes and the likes has apparently struck a chord with others, so big thanks to all of you who are interested in my culinary adventures, your support is awesome!

A few weeks ago, Kyle’s ship was rather suddenly mobilized to assist in the oil clean-up efforts in the Gulf of Mexico, so we spent his last week in town trying to get in as much quality time before they set sail through August 30th. It is a long time to be apart, but I am very proud of what he is a part of with the effort, and wit will make his homecoming all the more sweet.

In the meantime, I have settled into my solo routine quite well- and this weekend I had the pleasure of hosting one of our favorite couples for a night before they headed to their anniversary vacation out on Block Island. They were married out there last August, and it was hands down one of the best weddings I have ever been to- they sure know how to throw a stylish party! A few photos to pay homage to two of my favorite people- Happy Anniversary Will & Carolyn!!!


When Carolyn first asked about coming to stay for a night, I was beyond thrilled, as we don’t get to see each other all that often since we moved away from Annapolis. As those in the region know, the Northeast has been uncharacteristically hot this summer, which seems to impede my desire to whip up a lot in our tiny attic kitchen. Carolyn & Will were arriving mid-afternoon, so I whipped up these Spicy Seared Tuna Canapés with Avocado-Crème as a light snack and served a side of chilled edamame pods tossed with a little French sea salt. The canapés were a spin-off of an appetizer my friend Alex Day (who runs Chez-Vous here in Newport) brought to a cocktail party a few weeks ago, with a couple of modifications I made for what I had on hand.

The chilled tuna & avocado make a classic light combination, and went well with ice cold beers & mojitos. It was so great to catch up with good friends, although I paid the price a bit the next day at work- long gone are my days of being able to go out for drinks on a school night, but it was worth the paying the toll in the end!

Spicy Seared Tuna Canapés with Avocado-Crème (makes 12 hors d’oeuvres)
-6-8oz. Sushi-grade tuna steak
-Spice rub (see below)
-1ish Tblspn sesame oil
-1 Ripe Haas avocado
-1 Clove garlic, minced fine
-1 Tspn fresh lemon juice
-3+/- Tblspns whipped cream cheese
-1 Medium English cucumber
-Soy sauce
-Sri Racha or other Asian hot sauce (optional)
-Sea salt & fresh cracked pepper
-Chives, cilantro or other fresh herbs for garnishing

For the spice rub:
-1 Tbspn toasted black sesame seeds
-1 ½ Tbspn seafood seasoning (think Old Bay)
-½ to ¾ Tbspn curry powder (I prefer to use spicy)
- ½ Tbspn cayenne pepper powder
-Couple turns of the pepper mill & a good pinch of sea salt

Pat tuna dry & cut into 1 ½” strips (if purchased in one large steak, a lot of fish markets will cut it down for you if you like). Combine spice rub ingredients in a shallow dish & toss to mix well. Dredge tuna through the spice mixture, making sure to well coat all sides and set aside to allow flesh to absorb spices.

Mash avocado well (a few chunks add nice texture) with garlic, lemon juice and salt & pepper to taste. Lightly fold in whipped cream cheese (overworking will cause deflation, treat the mixture like a soufflé) until combined and keep chilled in the refrigerator.

Over medium-high heat, heat sesame oil in a non-stick skillet until the oil begins to sheen a bit. Sear tuna on each side (approx 30 seconds or per side) just long enough to sear & color the outside and maintain a rare to medium-rare interior. Remove tuna promptly from pan & set on a cutting board to cool. Once tuna is cooled, slice into bite sized slices against the grain.

While tuna is cooling, slice cucumber on a bias to create ovals (12) and lay on a plate lined with paper towels and lightly salt slices. After a few minutes blot off any moisture expelled from the slices and discard paper towels. Arrange cucumber on a chilled plate and top each slice with a small amount of avocado mixture, and top avocado with a slice of tuna. Add a dash of soy sauce directly to each piece of fish, followed by a small dallop of Sri Racha (if using). Garnish each finished bite with fresh herbs & serve immediately. If making ahead of time, cucumber/avocado/tuna slice component can be made in advance & kept cool in the refrigerator wrapped in plastic for a few hours. Just before serving, garnish with soy sauce, Sri Racha and herbs to maintain flavors.

Wednesday, June 30, 2010

Sangria Season!

Oh Sangria, my dear, dear friend- is there no situation that you can’t make better with your presence? I want to thank you for hanging out this past weekend and making not only my Friday night post-work decompression time all the more relaxing, but also staying over to share your festive spirit with our dinner soiree guests, it was much appreciated!

Sangria is such a versatile cocktail, and it lends itself well to a lot of different flavor combinations, and meal pairings. It is the perfect way to get some extra mileage out of less expensive wine, and a great way to showcase fresh seasonal fruits. I personally find it a lot of fun to fish bits of Triple Sec laced fruit out of a glass while sitting around and relaxing with friends. Last summer I had a group of friends who would get together for weekly summers and without fail, my friend Alyssa and I would whip up a big batch of white or red Sangria for the gang. The options are really endless for making Sangria, and as a result each person’s approach is a bit different, but the results are almost always fun!

The vast majority of times, I find most restaurant versions to be overly sweet, with too much emphasis on fruit juice, and not enough on the wine and actual fresh fruit (the exception being Salvation Café, a fabulous Newport spot that makes is perfectly!). I prefer my Sangria a little less on the sweet side, with lots of fresh citrus for a refreshing finish. Too much added sugar can leave you with the “mouth coat” feel, which is not appealing when the mercury starts to rise. When making Sangria for a party or get together, I usually start it a few hours in advance, leaving ample time for the fruit to infuse the mixture and absorb some of the Triple Sec- the extra time gives the finished Sangria a bit more cohesion, and gives the ingredients a better chance to come together. A few years ago I started adding fresh herbs to cut a little of the sweetness of the Triple Sec, and the end result was a well balanced, porch sipping Sangria that is perfect for the upcoming holiday weekend.

Red Sangria with Fresh Fruit & Herbs

- 1 .75ml (standard) bottle of Pinot Noir
- ¾ Cup Grand Mariner or other Triple Sec
- 1 Lime, halved & sliced thinly
- 1 Star or Ruby Red grapefruit, halved & sliced thinly
- 2 White peaches, sliced
- 3 Plums, sliced
- ½ Cup fresh Basil leaves, torn
- ¼ Cup fresh Mint leaves, torn
- 6-8oz. Seltzer water- I prefer using Pomegranate or any other flavored seltzer

Combine fruit, herbs & Triple Sec in a large, wide bottomed pitcher. Using a wooden spoon, begin lightly bruising fruit & herbs against the bottom and sides of the pitcher, releasing some of the juice into the mixture. Set aside for at least 30 minutes. Give mixture a good stir and add in wine. Cover & place in the refrigerator for a minimum of 30 minutes, or even overnight if time allows. Just before serving, remove from refrigerator, add in seltzer and stir well. Serve over ice.

Note: Any fresh seasonal fruits are a perfect addition to Sangria- other recommendations would be blueberries, strawberries, black raspberries, star fruit, clementines, apples, etc.


Tuesday, June 29, 2010

Friday Night Sandwich Fix


Friday night, just after walking in the door from work, is one of my favorite moments of the week. No matter how strenuous your work week, no matter how many frustrating phone calls were made, packages were lost, or clients were disgruntled, you’re HOME. And the whole weekend stretches out in front of you with a warm smile. For me, Friday night is like a mini birthday every week, in which you can treat yourself to that extra glass of wine, slip into something comfortable and tell the world of commerce you’ll check back in 72 hours.

This past Friday was an especially stressful day in my little world, and when I came home, there was nothing I wanted to do more than relax- and I proceeded to do just that! I had all good intentions on starting preparations for a small dinner party we were having on Saturday, but I passed on that and went directly to making a pitcher of Sangria (recipe to follow soon) and pulling together an easy dinner. The weather has been hot & muggy in Newport, and the last thing I was interested in was standing in front of a hot stove for an extensive period of time, especially when that stove has no hood vent. I had been playing out an idea for a meal-worthy sandwich in my head for a few days, comprised wholly of items already in my kitchen, and knew it would fit the bill to a “T”. Prep involved just enough work so that I felt productive (and what better way to get out some work frustrations then smashing a couple of cloves of garlic?), and assembly and cleanup were a snap.

I’m sure there are those out there that might scoff at a mere sandwich recipe, but for me there is something really wonderful about layering flavors together into a delicious handheld meal. Scoff if you must, but I am beyond satisfied with the end sandwich product (is there really nothing the sandwich can’t do???), and more importantly, so was my husband. ;-)

Tuscan Chicken Sandwich for Two
- ½ Loaf of crusty Italian bread, whole wheat or white
- ½ Medium vine ripened tomato, sliced
- ¼ Sweet Vidalia onion, sliced thin
- 1 Grilled chicken breast, sliced
- ¼- ½ Cup good shredded Parmesan cheese
- 4-6 Pitted Kalamata olives, sliced
- 6 Basil leaves
- Lemon-Garlic mayonnaise (recipe follows)
- Handful of salad greens
- Sea salt & fresh cracked pepper

Lemon-Garlic Mayonnaise
- 3 Tblspns good quality mayonnaise
- 1 Large or 2 small cloves of garlic, peeled
- Zest from ¼ of a lemon
- Juice from ¼ of a lemon
-1 Tbspn fresh Italian parsley, chopped
-Sea salt & fresh cracked pepper

For Mayonnaise: Crack garlic cloves and rough chop. Sprinkle garlic with sea salt, and using the side of the knife, work the garlic into a smooth paste by running over a few times until proper consistency is reached (add more salt accordingly to help break down garlic & soften flavor). Combine all ingredients in a bowl and combine well. Set aside while assembling rest of sandwich.

To Assemble Sandwich: Preheat oven broiler to low. Split bread length-wise and place on a baking sheet, cut side up. Place under broiler, approx four to six inches below broiler plate and toast bread (I would advise keeping an eye on the toasting, as bread can go from brown to black in a flash!). Remove bread from broiler. Coat the “bottom” side of the bread with Lemon-Garlic mayonnaise and top with tomatoes, olives, and sliced chicken. Coat the “top” with mayonnaise, onions and basil leaves. Sprinkle both sides with parmesan cheese and season with salt & pepper to taste. Place sandwich back under broiler for another 4-6 minutes, or until cheese is melted and browned. Remove sandwich from oven, top “bottom” with salad greens & cover with “top”. Slice in half & serve with favorite sandwich sides.

Curried Eggplant Delight

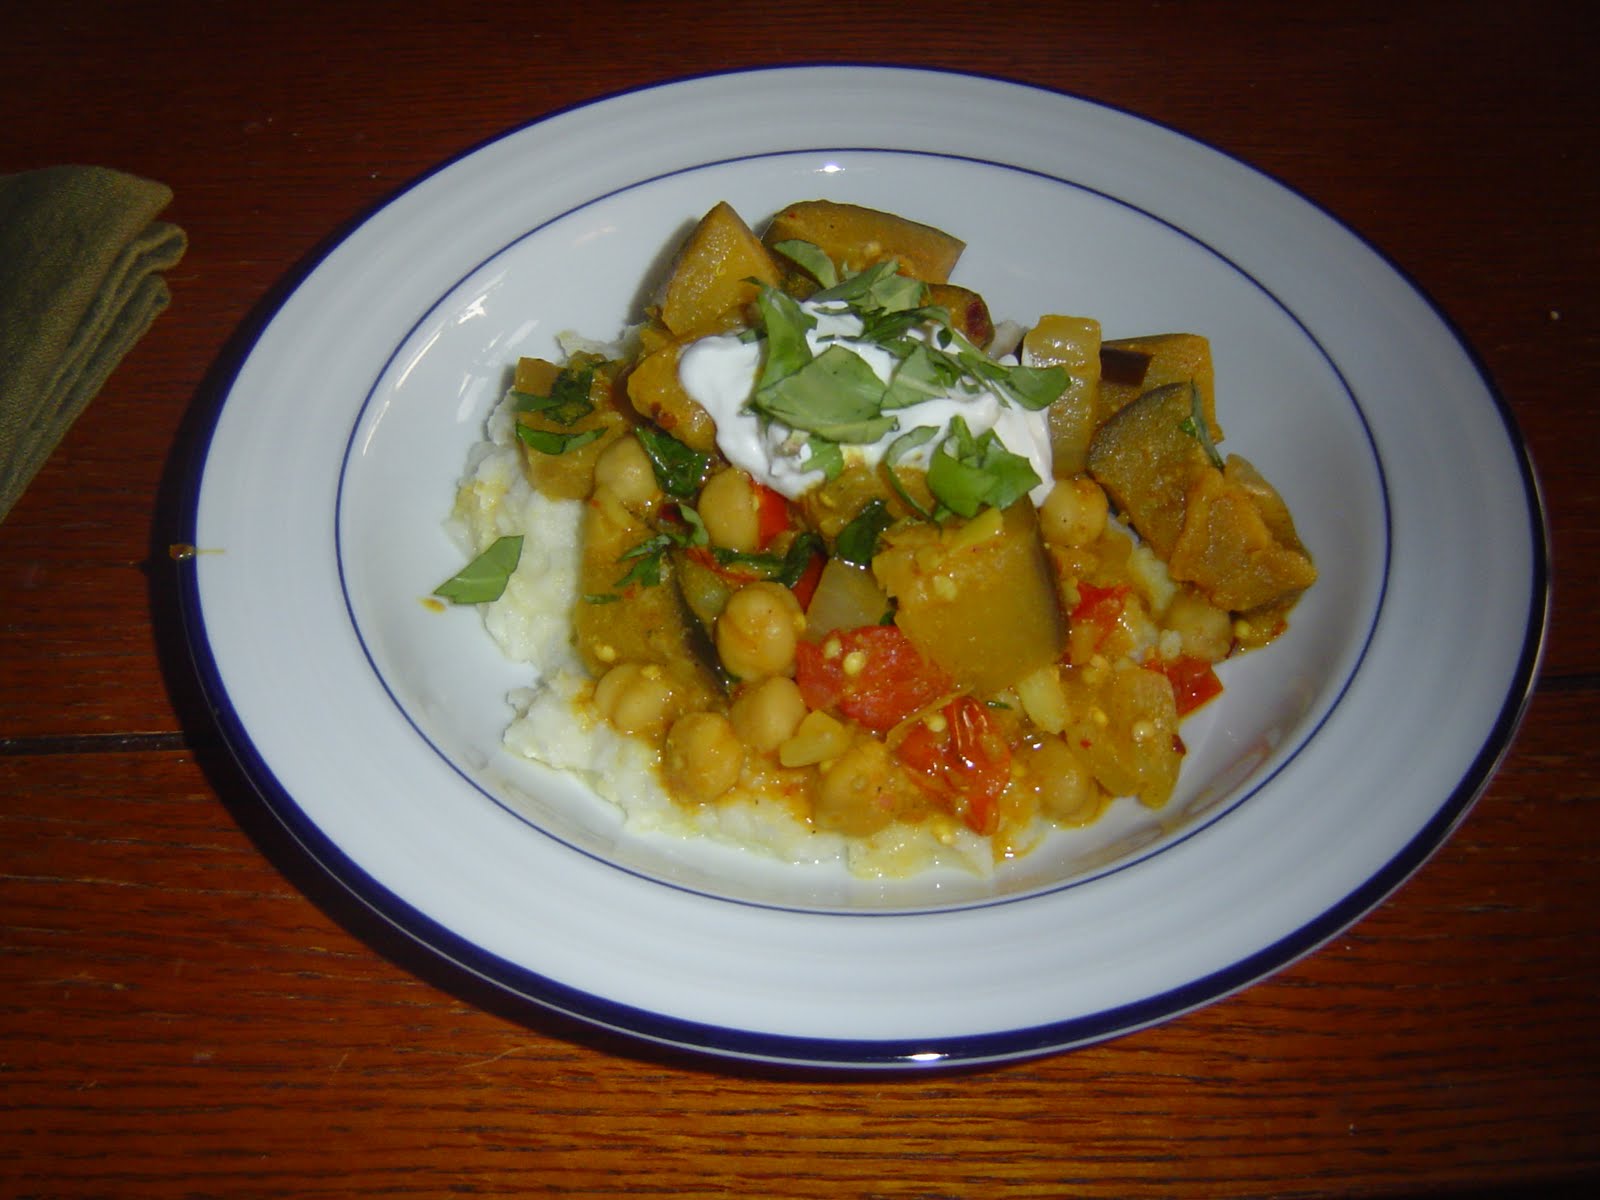
As we are now officially into the summer season, my menu planning takes a turn to lighter, more refreshing meals. I get a lot of daily recipe and cooking emails, and one such recent email fit the bill perfectly for using fresh summer produce, and employing fresh herbs from my windowsill. Real Simple is hands down one of my favorite magazines (I’ve been an avid reader and subscriber for the past two years), and a lot of their recipes ascribe to my cooking philosophy of keeping it simple (no surprise there!) in order to showcase the natural flavors of the ingredients. When the recipe for Curried Eggplant & Tomatoes with Basil popped up in my inbox, I knew it would be a smash success, and it was! I used the original recipe as a guide a tweaked for my own taste. My husband and I both really enjoyed it- the combination of eggplant and chickpeas made for a substantial vegetarian meal that left us both really satisfied. I used just a bit of light yogurt to add a little richness to the sauce, and the basil and curry played off of each other really well. Instead of serving it over rice (as suggested in RS’s recipe), we opted to use cauliflower mash, which cut out some of that heavy carb feeling and upped the veggie intake. I actually had the leftovers the next day for lunch, and the curry flavor was more saturated after a night in the fridge. It’s an easy weeknight meal to pull together, and I would even recommend serving it at a casual dinner party- it would be great for a homestyle dinner where large dishes are passed, and would go well with homemade pita chips on the side. All in all, a wildly tasty dish!

Curried Eggplant with Tomatoes and Basil
(Adapted from Real Simple, Cauliflower recipe my own)

For the Cauliflower Mash:
-1 Medium head of fresh cauliflower, broken into florets
-2 Tbspns salted butter (optional)
-2 Tbspns low fat Greek yogurt
-Sea salt & fresh cracked pepper

Steam cauliflower florets over boiling water in a vegetable steamer until fork tender. Remove from heat & transfer florets to a large bowl heatproof bowl. Add in butter & yogurt and mash using a handheld masher, stick blender or hand beaters until smooth. Season with salt & pepper to taste. Mash can be kept warm over a low simmering pot of water for up to 30 minutes. Give mash a good stir before plating.

For the Eggplant Curry:
-1 Large eggplant, about 1-1 ½ lbs. cut in 1 inch pieces
-1 Pint cherry tomatoes, halved
-1 Medium onion chopped (I recommend a sweet onion, such as Vidalia)
-3 Medium cloves of garlic, minced
-1 15.5-16oz Can of chickpeas, rinsed & drained
-3+ Tblspns good curry powder (I used Spice Island’s Spicy Curry Powder for a little extra kick)
-Good handful of fresh basil, chopped
- ¼ - ½ Cup of low fat Greek yogurt
-Olive oil
-Sea salt & fresh cracked pepper
-Red pepper flakes (optional)
- Couple tspns fresh cilantro, minced (optional)
-Crumbled goat cheese (optional)

In a large sauté pan or wok, heat a couple of tablespoons of olive oil over medium heat. Add onions and cook, stirring, until slightly translucent- about 3 minutes. Add in tomatoes and continue cooking for a few minutes, seasoning with salt & pepper. Add in eggplant, and cook until it begins to soften slightly about 5-7 minutes. Stir in garlic, curry powder and red pepper (if using), and cook another few minutes until fragrant (adjust curry powder to your personal taste, I tend to be a bit heavy handed personally). Add in chickpeas and about 1- 1 ½ cups of water and stir to combine all ingredients well. Simmer, stirring occasionally until vegetables are tender and chickpeas are heated through, about 15 minutes or so. Turn off heat, add in basil and yogurt and stir to combine well. Adjust salt & pepper seasoning to taste. Serve over cauliflower mash with chopped cilantro and goat cheese sprinkled on top.

Note: This dish would also be wonderful over brown rice, Israeli (or regular) couscous or any other hearty grain.

Thursday, June 24, 2010

Champagne, Sherry and Happy Anniversary!

This is not really a new recipe post, but more of a re-test of a sauce I already posted on, and I wanted to bring its deliciousness to the forefront again! As some may know, last Monday was our 2nd wedding anniversary, and I was under the impression that my husband was not going to be home until Tuesday, as he has been down in the Gulf working with the oil spill relief project. Low and behold that sneaky fella actually booked a flight home for the actual night of our anniversary! Needless to say, I was very surprised (and in the midst of painting my toenails in my pajamas) when he came through the door, but beyond thrilled to see him. We relaxed Monday night, and Tuesday I cooked him a big anniversary dinner and we relaxed all night with champagne, tasty food and each other.

 I first made this Garlic Sherry Brown Butter Sauce when I did pan seared lamb chops when my mother was visiting and absolutely loved it, as did she! I had purchased some fabulous filet mignons at the store and had a good feeling about the pairing. Not to toot my own horn, but it was wonderful! The delicate & buttery texture of the filet with the warm Brown Butter Sauce were a perfect pairing, and Sherry played beautifully off of both the champagne and the mushroom risotto served on the side (which also acted as a great vessel for sopping up any remaining sauce!). After making this sauce a few times, I am confident I will make it again and again- it is elegant, simple and comes together quickly for a lovely accompaniment to any good cut of meat, be it filet of beef, lamb, veal, buffalo or even a meaty fish such as swordfish or halibut!

Garlic Sherry Brown Butter Sauce
(follow same directions recommended for lamb for cooking any red meat)

Thursday, June 10, 2010

Cocktail Party Season!

One of my favorite things about warmer weather is entertaining outside. Whether it’s throwing a couple of steaks or chicken breasts on the grill on a weeknight, or an all out backyard soiree, eating al fresco seems to make things a bit more special. In the past couple of months, we’ve hosted a couple of small cocktail parties at our house during the week, and it’s been a blast. One of my favorite parts about cocktail parties (whether hosted indoors or out) is putting together a simple spread of bite sized food with a little something for everyone. I always put out a couple of cheeses with crackers, a cured or dried meat, nuts, crudités, a bowl of marinated olives and a couple of spreads or dips. Most of the components are pre-made, so throwing together a great looking appetizer table is easy, and really only requires a little arranging and tweaking. Time permitting, I like to put out at least two “from scratch” elements to add a little personal flavor to the scene, and it’s even more enjoyable if you encourage guests to bring a snack to share.

In warmer weather, my go to choices are most often seafood based, as it is satisfying without weighing you down, and pairs well with summer white wines, lighter beers and clear spirits. For a while now I have been making a smoked salmon spread that has made appearances at cocktail and porch parties from Annapolis to Maine. It is very simple to pull together, and is great when served with cucumber slices, water crackers or pumpernickel toast. I’ve also used this as a stuffing for hollowed out peproncini- the kick of the pepper plays well off of the coolness of the spread. I would recommend making the spread in advance, so the flavors have time to come together while chilling overnight.

If you end up with any leftover (a rarity!) it is also great with toasted bagels in the morning. I have rarely actually given the recipe out for the spread, but I think it’s time to bite the bullet and share, so long as I get credit at your next porch party! ;-)


Smoked Salmon Party Spread

-16oz Package regular cream cheese- room temp
-16oz Package whipped cream cheese
-2 to 3 Tblspns sour cream/mayo/plain yogurt (optional)
-16oz Wild caught smoked salmon (I usually use the pre sliced Scottish style in the cryovac’d package for easy preparation)
-8oz. Capers, chopped fine, brining liquid reserved
-1/2 to 1/4 Red onion, minced fine
-Good bunch of fresh dill, minced (adjust to suit personal taste)
-Juice from ¼ lemon
-Sea salt & fresh cracked pepper
-Couple shakes of hot sauce (optional)

In a good size bowl, combine first three ingredients and mix until well blended. Remove salmon from packaging, mince finely and add into cream cheese mixture. Add in capers, onion, dill and lemon juice, and mix until well combined. If spread is a bit thick, add in a small amount of brining liquid from capers to loosen and mix well. Season with salt, pepper and hot sauce to taste. Cover well with plastic wrap and refrigerate overnight. Remove from refrigerator an hour or so before serving to let soften a bit.